Vastly Improved Servo Control, Now Without Motor Surgery

Hobby servos are great, but they’re in many ways not ideal for robotic applications. The good news is that [Adam] brings the latest version of his ServoProject, providing off-the-shelf servos with industrial-type motion control to allow for much, much tighter motion tracking than one would otherwise be limited to.

Modifying a servo no longer requires opening the DC motor within.

The PID control system in a typical hobby servo is very good at two things: moving to a new position quickly, and holding that position. This system is not very good at smooth motion, which is desirable in robotics along with more precise motion tracking.

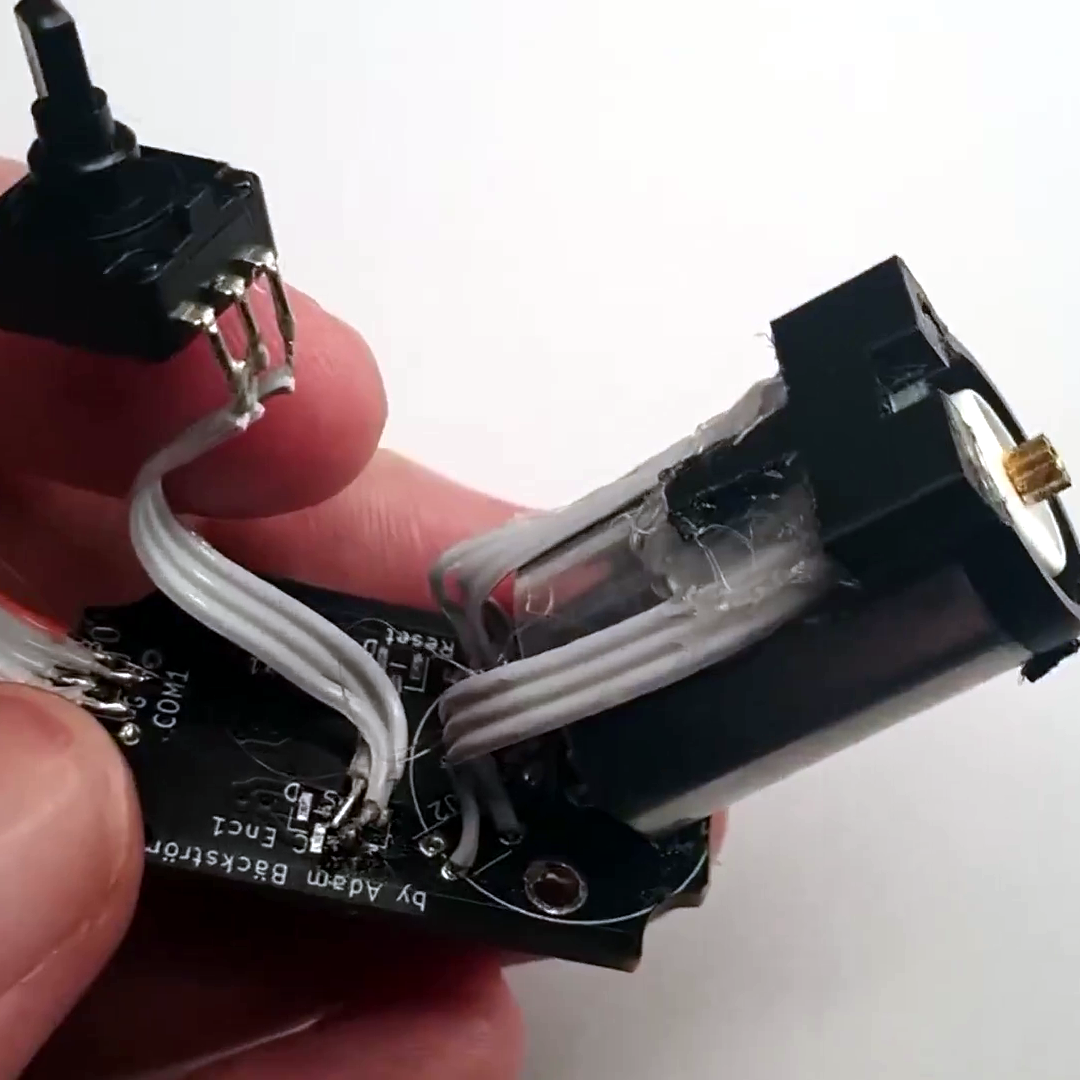
[Adam] has been working on replacing the PID control with a more capable cascade-based control scheme, which can even compensate for gearbox backlash by virtue of monitoring the output shaft and motor position separately. What’s really new in this latest version is that there is no longer any need to perform surgery on the DC motor when retrofitting a servo; the necessary sensing is now done externally. Check out the build instructions for details.

The video (embedded just below) briefly shows how a modified servo can perform compared to a stock one, and gives a good look at the modifications involved. There’s still careful assembly needed, but unlike the previous version there is no longer any need to actually open up and modify the DC motor, which is a great step forward.

Continue reading “Vastly Improved Servo Control, Now Without Motor Surgery”

A Deep Dive Into Quadcopter Controls

In the old days, building a quadcopter or drone required a lot of hacking together of various components from the motors to the batteries and even the control software. Not so much anymore, with quadcopters of all sizes ready to go literally out-of-the-box. While this has resulted in a number of knock-on effects such as FAA regulations for drone pilots, it’s also let us disconnect a little bit from the more interesting control systems these unique aircraft have. A group at Cornell wanted to take a closer look into the control systems for drones and built this one-dimensional quadcopter to experiment with.

The drone is only capable of flying in one dimension to allow the project to more easily fit into the four-week schedule of the class, so it’s restricted to travel along a vertical rod (which also improves the safety of the lab).  The drone knows its current position using an on-board IMU and can be commanded to move to a different position, but it first has to calculate the movements it needs to make as well as making use of a PID control system to make its movements as smooth as possible. The movements are translated into commands to the individual propellers which get their power from a circuit designed from scratch for this build.

All of the components of the project were built specifically for this drone, including the drone platform itself which was 3D printed to hold the microcontroller, motors, and accommodate the rod that allows it to travel up and down. There were some challenges such as having to move the microcontroller off of the platform and boosting the current-handling capacity of the power supply to the motors. Controlling quadcopters, even in just one dimension, is a complex topic when building everything from the ground up, but this guide goes some more of the details of PID controllers and how they help quadcopters maintain their position.

Continue reading “A Deep Dive Into Quadcopter Controls”

Building Reaction Wheels With Python And LEGO

Reaction wheels are useful things, typically used by satellites to keep themselves oriented the right way up in space. Turning the reaction wheel creates an equal and opposite torque in the spacecraft, allowing it to point and rotate itself accurately. The same technique also works here on Earth, and [Brick Experiment Channel] decided to build one out of LEGO to control an inverted pendulum.

The initial design using a small LEGO wheel on an inverted pendulum was only able to work reliably over a 4-degree angle from the vertical. Upgrading the wheel to a larger, heavier one enabled the wheel to instead work over a 28-degree range instead.

A MPU9250 inertial measurement unit was pressed into service for control of the reaction wheel, fitted to the base of the pendulum and read by a Raspberry Pi. The Pi takes accelerometer and gyroscope readings, and then controls the motor on the pendulum with a PID controller to keep the inverted pendulum upright.

The video goes into a great deal of detail on what it takes to make the pendulum run smoothly. From changes to the control coefficients to measuring the motor’s back EMF, [Brick Experiment Channel] demonstrates everything required to make the pendulum robust to outside perturbances.

The inverted pendulum is a great way to learn about control theory, as we’ve seen time and again.

Continue reading “Building Reaction Wheels With Python And LEGO”

Sonic The Self-Balancing Robot: Face-Plants And The Challenges Of Sensor Integration

Watching a child learn to run is a joyous, but sometimes painful experience. It seems the same is true for [James Bruton]’s impressive Sonic the Self-Balancing robot, even with bendable knees and force sensitive legs.

We covered the mechanical side of the project recently, and now [James] has added the electronics to turn it into a truly impressive working robot (videos after the break). Getting it to this point was not without challenges, but fortunately he is sharing the experience with us, wipe-outs and all. The knees of this robot are actuated using a pair of motors with ball screws, which are not back drivable. This means that external sensors are needed to allow the motors to actively respond to inputs, which in this case are load cells in the legs and an MPU6050 IMU for balancing. The main control board is a Teensy 3.6, with an NRF24 module providing remote control.

[James] wanted the robot to be able to lean into turns and handle uneven surfaces (small ramps) without tipping or falling over. The leaning part was fairly simple (for him), but the sensor integration for uneven surfaces turned out to be a real challenge, and required multiple iterations to get working. The first approach was to move the robot in the direction of the tipping motion to absorb it, and then return to level. However, this could cause it to tip over slightly larger ramps. When trying to keep the robot level while going over a ramp with one leg, it would go into wild side-to-side oscillations as it drops back to level ground. This was corrected by using the load cells to dampen the motion.

Continue reading “Sonic The Self-Balancing Robot: Face-Plants And The Challenges Of Sensor Integration”

Sonic The Hedgehog Self-Balancing Robot Can Bend At The Knees

Building your own self-balancing robot is a rite of passage for anyone getting into the field of robotics. Master of robots, [James Bruton] has been there, done that, and collected a few T-shirts. Now he’s building a large Sonic the Hedgehog self balancing robot that can bend at the knees and hip, allowing it to lean while turning and handle uneven terrain. Check out the first video embedded after the break.

Standing about 1 m tall, the robot is inspired by Boston Dynamic’s box handling bot, Handle. It’s “skeleton” consists of 20×20 aluminium extrusions, bolted together using a bunch of 3D printed fittings in the signature blue and red of Sonic. The wheels and tyres are also 3D printed, and driven by brushless motor via a toothed belt. The knee/hip mechanism is actuated using a ball screw, also driven by a brushless motor.

[James] intends to implement an active shock absorption system into the leg mechanism, using the same technique he tried on his OpenDog robot. It works by bolting a load cell onto one of the leg extrusion to sense when it flexes under load, and then actuating the knee mechanism to absorb the force. His first version of the system on OpenDog used PWM signals to send the load cell data to the main controller, but the motors on the legs induced enough noise in the signal wires to make it unusable. He has since started experimenting with the CAN bus protocol, which was specifically designed to work reliably in noisy systems like modern automobiles. If he gets it working on the two legs of this Sonic robot, he plans to also implement it on the quadruped OpenDog.

Continue reading “Sonic The Hedgehog Self-Balancing Robot Can Bend At The Knees”

This Two-Wheeled RC Car Is Rather Quick

Radio control cars have always been fun, it’s true. With that said, it’s hard to deny that true speed was unlocked when lithium polymer batteries and brushless motors came to the fore. [Gear Down For What?] built himself a speedy RC car of his own design, and it’s only got two wheels to boot (Youtube link, embedded below).

The design is of the self-balancing type – if you’re thinking of an angry unmanned Segway with a point to prove, you’re in the ballpark. The brains of the machine come thanks to a Teensy 3.6, which runs the PID loops for balancing and control. An MPU6050 gyroscope & accelerometer provide the necessary sensing to enable the ‘bot to keep itself upright in varied conditions. Performance is impressive, with the car reaching speeds in excess of 40 MPH and managing to handle simple ramps and bumps with ease. It’s all wrapped up in a 3D printed frame which held up surprisingly well to many crashes into tripods and tarmac.

Such builds are not just fun; they’re an excellent way to learn useful control skills that can serve you well in industry and your own projects. You can pick up the finer details of control systems in a university engineering course, or you could give our primer a whirl. When you’ve whipped up your first awesome project, we’d love to hear about it. Video after the break.

Continue reading “This Two-Wheeled RC Car Is Rather Quick”

PID Controlled Charcoal BBQ – Put An Arduino On It!

At Maker Faire Milwaukee this past weekend, [basement tech]  was showing off his latest build, a PID controlled charcoal grill. While it hasn’t QUITE been tested yet with real food, it does work in theory.

PID (a feedback loop with some fancy math used to adjust the input to get a consistent output) controlled cooking is commonly used for sous vide, where one heats up a water bath to a controlled temperature to cook food in plastic bags. Maintaining water temperature is fairly easy. Controlling a charcoal barbecue is much more difficult. [basement tech] accomplishes this with controlled venting and fans. With the charcoal hot and the lid on, there are two ways to control temperature; venting to let hot air out, and blowing air on the coals to make them hotter. A thermocouple sensor stuck through the grill gives the reading of the air inside, and an Arduino nearby reads that and adjusts the vents and fans accordingly.

The video goes into extensive detail on the project, and describes some of the challenges he had along the way, such as preventing the electronics and servos from melting.

Continue reading “PID Controlled Charcoal BBQ – Put An Arduino On It!”