Vibrating Distance Torch Illuminates The Dark Without Light

If you’ve ever had to move around in a dark room before, you know how frustrating it can be. This is especially true if you are in an unfamiliar place. [Brian] has attempted to help solve this problem by building a vibrating distance sensor that is intuitive to use.

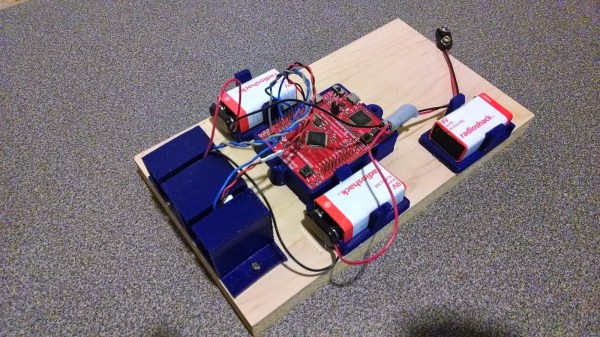
The main circuit is rather simple. An Arduino is hooked up to both an ultrasonic distance sensor and a vibrating motor. The distance sensor uses sound to determine the distance of an object by calculating how long it takes for an emitted sound to return to the sensor. The sensor uses sounds that are above the range of human hearing, so no one in the vicinity will hear it. The Arduino then vibrates a motor quickly if the object is very close, or slowly if it is far away. The whole circuit is powered by a 9V battery.

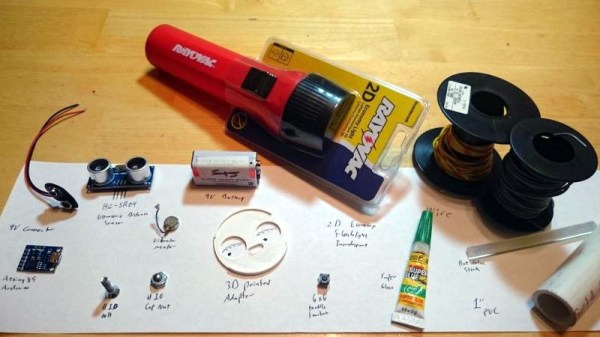
The real trick to this project is that the entire thing is housed inside of an old flashlight. [Brian] used OpenSCAD to design a custom plastic mount. This mount replaces the flashlight lens and allows the ultrasonic sensor to be secured to the front of the flashlight. The flashlight housing makes the device very intuitive to use. You simply point the flashlight in front of you and press the button. Instead of shining a bright light, the flashlight vibrates to let you know if the way ahead is clear. This way the user can more easily navigate around in the dark without the risk of being seen or waking up people in the area.

This reminds us of project Tacit, which used two of these ultrasonic sensors mounted on a fingerless glove.

Sonar Built From Piezo And Microphone

[Jason] has continued to plug along with his sonar build and recently showed up a monostatic active sonar using a piezo element and microphone. Regular readers will remember [Jason’s] experiments from a Fail of the Week post which focused on his water-proofing woes from a much earlier prototype.

We find this offering far more engaging. He has ditched the ultrasonic module seen in those experiments. The new rig drives the piezo element using a 27V source. After each ping is sent out, the microphone input is immediately captured to detect the return of the audible sound. [Jason] mentions that the TI Launchpad he’s using for the project is fast enough for these experiments but he may switch to a Teensy 3.1 in order to double the RAM and thereby increase the sample size he is able to record.

Of course this is intended for underwater ROVs so his next iteration will involve a DIY hydrophone. We can’t wait to see that one as the process of converting this test rig into one that works underwater evades us. If you have some tips on that topic please let us know in the comments.

Continue reading “Sonar Built From Piezo And Microphone”

Pandaphone

Pandaphone Is A DIY Baby Toy

[Tyler] was looking for a gift for his friend’s one year old son. Searching through the shelves in the toy store, [Tyler] realized that most toys for children this age are just boxes of plastic that flash lights and make sound. Something that he should be able to make himself with relative ease. After spending a bit of time in the shop, [Tyler] came up with the Pandaphone.

The enclosure is made from a piece of 2×4 lumber. He cut that piece into three thinner pieces of wood. The top piece has two holes cut out to allow for an ultrasonic sensor to poke out. The middle piece has a cavity carved out using a band saw. This would leave room to store the electronics. The bottom piece acts as a cover to hide the insides.

The circuit uses an ATtiny85. The program watches the ultrasonic PING sensor for a change in distance. It then plays an audio tone out of a small speaker, which changes pitch based on the distance detected. The result is a pitch that is lower when your hand is close to the sensor, but higher when your hand is farther away. The case was painted with the image of a panda on the front, hence the name, “Pandaphone”. Based on the video below, it looks like the recipient is enjoying it! Continue reading “Pandaphone Is A DIY Baby Toy”

Mobile Planter Chases The Sun

There are two types of people: ones with green thumbs, and ones that kill their cacti  because they forgot to water them for over a year. Sadly, we are of the latter group. We currently have a resilient spider plant that looks like it could use more sun. Now there’s a way for it to catch those rays wherever they may shine, thanks to [Dot Matrix] of Instructables. She made a mobile planter that actively seeks out sunlight.

The planter’s base was made of plywood, topped with fake grass and a watering can to hold the plant. Anything above the planter base can be modified to whatever desired aesthetic. A CRT planter may be too heavy, but there are countless ways to personalize it. [Dot] used an Afinia 3D printer to make various mounts and brackets with ABS plastic. The planter was controlled by an Arduino Micro and used a pair of 0.5W solar panels and Parallax PING))) sensors to decide how it should move from its current position. If the planter would fall or hit an object moving forward, it would reverse and turn on wheels powered by Parallax continuous rotation servos. It would evaluate its new position, repeating the process if it was in danger. Once the planter was safe, it used the solar panels to detect the most sunlight: the sum of the panels determines the area’s brightness while the individual panels’ readings were used to move the planter towards a brighter area. The sun-seeking continued until the sunniest spot was found (defined in the code). Here, the planter remained idle for 10 minutes before restarting the process.

We think [Dot’s] planter is a fun way to keep plants happy and healthy in spite of us. See a video of the planter after the break.

Continue reading “Mobile Planter Chases The Sun”

HackPhx Winter 2014 Hackathon Winners

HackPhx 2014

The HackPhx Winter 2014 hackathon was held at Heatsync Labs hackerspace in Mesa, Arizona, USA. The advertised theme was “Arduino Wearables”. Participating attendees were randomly placed on teams evenly distributed by their disclosed skills across all teams. There were 10 teams with 4 to 5 members per team competing for two winning spots.

Each team had to build an amazing wearable project utilizing the secret ingredient which was Seedstudio’s Arduino-compatible Xadow wearable platform and add-ons. The Xadow is similar to the Arduino Leonardo and participants used an Arduino cross compatibility and pin mapping chart to assist in development.

Top prize was the Judges’ prizes for the best completed and documented Xadow wearable team project. The second prize was the Jury’s prize given to the team project that the other teams liked the most regardless of event criteria.

Read more about the winning teams and watch their presentations after the break.

Continue reading “HackPhx Winter 2014 Hackathon Winners”

Fire Breathing Jack-O-Lantern Of Death

[Rick] is at it again, this week he has conjured up an even more dangerous Halloween hack. Thankfully [Rick] has included a warning of just how dangerous this hack can be, especially if children are around. Don’t do this hack unless you know what you’re doing and you can do it safely.

For [Rick]’s number four hack of the month he gives us the Fire Breathing Jack-O-Lantern of death! This isn’t a new idea but it is a very unique and simple implementation. We always love seeing the ingenuity of hackers to repurpose existing commercial products. In this case, [Rick] uses an automated air freshener which dispenses a flammable spray for the pumpkins breath if you dare get too close, but not so close as to get burned. The trigger distance is controlled by an Arduino and a Parallax Ping))) sensor so as to fire only when people are farther than 3 feet but closer than 5 feet. You can get a copy of the Arduino sketch from his blog posting.

A small candle is used to ignite the flammable spray, which shoots out 5 to 10 inches from the pumpkin’s mouth when triggered by the ultrasonic sensor. It couldn’t be simpler. The most challenging part was getting the large air freshener dispenser in the pumpkin with the flames coming out the mouth. A little extra whacking at the pumpkin fixed the fit, but planning for a larger pumpkin would be advised.

Theoretically the Arduino shouldn’t trigger and throw flames if people are too close, but when kids are running around they may come right into the target area unexpectedly. If this hack is used in the right place it would make for a great Halloween display item and could be used safely.

After the break you can watch [Rick’s] flame breathing Jack-o-Lantern build tutorial.

Continue reading “Fire Breathing Jack-O-Lantern Of Death”

No-touch Music Player

no-touch-mp3-player

This little box not only plays tunes, but it lets you control several aspects of playback without touching a thing. [Thomas Clauser] calls it the LighTouch and we like it because it uses inaudible sound to control audible sound.

We think the pair of cylinders sticking up through the top of this project enclosure will be recognized by most readers as the business end of an ultrasonic rangefinder. This is the only control interface which [Thomas] chose to use. Although he didn’t write very extensively about the specific control scheme he implemented, the video embedded in his post shows some of the gestures that cause the Arduino inside to change its behavior. For instance, a swipe of the hand at higher level starts playback, swiping at a lower level pauses it. When adjusting the volume the box responds to how close his hand is to that sensor. With this control in place, the music side of these things is simply handled by a music shield he is using.