That Game Cartridge Isn’t As Straightforward As You’d Think

Classic games consoles played their games from cartridges, plastic bricks that held a PCB with the game code on it ready to be run by the console hardware. You might therefore expect them to be an easy prospect for emulation, given that the code can be extracted from whatever ROM they contain. But as anyone with an interest in the subject will tell you, some cartridges included extra hardware to boost the capabilities of their games, and this makes the job of an emulator significantly more complex.

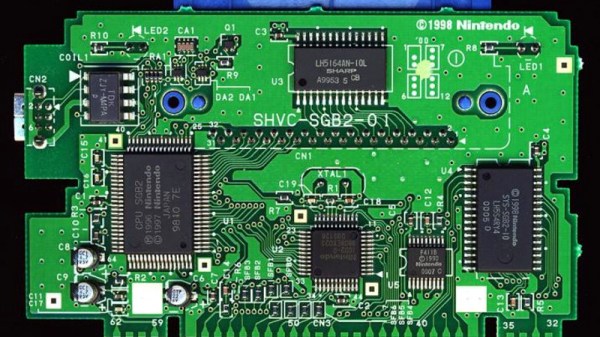
[Byuu] has penned an article exploring this topic across a variety of consoles, with in-depth analyses of special-case cartridges. We see the obvious examples such as the DSP coprocessors famously used on some SNES games, as well as Nintendo’s Super Game Boy that contained an entire Game Boy on a chip.

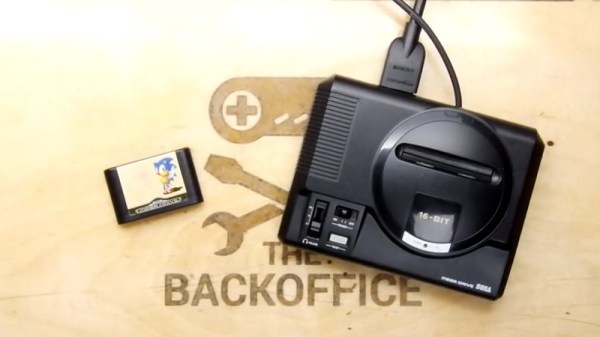
But perhaps more interesting are the edge-case cartridges which didn’t contain special hardware. Capcom’s Rockman X had a copy protection feature that sabotaged the game if it detected RAM at a frequently used save game address emulated by copiers. Unfortunately this could also be triggered accidentally, so every one of the first generation Rockman X cartridges had a manually attached bodge wire that a faithful emulator must replicate. There is also the case of the Sega Genesis F22 Interceptor, which contained an 8-bit ROM where most cartridges for this 68000-powered platform had a 16-bit part. Simple attempts to copy this cartridge result in the upper 8 bits having random values due to the floating data lines, which yet again an emulator must handle correctly.

It’s a subject with a variety as huge as the number of console developers and their games, and a field in which new quirks are constantly being unearthed. While most of us don’t spend our time peering into dusty cartridges, we’re grateful for this insight into that world.

We’ve visited the world of emulators a few times before, such as when we looked at combatting in-game lag.

Hackaday Podcast 030: Seven Years Of RTL-SDR, 3D Printing Optimized For The Eye, Sega Audiophile, Swimming In Brighteners

Hackaday Editors Mike Szczys and Elliot Williams curate the awesome hacks from the past week. On this episode, we marvel about the legacy RTL-SDR has had on the software-defined radio scene, turn a critical ear to 16-bit console audio hardware, watch generative algorithms make 3D prints beautiful, and discover why printer paper is so very, very bright white.

Take a look at the links below if you want to follow along, and as always tell us what you think about this episode in the comments!

Take a look at the links below if you want to follow along, and as always, tell us what you think about this episode in the comments!

Direct download (60 MB or so.)

Continue reading “Hackaday Podcast 030: Seven Years Of RTL-SDR, 3D Printing Optimized For The Eye, Sega Audiophile, Swimming In Brighteners”

Run Your Own Phone To Bring The Dreamcast Back Online

Playing a video game online is almost second nature now. So much so that almost all multiplayer video games have ditched their split-screen multiplayer modes because they assume you’d rather just be alone at your house than hanging out with your friends. This wasn’t always the case though. In the early days of online multiplayer, systems had to rely on dial-up internet before broadband was readily available (and still had split screen if you didn’t even have that). Almost no one uses dial up anymore though, so if you still like playing your old Dreamcast you’re going to have to do some work to get it online again.

Luckily for all of us there’s a Raspberry Pi image to do almost anything now. This project from [Kazade] uses one to mimic a dial-up connection for a Dreamcast so you can connect with other people still playing Quake 20 years later. It’s essentially a network bridge, but you will need some extra hardware because phone lines use a high voltage line that you’ll have to make (or buy) a solution for. Once all the hardware is set up and working, you’ll need to make a few software configuration changes, but it’s a very straightforward project.

Granted, there have been ways of playing Dreamcast games online before, but this new method really streamlines the process and makes it as simple as possible. The Dreamcast was a great system, and there’s an argument to be made that the only reason it wasn’t more popular was that it was just slightly too far ahead of its time.

Thanks to [Rusty] for the tip!

This Chiptune Player’s Got What Nintendon’t

When it comes to chiptunes, the original Nintendo Entertainment System and the Game Boy get all the accolades. The OPL synths have all the fun. But there’s another chip out there in dusty old machines that is at least as interesting with a repertoire at least as influential as the Mega Man 2 OST. It’s the YM2612, the chip in the Sega Mega Drive/Genesis.

[natalie] created a portable device capable of playing back the files targeting the sound chips in this venerable machine. It’s the MegaGRRL, and it’s the iPod for the original Genesis sound tracks.

Inside the MegaGRRL is an ESP32 in the form of an ESP-WROOM-32 module. There is, of course a YM2612 chip in there, along with a headphone amplifier and a battery charger. The display is a fairly standard and cheap affair that’s 240 x 320 pixels in full color, and there are seven buttons on this device, because of course you need an A, B, and C button.

Combined with a 3D printed enclosure, the GameGRRL does exactly what it says it will: it plays all the music from old Sega games. Now, when you’re in the inevitable argument with someone over the fact that Michael Jackson wrote the Sonic 3 soundtrack, the proof is right in your pocket. Of if you want to jam out on the Toe Jam And Earl soundtrack, that’s right there too. You can check out the video demos below.

Continue reading “This Chiptune Player’s Got What Nintendon’t”

MIDI Synthesizer From A Sega Genesis

[Aidan] is really into FM synthesis chips for creating audio, and one of the most interesting chips from that era is found on the Sega Genesis. Anyone involved in the console wars at that time certainly remembers the classic, unique sound that those video game systems were able to produce, so [Aidan] built a device using a sound chip from a Genesis to play any piece of music from any game. The second iteration of that project, though, is able to use those same sound files as a MIDI synthesizer.

The interesting aspect of these chips is how they use registers to change the audio output. Essentially, there is a complicated register map (one section of his write-up is simply called “Register Hell”) that can be called in order to access the various types of effects one would normally see on a synthesizer. It’s not straightforward at all, though, and got even more complicated once [Aidan] started adding MIDI functionality to it as well. Once he finished sifting through the Sega Genesis technical manuals and a bunch of registers, though, he had a unique synthesizer working that doesn’t sound like anything you’ve ever heard, unless you’ve ever played a Genesis.

If you’d like to check out his first project, the MegaBlaster, which plays the sound files of the old Genesis games directly, we featured that a while ago. Keep in mind though that his latest project isn’t just an updated MegaBlaster, though. He built this entire thing from the ground up.

Continue reading “MIDI Synthesizer From A Sega Genesis”

Raspberry Pi Breathes Life Into A Scale Model SEGA

Miniature game consoles are all the rage right now. Many of the big names in gaming are releasing their own official “mini” versions of their classic machines, but naturally we see plenty of DIY builds around these parts as well. Generally they’re enclosed in a 3D printed model of whatever system they’re looking to emulate, but as you might expect that involves a lot of sanding and painting to achieve a professional look.

But for SEGA Genesis (or Mega Drive as it was known outside the US) fans, there’s a new option. A company by the name of Retro Electro Models has released a high-fidelity scale model of SEGA’s classic console, so naturally somebody hacked it to hold a Raspberry Pi. Wanting to do the scale detailing of the model justice, [Andrew Armstrong] went the extra mile to get the power button on the front of the console working, and even added support for swapping games via RFID tags.

[Andrew] uses the Raspberry Pi 3 A+ which ended up being the perfect size to fit inside the model. Fitting the Pi Zero would have been even easier, but it lacks the horsepower of its bigger siblings. The RFID reader is connected to the Pi over SPI, and the reed switch used to detect when the power switch has been moved is wired directly to the GPIO pins. The system is powered by a USB cable soldered directly to Pi’s PCB and ran out a small hole in the back of the case.

For input, [Andrew] is using a small wireless keyboard that includes a touch pad and gaming controls. Unfortunately, it has a proprietary receiver which had to be integrated into the system. In a particularly nice touch, he used snipped off component leads to “wire” the receiver’s PCB directly to the pins of the Pi’s USB port. Not only does it look cool, but provides a rigid enough connection that he didn’t even need to glue it down to keep it from rattling around inside the case. Definitely a tip to keep in the back of your mind.

The software side of this project is about what you’d expect for an emulation console, though with the added trickery of loading games based on their RFID tag. At this point [Andrew] only has a single “cartridge” for the system, so he simply drops the tags into the cartridge slot of the console to load up a new title. It doesn’t look like Retro Electro Models is selling loose cartridges (which makes sense, all things considered), so there might still be a job for your 3D printer yet if you want to have a library of scale cartridges to go with your console.

For those of you who were on Team Nintendo in the 1990’s, we’ve seen a similar build done with a 3D printed case. Of course, if even these consoles are a bit too recent for your tastes, you could build a miniature Vectrex instead.

Continue reading “Raspberry Pi Breathes Life Into A Scale Model SEGA”

Full Motion Video And 3D Graphics Make This Genesis Demo Pop

The SEGA Genesis (aka Mega Drive) was launched at the tail end of the 1980s, bringing a new level of performance to the console world. At the time, 2D graphics ruled the roost, outside a few niche titles here and there. Decades later however, the demoscene continues to work in earnest. The Red Eyes demo is a great example of what can be done when pushing the Genesis hardware to the limits.

The demo features full motion video and an impressive 3D sequence. It’s quite a feat to pull this off with the limited resources of the Genesis platform. [Remute], [Kabuto] and [Exocet] have laid their secrets bare in a technical document, describing in explicit detail how it’s all achieved.

There’s plenty of juicy reading material here. There are palette hacks to produce high-quality greyscale images, rendering tips to produce the smooth 3D rendered sequences, as well as optimizations to create the best possible sample playback using the onboard YM2612 sound chip. It’s a tour de force of development, and it’s astounding to look behind the curtain to see just what can be achieved.

If you’re thinking about tinkering with the Genesis yourself, you might find it useful to have a dev kit on your bench. Video after the break.

Continue reading “Full Motion Video And 3D Graphics Make This Genesis Demo Pop”