One of the great things about the Hackaday community is how quickly you find out what you don’t know. That’s not a bad thing, of course; after all, everyone is here to get smarter, right? So let’s work together to get our heads around this paper (PDF) by [Zerina Kapetanovic], [Miguel Morales], and [Joshua R. Smith] from the University of Washington, which purports to construct a low-throughput RF transmitter from little more than a resistor.
This witchcraft is made possible thanks to Johnson noise, also known as Johnson-Nyquist noise, which is the white noise generated by charge carriers in a conductor. In effect, the movement of electrons in a material thanks to thermal energy produces noise across the spectrum. Reducing interference from Johnson noise is why telescopes often have their sensors cooled to cryogenic temperatures. Rather than trying to eliminate Johnson noise, these experiments use it to build an RF transmitter, and with easily available and relatively cheap equipment. Continue reading “A Single-Resistor Radio Transmitter, Thanks To The Power Of Noise”→
The term “adaptive optics” sounds like something that should be really complicated and really expensive. And in general, the ability to control the properties of optical elements is sufficiently difficult enough that it’s reserved for big-science stuff like billion-dollar space telescopes.
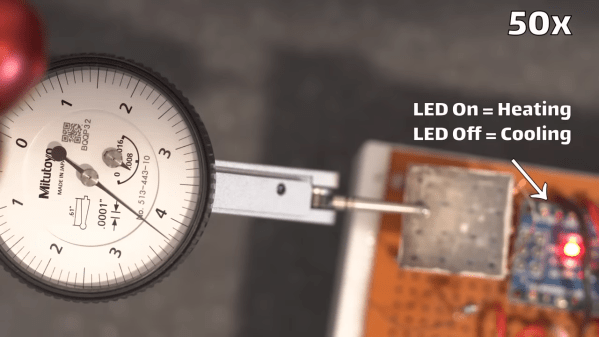
But that doesn’t mean there aren’t quick and dirty adaptive optics that are suitable for the budget-minded experimenter, like this thermally deformable mirror. As [Zachary Tong] explains, this project, which started quite some time ago, is dead simple — a 4 by 4 array of through-hole resistors stand on end, and these are attached to a glass coverslip that has been aluminized on one side. An Arduino and a couple of shift registers make it possible to individually address each of the 16 resistors in the array. Passing a current through a resistor heats it up a bit, leading to thermal expansion and a slight deflection of the mirror sitting on top of the array. Controlling which resistors heat up and by how much should lead to deformation of the mirror surface in a predictable way.
The video below shows some of [Zach]’s experiments with the setup. Unfortunately, he wasn’t able to fully demonstrate its potential — the low-quality mirror didn’t cooperate with his homebrew interferometer. He was, however, able to use a dial indicator to show deflection of the mirror in the 2- to 3-micron range by heating the array. That alone is pretty cool, especially given the dirt cheap nature of the build.
As mentioned, the keyboard was missing a 9 VDC power supply (rated 800 mA) with a center-negative barrel connector. Slightly oddball, but nothing an enterprising hacker can’t deal with. After supplying power with a bench supply, not only did the keyboard not come to life, but the power supply clamped the current draw at 1.5 A! Something was definitely not right.
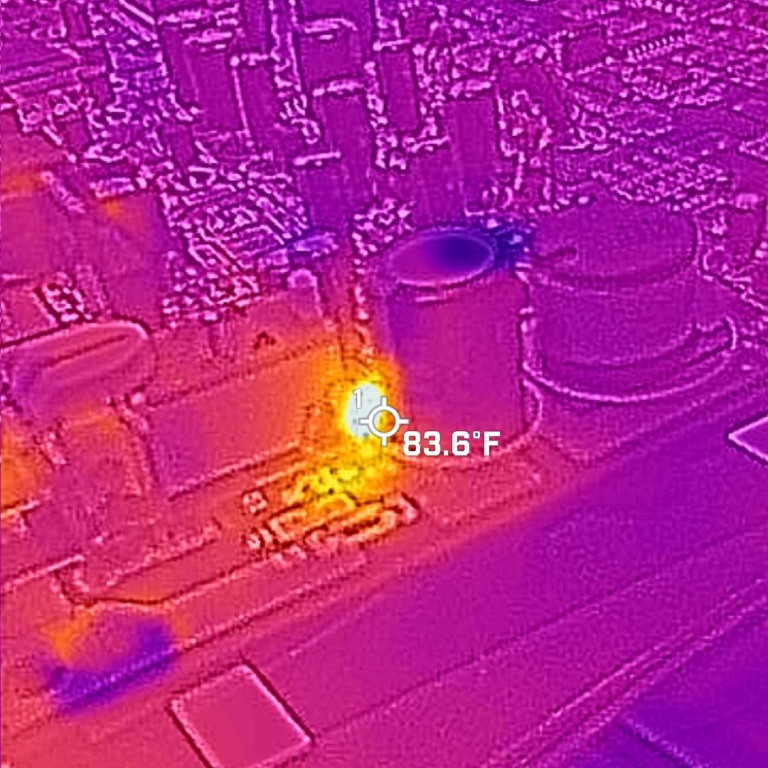
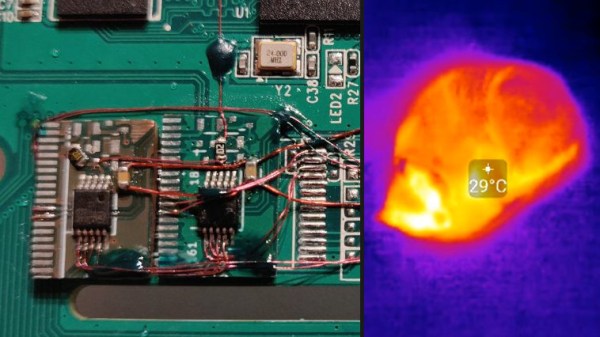
This shorted glass-bodied diode might look normal to the naked eye, but thermal imaging makes it clear something’s amiss.
Inside, there was no visible (or olfactory) sign of damage, but looking closer revealed that a little SMT capacitor by the power connector was cracked in two. Fixing that didn’t bring the keyboard to life, so it was time to break out the thermal imager. Something was soaking up all that current, and it’s a fair bet that something is getting hot in the process.
The culprit? The reverse polarity protection diode was shorted, probably as a result of damage by an inappropriate power supply or a surge of some kind. Replacing it resulted in a working keyboard! Not bad at all for $5, a diode, an SMT cap, and a little workbench time. The finishing touch was replacing a missing slider knob, which took some work in OpenSCAD and a 3D printer. Overall, not bad!
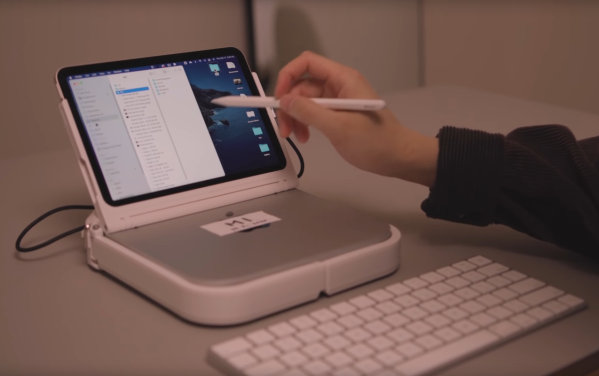
Most of us either own or have used a laptop at some point. For traveling, as a student, or even for browsing Hackaday on the couch in front of the TV, they are pretty much indispensable. They do tend to have a sharp performance reduction compared to a desktop though thanks to the thermal and battery limitations of a portable form factor. [Scott Yu-Jan] wanted to solve that in his own life by building a custom Mac laptop with none of these downsides.
Noticing that a modern iPad Mini has exactly the same width of his Mac Mini, [Scott] set about combining the two devices into a single unit that he could assemble when traveling. A 3D printed case with a traditional laptop clamshell design takes care of physically combining these two devices, and a USB-C cable between the two takes care of combining them in software thanks to Apple’s Duet program. While this has better performance than a Macbook Pro it might actually have some perks, since Apple continues to refuse to make a laptop with a touchscreen.
There are some downsides, of course. The price is higher than a comparable Macbook Pro for the iPad and Mac together, plus it doesn’t include a keyboard or mouse. It also has no battery, so it needs to be plugged in. In the follow-up video linked below, though, [Scott] notes that for him this still made sense as he uses the Mac and iPad individually already, and only works remotely at places that have power outlets readily available. For the average person, though, we might recommend something different if you really need an esoteric laptop-like machine.
Thanks to [Varun] for originally sending in this tip!
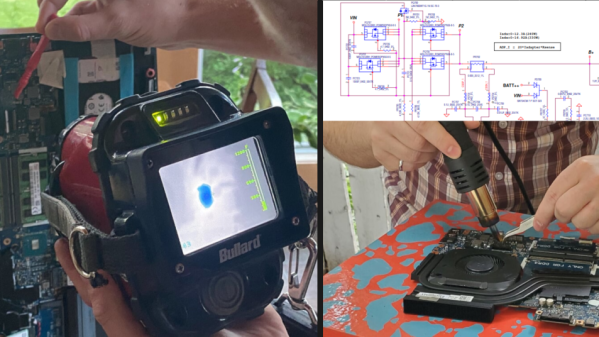
It started with a friend’s Alienware laptop that would only boot to a black screen and get very hot in the process. With the help of a thermal imaging camera and some schematics, [Troy] was able to see that one of the closely-spaced MOSFETs in the power supply appeared to be the culprit. Swapping the power MOSFETs out with replacements seemed a reasonable approach, so armed with a hot air rework station he got to work. But that’s where problems began.
The desoldering process was far from clean, in part because the laptop’s multi-layer PCB had excellent thermal management, sucking away heat nearly as fast as [Troy]’s hot air gun could lay it down. It ended up being a messy slog of a job that damaged some of the pads. As a result, the prospects of soldering on a replacement was not looking good. But reviewing the schematic and pondering the situation gave [Troy] an idea.
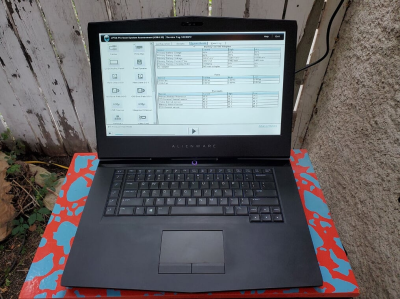
One expensive laptop, brought back to service.
According to the schematic, the two MOSFETs (at least one of which was faulty) had parallel counterparts on the other side of the board. This is typically done to increase capacity and spread the thermal load somewhat. However, according to the current calculations on the schematic, these parts are expected to handle about 20 A in total, but the datasheets show that each of the MOSFETs could handle that kind of current easily (as long as heat sinking could keep up.) In theory, the laptop didn’t need the extra capacity.
Could the laptop “just work” now that the faulty part had simply been removed? [Troy] and his friend [Mike] were willing to give it a shot, so after cleaning up the mess as best they could, they powered the laptop on, and to their mild surprise, everything worked! Some stress testing with intensive gaming showed that the thermal problems were a thing of the past.
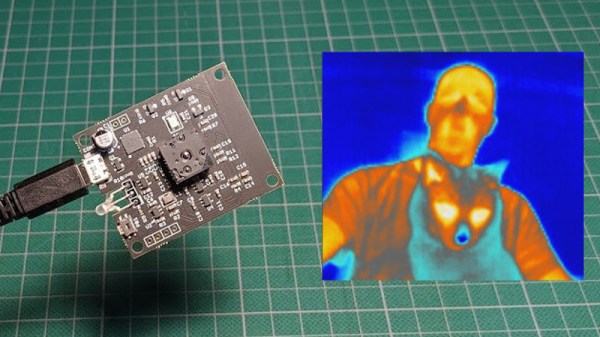
A thermal camera is a tool I have been wanting to add to my workbench for quite a while, so when I learned about the tCam-Mini, a wireless thermal camera by Dan Julio, I placed an order. A thermal imager is a camera whose images represent temperatures, making it easy to see things like hot and cold spots, or read the temperature of any point within the camera’s view. The main (and most expensive) component of the tCam-Mini is the Lepton 3.5 sensor, which sits in a socket in the middle of the board. The sensor is sold separately, but the campaign made it available as an add-on.
Want to see how evenly a 3D printer’s heat bed is warming up, or check whether a hot plate is actually reflowing PCBs at the optimal temperature? How about just seeing how weird your pets would look if you had heat vision instead of normal eyes? A thermal imager like the tCam-mini is the tool for that, but it’s important to understand exactly how the tCam-mini works. While it may look like a webcam, it does not work like one.
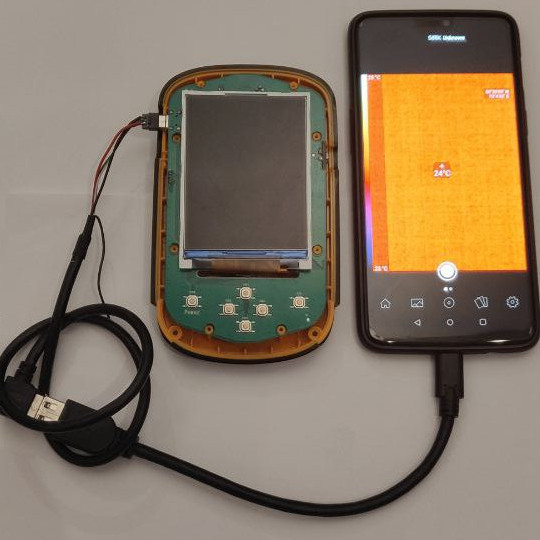
Sometimes a device doesn’t do quite what one needs, and in those cases a bit of tampering might do the trick. That’s what led to being able to record video from a HTI HT-A1 thermal imager despite the device not actually supporting that function, thanks to careful investigation and warranty violation.
Plugging in a custom USB cable allows a mobile phone app to access the thermal sensor, while the host device itself remains ignorant.
We’ve seen a teardown of the HT-A1 in the past, and it turns out that Seek — the manufacturer for the actual thermal sensor inside the device — released an OEM development kit and mobile phone app for their modules. Could this mean that the raw sensor module in the HT-A1 could be accessed via the developer kit app? One hacked together USB cable later showed that the answer is yes! Not only does the app allow viewing thermal imagery, but it makes it possible to do things like record video (a function the HT-A1 itself does not support.)
But even if the HT-A1 doesn’t allow recording, as a handheld thermal sensor with a screen it’s still pretty useful in its own way and it would be shame to gut the unit just for a raw sensor module. The best solution ended up being to put the sensor back into the HT-A1, and install some switching circuitry to disconnect the sensor from the HT-A1’s CPU and divert its data to the USB plug on demand. This means the HT-A1 can be used normally, but by plugging in a custom-made cable while the unit is off, the thermal sensor can be accessed by the mobile phone app instead. Best of both worlds. You can see a brief celebratory thermal cat video embedded below, proving it works.