Camera Controller

A Remote For CHDK Cameras Made Possible With Arduino

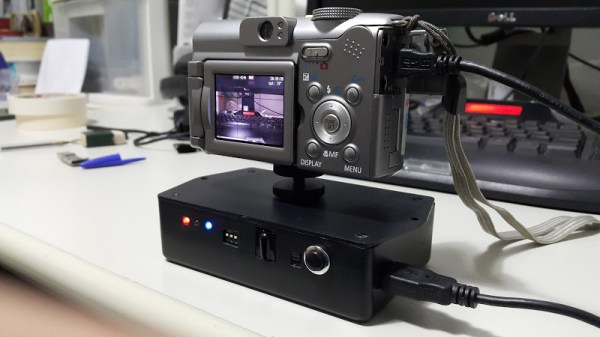
[AlxDroidDev] built himself a nice remote control box for CHDK-enabled cameras. If you haven’t heard of CHDK, it’s a pretty cool software modification for some Canon cameras. CHDK adds many new features to inexpensive cameras. In this case, [AlxDroidDev] is using a feature that allows the camera shutter to be activated via USB. CHDK can be run from the SD card, so no permanent modifications need to be made to the camera.

[AlxDroidDev’s] device runs off of an ATMega328p with Arduino. It operates from a 9V battery. The circuit contains an infrared receiver and also a Bluetooth module. This allows [AlxDroidDev] to control his camera using either method. The device interfaces to the camera using a standard USB connector and cable. It contains three LEDs, red, green, and blue. Each one indicates the status of a different function.

The Arduino uses Ken Shirrif’s IR Remote library to handle the infrared remote control functions. SoftwareSerial is used to connect to the Bluetooth module. The Arduino code has built-in functionality for both Canon and Nikon infrared remote controls. To control the camera via Bluetooth, [AlxDroidDev] built a custom Android application. The app can not only control the camera’s shutter, but it can also control the level of zoom.

3D Printed Surfboard

You whippersnappers these days with your 3D printers! Back in our day, we had to labor over a blank for hours, getting all sweaty and covered in foam dust. And it still wouldn’t come out symmetric. Shaping a surfboard used to be an art, and now you’re just downloading software and slinging STLs.

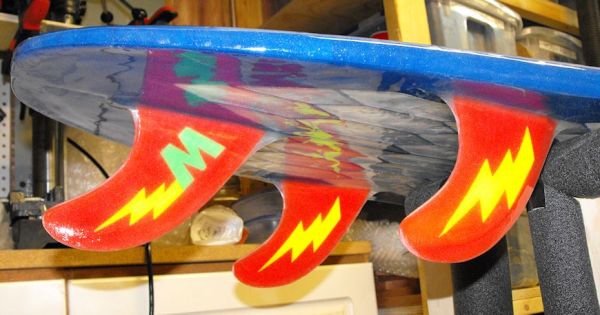
Joking aside, [Jody] made an incredible surfboard (yes, actual human-sized surfboard) out of just over 1 kilometer of ABS filament, clocking 164 hours of printing time along the way. That’s a serious stress test, and of course, his 3D printer broke down along the way. Then all the segments had to be glued together.

But the printing was the easy part; there’s also fiberglassing and sanding. And even though he made multiple mock-ups, nothing ever goes the same on opening night as it did in the dress rehearsal. But [Jody] persevered and wrote up his trials and tribulations, and you should give it a look if you’re thinking of doing anything large or in combination with fiberglass.

Even the fins are 3D printed and the results look amazing! We can’t wait for the ride report.

Shaka.

Sonar Built From Piezo And Microphone

[Jason] has continued to plug along with his sonar build and recently showed up a monostatic active sonar using a piezo element and microphone. Regular readers will remember [Jason’s] experiments from a Fail of the Week post which focused on his water-proofing woes from a much earlier prototype.

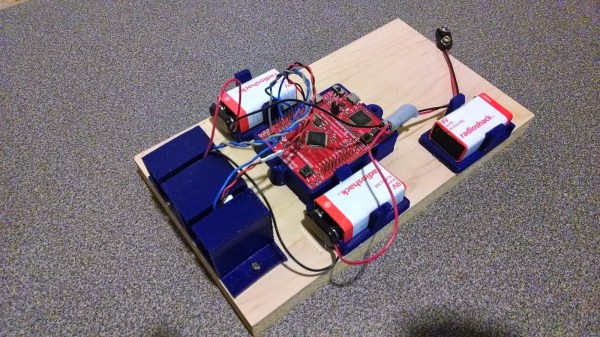
We find this offering far more engaging. He has ditched the ultrasonic module seen in those experiments. The new rig drives the piezo element using a 27V source. After each ping is sent out, the microphone input is immediately captured to detect the return of the audible sound. [Jason] mentions that the TI Launchpad he’s using for the project is fast enough for these experiments but he may switch to a Teensy 3.1 in order to double the RAM and thereby increase the sample size he is able to record.

Of course this is intended for underwater ROVs so his next iteration will involve a DIY hydrophone. We can’t wait to see that one as the process of converting this test rig into one that works underwater evades us. If you have some tips on that topic please let us know in the comments.

Continue reading “Sonar Built From Piezo And Microphone”

Rendering Fractals With Just HTML And CSS

What’s better than spending hours and hours with CSS
trying to get images and text to center properly? Not [Jim], but he did notice that
CSS3 was a very powerful language. He wondered about building Tetris, a Turing Machine, or rendering fractals purely in CSS and HTML. The jury is still out if a Turing machine is possible, but he did manage to generate some simple fractals using just CSS and HTML, no JavaScript required.

Most fractals are recursive, and CSS rules can be applied to HTML objects that have already have rules applied to them. It’s not quite recursion, because there’s no way to dynamically generate HTML with CSS. However, with just a few tags, [Jim] can generate one level of a Pythagoras Tree. This method requires placing tags in the HTML for every level of the tree, greatly limiting the cool factor. That’s easily remedied by a few CTRL+Cs and CTRL+Vs.

The same technique can be used to render a Koch snowflake – seen on this page. Yes, it’s all HTML and CSS, without JavaScript. Why? Because he can, and that’s good enough for us.

Using RC Transmitters With Flight Simulators

It’s winter, and that means terrible weather and very few days where flying RC planes and helicopters is tolerable. [sjtrny] has been spending the season with RC flight simulators for some practice time. He had been using an old Xbox 360 controller, but that was really unsuitable for proper RC simulation – a much better solution would be to use his normal RC transmitter as a computer peripheral.

The usual way of using an RC transmitter with a computer is to buy a USB simulator adapter that emulates a USB game pad through a port on the transmitter. Buying one of these adapters would mean a week of waiting for shipping, so [sjtrny] did the logical thing and made his own.

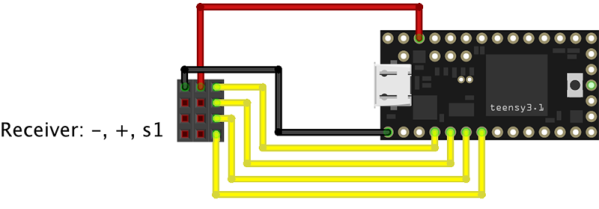
Normally, a USB simulator adapter plugs in to a 3.5mm jack on the transmitter used for a ‘buddy box’, but [sjtrny] had an extra receiver sitting around. Since a receiver simply outputs signals to servos, this provides a vastly simpler interface for an Arduino to listen in on. After connecting the rudder, elevator, aileron, and throttle signals on the receiver to an Arduino, a simple bit of code and the UnoJoy library allows any Arduino and RC receiver to become a USB joystick.

[sjtrny] went through a second iteration of hardware for this project with a Teensy 3.1. This version has higher resolution on the joystick axes, and the layout of the code isn’t slightly terrible. It’s a great project for all the RC pilots out there that can’t get a break in the weather, and is also a great use for a spare receiver you might have sitting around.

The Proper Use For A Gameboy Advance Carrying Case

About a decade ago, Nintendo released a Game Boy Advance carrying case in the shape of a Game Boy Advance. It was the obvious answer to the original brick Game Boy carrying case every eight year old had in 1990. This jumbo-sized Game Boy Advance case also makes a really good platform for a console mod, which is exactly what [frostefires] got when he put an N64 in one.

This isn’t the first time we’ve seen this bit of old Nintendo paraphernalia used to house an N64. A few years ago, [Hailrazer] used the same GBA carrying case as the body of an N64 build. There were a few shortcomings in that build, most importantly the removal of the D pad.  [frostedfires]’ build fixes this oversight.

Inside the GBA enclosure is a 4.3 inch screen, a replacement Gamecube joystick, an SNES D pad, and of course the entire N64 circuit board with a few modifications.

[frostedfires] entered this into a ‘Shark Tank’-ish  competition at school, and this build was so impressive he won first place. Link to the full build thread here.