Meter All The Phases: Three Phase Energy Meter With OpenWrt

Keeping track your overall electricity usage is a good thing, and it’s even better if you know where all the kilowatt-hours are going. [Anurag Chugh’s] house has the three phases coming from the electrical distribution box tidily organized: One for the lighting and fans, one for household appliances, and one for the hot water supply. To monitor and analyze the electrical fingerprint of his house, [Anurag] installed a 3 phase energy meter and hooked it up to the internet.

Continue reading “Meter All The Phases: Three Phase Energy Meter With OpenWrt”

Black Line Follower: A Modern Bristlebot

It’s been a while since we’ve seen much action on the bristlebot front, which is too bad. So we’re happy to see [Extreme Electronics]’s take on the classic introductory “robot”: the Black Line Follower. The beauty of these things is their simplicity, so we’ll just point you to his build instructions and leave the rest to you.

The original bristlebot is a fantastic introduction to electronics, because it’s simple enough that you can cobble one together in no time. A battery, a pager motor, and a toothbrush head are all you need. But it goes where it wants, rather than where you want it to go.

Adding steering is as simple as tying two bristlebots together and firing one motor at a time to execute a turn. The Black Line Follower is of this style.

Of course, any good idea can be taken to extremes, as in this giant weight-shifting bristlebot, or this super-tiny IR-controlled bristlebot.

But that was more than five years ago now. What happened to the mighty engines of bristlebot creativity? Has the b-bot seen its finest hour? Or are we just waiting for the next generation to wiggle up to the plate?

Continue reading “Black Line Follower: A Modern Bristlebot”

Hackaday Prize Entry: Worldwide Educational Infrastructure

The future of education is STEM, and for the next generation to be fitter, happier, and more productive, classrooms around the world must start teaching programming, computer engineering, science, maths, and electronics to grade school students. In industrialized countries, this isn’t a problem: they have enough money for iPads, Chromebooks, and a fast Internet connection. For developing economies? That problem is a little harder to solve. Children in these countries go to school, but there are no racks of iPads, no computers, and even electricity isn’t a given. To solve this problem, [Eric] has created a portable classroom for his entry into this year’s Hackaday Prize.

Classrooms don’t need much, but the best education will invariably need computers and the Internet. Simply by the virtue of Wikipedia, a connection to the Internet multiplies the efforts of any teacher, and is perhaps the best investment anyone can make in the education of a child. This was the idea behind the One Laptop Per Child project a decade ago, but since then, ARM boards running Linux have become incredibly cheap, and we’re getting to a point where cheap Internet everywhere is a real possibility.

To build this portable classroom, [Eric] is relying on the Raspberry Pi. Yes, there are cheaper options, but the Pi is good enough. A connection to online resources is required, and for that [Eric] is turning to the Outernet. It’s a system that will broadcast educational material down from orbit, using ground stations made from cheap and portable KU band satellite dishes and cheap receivers.

When it comes to educational resources for very rural communities, the options are limited. With [Eric]’s project, the possibilities for educating students on the basics of living in the modern world become much easier, and makes for a great entry into this year’s Hackaday Prize.

Continue reading “Hackaday Prize Entry: Worldwide Educational Infrastructure”

Sweet 3D Printer

Dylan’s Candy Bar is an upscale sweet shop in Manhattan. In a stunning proof that 3D printing has become buzzword-worthy, they’ve announced a deal with Katjes Magic Candy Factory to bring four 3D gummy printers to the US (specifically, to New York, Chicago, Los Angeles, and Miami).

The device looks a bit like a classic 3D printer, but it extrudes eight different gummis in a variety of flavors. The store offers twenty designs but you can also print text or your own drawings (including, apparently, your face).

Each creation costs about $20. Time will tell if this is just a stunt, or if we are going to see food printers cropping up at a mall near you. You can see a video they posted to Twitter below along with a video from the product roll out of the printer in question.

Continue reading “Sweet 3D Printer”

3D Printing Metal In Mid Air

Published only 3 days before our article on how it is high time for direct metal 3D printers, the folks at Harvard have mastered 3D metal printing in midair with no support (as well as time travel apparently). Because it hardens so quickly, support isn’t necessary, and curves, sharp angles, and sophisticated shapes are possible.

The material is silver nanoparticles extruded out of a nozzle, and shortly after leaving it is blasted with a carefully programmed laser that solidifies the material. The trick is that the laser can’t focus on the tip of the nozzle or else heat transfer would solidify the ink inside the nozzle and clog it. In the video you can see the flash from the laser following slightly behind. The extrusion diameter is thinner than a hair, so don’t expect to be building large structures with this yet.

If you want big metal 3D printing, you should probably stick to the welders attached to robotic arms.

Continue reading “3D Printing Metal In Mid Air”

Compact Controllers Automate Window Blinds

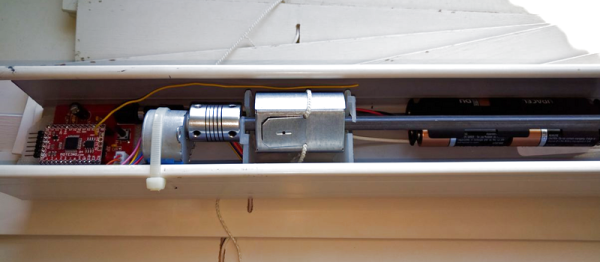
Commercially available motorized window blinds are a nice high-end touch for today’s automated home, but they tend to command a premium price. Seems silly to charge so much for what amounts to a gear motor and controller, which is why [James Wilcox] took matters into his own hands and came up with this simple and cheap wireless blind control.

[James] started his project the sensible way, with a thorough analysis of the problem. Once COTS alternatives were eliminated – six windows would have been $1200 – he came up with a list of deliverables, including tilting to pre-determined positions, tilt-syncing across multiple windows, and long battery life. The hardware in the head rail of each blind ended up being a Moteino on a custom PCB for the drivers, a $2 stepper motor, and a four-AA battery pack. The Moteino in one blind talks to a BeagleBone Black over USB and wirelessly to the other windows for coordinated control. As for battery life, [James] capitalized on the Moteino’s low-power Listen Mode to reduce the current draw by about three orders of magnitude, which should equate to a few years between battery changes. And he did it all for only about $40 a window.

Window blinds seem to be a tempting target for hacking, whether it’s motorizing regular blinds or interfacing commercial motorized units into a home automation system. We like how compact this build is, and wonder if it could be offered as an aftermarket add-on for manual blinds.

Continue reading “Compact Controllers Automate Window Blinds”

How The Dis-integrated 6502 Came To Be

I made a bee line for one booth in particular at this year’s Bay Area Maker Faire; our friend [Eric Schlaepfer] had his MOnSter 6502 on display. If you missed it last week, the unveiling of a 6502 built from discrete transistors lit the Internet afire. At that point, the board was not fully operational but [Eric’s] perseverance paid off because it had no problem whatsoever blinking out verification code at his booth.

I interviewed [Eric] in the video below about the design process. It’s not surprising to hear that he was initially trying to prove that this couldn’t be done. Unable to do so, there was nothing left to do but devote almost six-months of his free time to completing the design, layout, and assembly.

What I’m most impressed about (besides just pulling it off in the first place) is the level of perfection [Eric] achieved in his design. He has virtually no errors whatsoever. In the video you’ll hear him discuss an issue with pull-up/pull-down components which did smoke some of the transistors. The solution is an in-line resistor on each of the replacement transistors. This was difficult to photograph but you can make out the soldering trick above where the 3-pin MOSFET is propped up with it’s pair of legs on the board, and the single leg in the air. The added resistor to fix the issue connects that airborne leg to its PCB pad. Other than this, there was no other routing to correct. Incredible.

The huge schematic binder includes a centerfold — literally. One of the most difficult pieces of the puzzle was working out the decode ROM. What folds out of this binder doesn’t even look like a schematic at first glance, but take a closer look (warning, 8 MB image). Every component in that grid was placed manually.

I had been expecting to see some tube-based goodness from [Eric] this year. That’s because I loved his work on Flappy Bird on a green CRT in 2014, and Battlezone on a tube with a hand-wound yoke last year. But I’m glad he stepped away from the tubes and created this marvelous specimen of engineering.