Circuit Bending A TV For Better Input

If you haven’t noticed, CRTs are getting hard to find. You can’t get them in Goodwill, because thrift stores don’t take giant tube TVs anymore. You can’t find them on the curb set out for the trash man, because they won’t pick them up. It’s hard to find them on eBay, because no one wants to ship them. That’s a shame, because the best way to enjoy old retrocomputers and game systems is with a CRT with RGB input. If you don’t already have one, the best you can hope for is an old CRT with a composite input.

But there’s a way. [The 8-Bit Guy] just opened up late 90s CRT TV and modded it to accept RGB input. That’s a monitor for your Apple, your Commodore, and a much better display for your Sega Genesis.

There are a few things to know before cracking open an old CRT and messing with the circuits. Every (color) CRT has three electron guns, one each for red, green, and blue. These require high voltage, and in CRTs with RGB inputs you’re looking at a circuit path that takes those inputs, amplifies them, and sends them to the gun. If the TV only has a composite input, there’s a bit of circuitry that takes that composite signal apart and sends it to the guns. In [8-bit guy]’s TV — and just about every CRT TV you would find from the mid to late 90s — there’s a ‘Jungle IC’ that handles this conversion, and most of the time there’s RGB inputs meant for the on-screen display. By simply tapping into those inputs, you can add RGB inputs with fancy-schmancy RCA jacks on the back.

While the actual process of adding RGB inputs to a late 90’s CRT will be slightly different for each individual make and model, the process is pretty much the same. It’s really just a little bit of soldering and then sitting back and playing with old computers that are finally displaying the right colors on a proper screen.

Continue reading “Circuit Bending A TV For Better Input”

Hams See Dark Side Of The Moon Without Pink Floyd

Ham radio operators bouncing signals off the moon have become old hat. But a ham radio transmitter on the Chinese Longjiang-2 satellite is orbiting the moon and has sent back pictures of the Earth and the dark side of the moon. The transceiver’s main purpose is to allow hams to downlink telemetry and relay messages via lunar orbit.

While the photo was received by the Dwingeloo radio telescope, reports are that other hams also picked up the signal. The entire affair has drawn in hams around the world. Some of the communications use a modulation scheme devised by [Joe Taylor, K1JT] who also happens to be a recipient of a Nobel prize for his work with pulsars. The Dwingeloo telescope has several ham radio operators including [PA3FXB] and [PE1CHQ].

Continue reading “Hams See Dark Side Of The Moon Without Pink Floyd”

Hybrid Robot Walks, Transforms, And Takes Flight

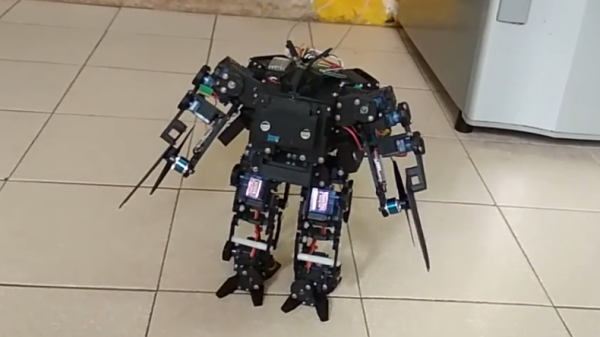
[Project Malaikat] is a 3D printed hybrid bipedal walker and quadcopter robot, but there’s much more to it than just sticking some props and a flight controller to a biped and calling it a day. Not only is it a custom design capable of a careful but deliberate two-legged gait, but the props are tucked away and deployed on command via some impressive-looking linkages that allow it to transform from walking mode to flying mode.

Creator [tang woonthai] has the 3D models available for download (.rar file) and the video descriptions on YouTube contain a bill of materials, but beyond that there doesn’t seem to be much other information available about [Malaikat]. The creator does urge care to be taken should anyone use the design, because while the robot may be small, it does essentially have spinning blades for hands.

Embedded below are videos that show off the robot’s moves, as well as a short flight test demonstrating that while control was somewhat lacking during the test, the robot is definitely more than capable of actual flight.

Continue reading “Hybrid Robot Walks, Transforms, And Takes Flight”

Wind Turbine Pushes Limits Of Desktop 3D Printing

There was a time, not so long ago, when hype for desktop 3D printing as so high that it seemed you could print anything. Just imagine it, and your handy dandy magical 3D printer could manifest it into reality. But now that more people have had first hand experience with the technology, the bubble has burst. Reality has sobered us up a bit, and today we’ve got a much better idea of what can and cannot be printed on a traditional desktop 3D printer.

But that doesn’t mean we aren’t surprised from time to time. As a perfect example, take a look at this almost entirely 3D printed wind turbine designed and built by [Nikola Petrov]. Outside of the electronics, the pole it’s mounted to, and some assorted bits and bobs, he produced all the parts on his own large-format TEVO Black Widow printer. He mentions there are a few things he would do differently if he was to build another one, but it’s hard to find much to complain about with such a gorgeous build.

To be sure, this one isn’t for the 3D printing novice. First of all, you’ll need a printer with a bed that’s at least 370 mm wide just to print the blades. [Nikola] also recommends printing the parts in ABS and coating them with acetone to smooth and harden the outside surfaces. We’d be surprised if you could print such large objects in ABS without a heated enclosure as well, so plan on adding that to your shopping list.

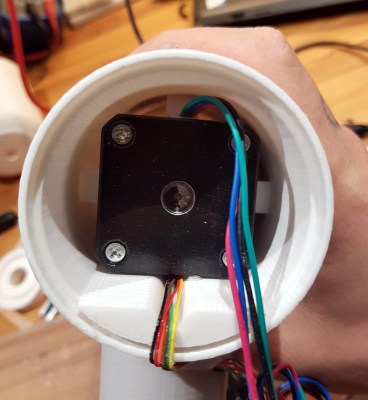
On the flip side though, the electronics are about as simple as they come. The blades are spinning a standard NEMA 17 stepper motor (through a 1:5 gearbox) to produce AC power. This is then fed into two W02M rectifiers and a beefy capacitor, which gives him DC with a minimum of fuss. In theory it should be capable of producing 1A at 12V, which is enough to light LEDs and charge phones. In this design there’s no battery charging circuit or anything like that, as [Nikola] says it’s up to the reader to figure out how to integrate the turbine into their system.

If you don’t think your 3D printing skills are up to the task, no worries. In the past we’ve seen wind turbines built out of ceiling fans, and occasionally, even less.

The Incredible Judges Of The Hackaday Prize

The last challenge of The Hackaday Prize has ended. Over the past few months, we’ve gotten a sneak peek at over a thousand amazing projects, from Open Hardware to Human Computer Interfaces. This is a contest, though, and to decide the winner, we’re tapping some of the greats in the hardware world to judge these astonishing projects.

Below are just a preview of the judges in this year’s Hackaday Prize. In the next few weeks, we’ll be sending the judging sheets out to them, tallying the results, and in just under a month we’ll be announcing the winners of the Hackaday Prize at the Hackaday Superconference in Pasadena. This is not an event to be missed — not only are we going to hear some fantastic technical talks from the hardware greats, but we’re also going to see who will walk away with the Grand Prize of $50,000.


Sherry Huss

Sherry Huss is the former vice president of Maker Media, and oversees the publishing of Make Magazine and Maker Faires across the globe. Sherry is a major advocate of ‘all things maker’ in the global community, and her vision and passion for the maker movement was instrumental in growing the Make: brand within the maker ecosystem. Under her guidance, the largest Maker Faires, the Bay Area and World Maker Faire in New York, have grown from just a few thousand people in 2006 to events with over 200,000 attendees each year. Sherry is a giant in the Maker world, and an unending advocate of maker, DIY, and everyone who makes, whether that’s through wood, code, metal, solder, or fabric.

Anool Mahidharia

Anool is an electrical engineer, and works in Test & Measurement at Lumetronics. He’s part of WyoLum, an international group of hardware nerds who are consistently pumping out projects that push the limits of how blinky, glowey, and interesting a thing can be. They’re behind some projects you may have caught at random hacker meetups, and the creators of an absurd RGB LED cube that’s also a die. Anool is, by every account, an extremely capable hardware engineer, a longtime writer for Hackaday, and is constantly travelling the world presenting the latest developments in electronics to the public.

Danielle Applestone

Before founding Other Machine Co., now Bantam Tools, makers of tiny desktop milling machines that make fantastic circuit boards, Danielle Applestone worked with DARPA to develop high-precision machines that were effectively made out of kitchen cutting boards. HDPE, it turns out, is extraordinarily mechanically stable, cuts and machines easily, and can make very rigid components. Danielle spun this research out into the Othermill, an actual successful hardware startup. Danielle talked about this experience at the Hackaday Superconference, and we’re thrilled to have her on board judging other makers in their efforts to create the next big hardware thing.

Kwabena Agyeman

Kwab is one of the leading experts in computer vision and machine learning applications, and specializes in FPGA and Chip design. His greatest contribution to Open Hardware is the OpenMV, a platform for Computer Vision, ‘at the edge’, or basically a very high performance microcontroller and camera module on a single board, that’s running computer vision algorithms. This project began as a Hackaday Prize project that was then bootstrapped into a successful business. Formerly of Planet Labs where he spent his time pulling off Apollo 13-level hacks on space assets, Kwab is among the most successful designers in the world of Open Hardware.

These are just a few of the amazingly accomplished judges we have lined up to determine the winner of this year’s Hackaday Prize. The winner will be announced on November 3rd at the Hackaday Superconference. There are still tickets available, but if you can’t make it, don’t worry. We’re going to be live streaming everything, including the prize ceremony, where one team will walk away with the grand prize of $50,000. It’s not an event to miss.

Teardown: D50761 Aircraft Quick Access Recorder

Everyone’s heard of the “black box”. Officially known as the Flight Data Recorder (FDR), it’s a mandatory piece of equipment on commercial aircraft. The FDR is instrumental in investigating incidents or crashes, and is specifically designed to survive should the aircraft be destroyed. The search for the so-called “black box” often dominates the news cycle after the loss of a commercial aircraft; as finding it will almost certainly be necessary to determine the true cause of the accident. What you probably haven’t heard of is a Quick Access Recorder (QAR).

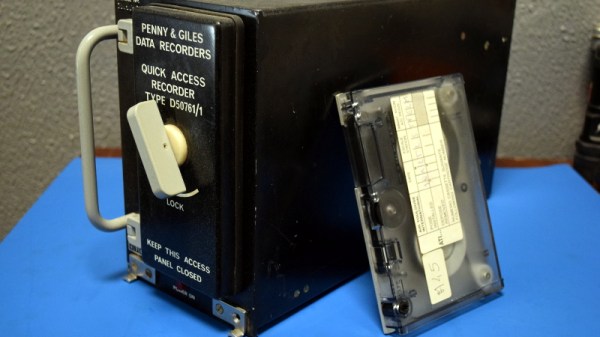
While it’s the best known, the FDR is not the only type of recording device used in aviation. The QAR could be thought of as the non-emergency alternative to the FDR. While retrieving data from the FDR usually means the worst has happened, the QAR is specifically designed to facilitate easy and regular access to flight data for research and maintenance purposes. Its data is stored on removable media and since the QAR is not expected to survive the loss of the aircraft it isn’t physically hardened. In fact, modern aircraft often use consumer-grade technology such as Compact Flash cards and USB flash drives as storage media in their QAR.

Through the wonders of eBay, I recently acquired a vintage Penny & Giles D50761 Quick Access Recorder. This was pulled out of an aircraft which had been in service with the now defunct airline, Air Toulouse International. Let’s crack open this relatively obscure piece of equipment and see just what goes into the hardware that airlines trust to help ensure their multi-million dollar aircraft are operating in peak condition.

Continue reading “Teardown: D50761 Aircraft Quick Access Recorder”

The 3D Printed Plotter You Didn’t Know You Needed

We’ve been seeing an influx of repurposed 3D printers recently. Thrifty hackers have been leveraging cheap 3D printers as a way to bootstrap their builds, on everything from laser engravers to pick and place machines. There’s nothing wrong with that, and honestly when you can get a cheap 3D printer for less than the cost of the components separately thanks to the economies of scale, you’d be foolish not to.

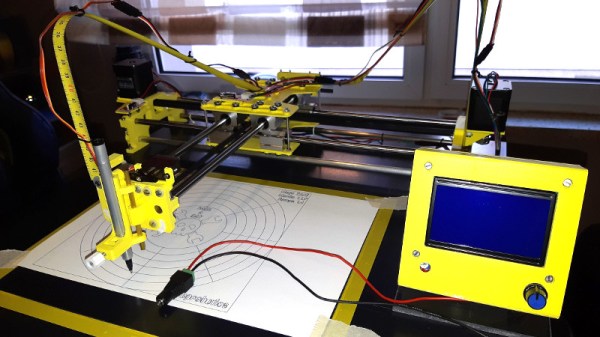
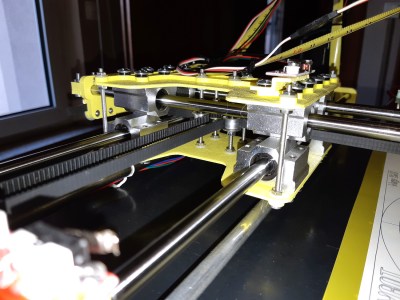
But there’s still something to be said for the classic RepRap mentality of building things using printed parts and smooth rods. Case in point, the largely 3D printed plotter that [darth vader] sent in for our viewing pleasure. This isn’t somebody sicking a pen on the extruder of their open box Monoprice special, this is a purpose built plotter and it shows. In the video after the break you can see not only how well it draws, but also how large of a work area it has compared to a modified 3D printer.

If you know your way around a 3D printer, most of it should look pretty familiar to you. Using the same GT2 belts, steppers, end stop switches, and linear bearings which are ubiquitous in 3D printers, it shouldn’t be difficult to source the parts to build your own. It even uses a Mega 2560 with RAMPS 1.4 running Marlin 1.1.9 for control.

The biggest difference is the physical layout. Since there’s no heavy hotend or extruder assembly to move around, the plotter has a cantilever design which gives it far greater reach. As it only needs to sightly lift the pen off the paper, there’s no need for a complex Z axis with leadscrews either; a simple servo mounted to the end of the arm is used to raise and lift the pen. We especially like the use of a tape measure as strain relief for his wiring, a fantastic tip that we (and many of you) fell in love with last year.

While it’s hard to beat just tossing a pen onto the business end of your desktop 3D printer in terms of convenience, we think it’s pretty clear from this build that the results don’t quite compare. If you want a real plotter, build a real plotter.

Continue reading “The 3D Printed Plotter You Didn’t Know You Needed”