Can You “Take Back” Open Source Code?

It seems a simple enough concept for anyone who’s spent some time hacking on open source code: once you release something as open source, it’s open for good. Sure the developer might decide that future versions of the project close up the source, it’s been known to happen occasionally, but what’s already out there publicly can never be recalled. The Internet doesn’t have a “Delete” button, and once you’ve published your source code and let potentially millions of people download it, there’s no putting the Genie back in the bottle.

But what happens if there are extenuating circumstances? What if the project turns into something you no longer want to be a part of? Perhaps you submitted your code to a project with a specific understanding of how it was to be used, and then the rules changed. Or maybe you’ve been personally banned from a project, and yet the maintainers of said project have no problem letting your sizable code contributions stick around even after you’ve been kicked to the curb?

Due to what some perceive as a forced change in the Linux Code of Conduct, these are the questions being asked by some of the developers of the world’s preeminent open source project. It’s a situation which the open source community has rarely had to deal with, and certainly never on a project of this magnitude.

Is it truly possible to “take back” source code submitted to a project that’s released under a free and open source license such as the GPL? If so, what are the ramifications? What happens if it’s determined that the literally billions of devices running the Linux kernel are doing so in violation of a single developer’s copyright? These questions are of grave importance to the Internet and arguably our way of life. But the answers aren’t as easy to come by as you might think.

Continue reading “Can You “Take Back” Open Source Code?”

The Exquisite Badges Of Open Hardware Summit

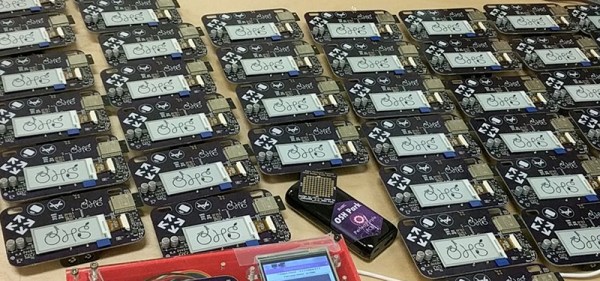
The past few years have been all about electronic conference badges and this year is no different. Right now, we’re setting up at the Open Hardware Summit at MIT, and this year’s badge is nothing short of extraordinary. It’s a WiFi and Bluetooth-enabled e-paper badge, individually programmed for every attendee. The 2018 Open Hardware Summit badge is a work of art, and it was all created over on hackaday.io.

This board is based on the ESP trINKet designed by [Mike Rankin] with additional hardware design from [Alex Camilo]. The badge is based around the ESP32-wroom-32 module with a 2.13 inch e-paper display with a resolution of 250 x 122 pixels. To this, the badge adds an I2C accelerometer and support for add-ons. There’s also pads for an SD card holder — a soldering challenge, if you will — and few additional pads for bits and bobs.

But a badge is nothing without software, and that’s where this really gets good. The ESP32 module is a powerhouse, capable of emulating NES games or serving as a file server. Here, the stock configuration of the badge is rather simplistic: you can start a WiFi AP, log onto a web page, and change the name displayed on the badge. You can also start an FTP server, which is where things get really fun. Drop an application on that FTP server, and you can run Micro Python.

The badge is great, but the programming jig is awesome

The boards were made through OSH Park, and Screaming Circuits took care of the assembly. Anyone who has ever built a badge will tell you it isn’t the assembly that gets you — it’s the programming and provisioning. This is especially true since the Open Hardware Summit badge is distributed with the attendee’s names already preloaded. That’s a few hundred badges, all with unique firmware. This is a nightmare by any definition.

However, there’s always a good solution to a problem, and [Drew] from OSH Park showed me the best programming jig I’ve ever seen during the Summit pre-game at Artisan’s Asylum.

What you’re looking at is a 3D printed box loaded up with a touch-screen display, a Raspberry Pi Zero W, and a few pogo pins. This Raspberry Pi does all the heavy lifting by connecting to the Internet, pulling down the current version of the firmware, and loading that firmware onto the badge. There are a few more options thanks to the touch-screen interface, including provisioning all the badges with the names of the attendees — this can be done by reading a list of attendees and uploading the next one to the badge in the jig. All of this is wrapped up with a nice laser-cut cover that securely holds each badge exactly where it needs to be for the pogo pins to make contact.

This is, without question, the best programming jig I’ve seen. Any badge makers out there should take note: this is how you program a few hundred badges. The badge, itself, is great and just as this post is published there will be hundreds of eager hackers futzing about with this remarkable piece of hardware. If you want to check out the current progress of the badge hacking, check out the updates on Twitter

Maker Faire NY: Infinite Autonomous 3D Printing

Although it’s not an idea that has yet trickled down to $200 printers drop-shipped from China, one of the most innovative ideas in the 3D printing world in the last few years is putting plastic down on a conveyor belt. Yes, MakerBot was doing it back in 2010, but we’re not going to talk about that. Printing on a conveyor belt instead of a static bed allows you to easily print multiples of an object autonomously, without any human interaction. If you’re really clever, you could rotate the hot end 45° and build a piece of plastic that is infinitely long, like the printer [Bill Steele] built, the Blackbelt, or ‘the CAD files might exist somewhere’ Printrbot infinite build volume printer.

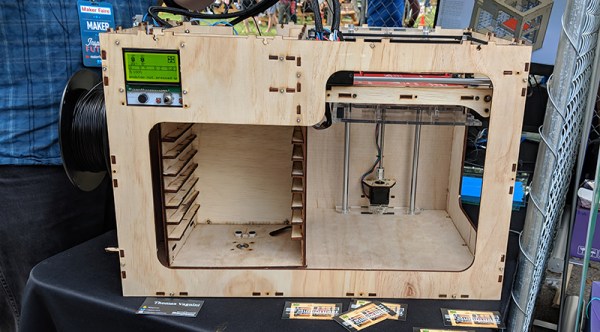
At this year’s World Maker Faire, we didn’t see an infinite printer, but we did catch a glimpse of an idea that could reliably take 3D printers into production. It’s a Multiprinter Autonomous 3D Printer, designed and built by [Thomas Vagnini].

The idea of using 3D printers for production and manufacturing is a well-studied problem. Lulzbot has a heated room filled with printers they use to manufacture all their machines. Prusa’s manufacturing facility is similarly well-equipped. However, both of these setups require helper monkeys to remove a part from the bed and set the machine up for the next print.

Instead of a strictly manual process, [Thomas]’ machine uses a sort of cartridge-based system for the printing bed. The glass beds are stored in a cassette, and for the first print, the printer pulls a bed onto the heated build plate through a system of conveyors. When the print is finished, the part and the bed ar fed into a rotating cassette, where it can be removed by a tech, prepped for the next print, and placed back in the ‘bed feeder’. It’s a system that brings the manual intervention cycle time of a 3D printer down to zero. If you’re producing hundreds of parts, this will drastically speed up manufacturing.

While it is a relatively niche idea, this is a very well-designed machine. It’s all laser cut, uses core-XY mechanics, and with the right amount of tuning, it does exactly what it says it will do. It’s not for everybody, but that’s sort of the point of manufacturing parts on a 3D printer.

Fallout Watch Build Triumphs In Adverse Conditions

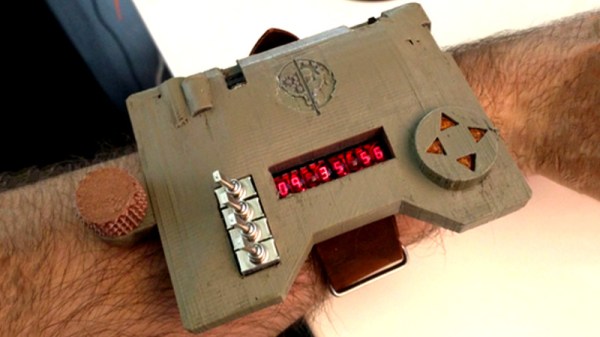
Is it a badge? Is it a watch? Well, it’s [Sarif’s] take on a wrist-mounted computer from the Fallout series, so you’re free to choose your own designation! We think the Brotherhood of Steel would be proud to have this piece of kit.

[Sarif] commenced the build after first getting their feet wet with the pipman, a watch inspired by Metro 2033 and Steins;;gate as much as Bethesda’s popular post-apocalyptic RPG. It features all the fruit – GPS, compass, a TV-B-Gone – and perhaps the coolest feature, long-since-deprecated bubble LED displays and flippy switches for that Altair-esque charm.

The build log is full of details, from the components used and the debugging battles involved in the journey. [Sarif] learned about using transistors, burning up a few along the way – some say setting the lab on fire is the quickest way to learn important lessons, anyway. On top of that, there were some software niggles but in the end, the watchputer made it to DEFCON 26 anyway!

Builds like this that start from limited experience and go deep into the trials and tribulations involved are an excellent way to learn about what goes into the average DIY electronics project, particularly when talking about embedded systems. And if you’re keen to check out the work of [Sarif’s] contemporaries, we’ve got a collection of all the awesome badges from DEFCON 26. Enjoy!

Epoxy Fix For A Combusted PCB

When the Magic Smoke is released, chances are pretty good that you’ve got some component-level diagnosis to do. It’s usually not that hard to find the faulty part, charred and crusty as it likely appears. In that case, some snips, a new non-crusty part, and a little solder are usually enough to get you back in business.

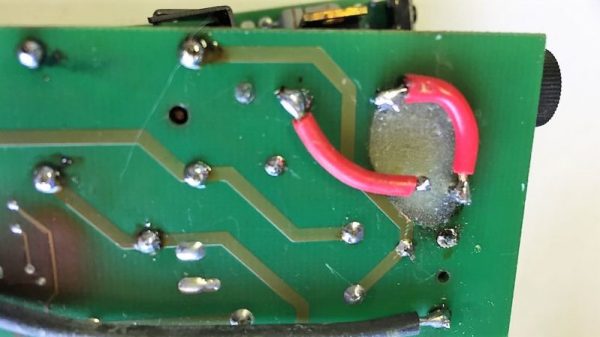
But what if the smoke came not from a component but from the PCB itself? [Happymacer] chanced upon this sorry situation in a power supply for an electric gate opener. Basking in the Australian sunshine for a few years, the opener started acting fussy at first, then not acting at all. Inspection of its innards revealed that some unlucky ants had shorted across line and neutral on the power supply board, which burned not only the traces but the FR4 of the board as well. Rather than replace the entire board, [Happymacer] carefully removed the carbonized (and therefore conductive) fiberglass and resin, leaving a gaping hole in the board. He fastened a patch for the hole from some epoxy glue; Araldite is the brand he used, but any two-part epoxy, like JB Weld, should work. One side of the hole was covered with tape and the epoxy was smeared into the hole, and after a week of curing and a little cleanup, it was ready for duty. The components were placed into freshly drilled holes, missing traces were replaced with wire, and it seems to be working fine.

This seems like a great tip to keep in mind for when catastrophe strikes your boards. There are more extreme ways to do it, of course, but perhaps none so flexible. After all, epoxy is versatile stuff.

Learn Verilog In Your Browser

We are big fans of tools in the browser for education. You have a consistent environment maintained by someone else, you don’t have to install anything, and you can work from any computer you happen to find yourself. The HDLBits site has a great set of Verilog “exams” that would be a big help to anyone trying to learn or brush up on their Verilog skills.

The site offers a range of topics that go from the silly (output a constant 1 or 0) to full-blown state machines and testbenches. The site isn’t tutorial in nature, instead it offers a problem, an optional hint, and an editing window with some code already in place. You add your code and hit submit. Behind the scenes, the site runs Intel Quartus and Modelsim to test your work. It will either show you the results or tell you that you failed.

Continue reading “Learn Verilog In Your Browser”

Apple’s Best Computer Gets WiFi

The greatest computer Apple will ever make isn’t the Apple II, it isn’t the Bondi Blue iMac, it isn’t the trash can, and it certainly isn’t whatever overheating mess they’re pushing out now. The best computer Apple will ever make is the SE/30, at its time a server in a tiny portable shell, and capable of supporting 128 Megabytes of RAM thirty years ago.

Over the years, people have extended and expanded the SE/30 to absolutely ludicrous degrees, but now we have a simple way of adding WiFi to this classic computer. Over on the 68kmla forums, [ants] discovered a tiny cheap card that could easily serve as an Ethernet to WiFi bridge. After attaching this card to a Danaport Ethernet card and bending some aluminum for a bracket, they had a WiFi antenna sticking out of the back of a 30-year-old computer.

But adding a WiFi card to an old computer is nothing new — this could have been done with a Pi, or if you’re a hacker, a TP-Link router flashed with OpenWRT. To really do this right, you’ll need integration with the operating system, and that’s where this build goes off the rails. [ants] wrote a WiFi extension for System 7 (with the relevant GitHub)

The problem with the Vonets WiFi card is that configuration has to be done through a browser. Since there are no modern browsers for classic macs, this meant either pulling out a PowerBook or doing the configuration through your daily driver desktop PC. The WiFi extension gets around that by giving a classic mac the ability to configure the Vonets card almost automatically. This extension also looks like how you would configure the WiFi on a modern mac, complete with the WiFi icon in the toolbar. It’s beautiful, and one of the rare examples of modern 68k mac programming.

As for what you can do by adding WiFi to a 30-year-old computer with a 16MHz processor, the answer is a resounding, ‘not much’. Your choice of browsers is limited (iCab seems to be the best), but you can load the Google homepage slowly. HTTPS isn’t going to work, and the Internet right now is full of megabytes of Javascript cruft. If you find a nice, lightweight web page — such as the Hackaday Retro Edition, for example — you’re looking at a capable web browsing machine. Of course, the real use case for giving the SE/30 WiFi is file transfer around the home network, but still: it’s WiFi for the best computer Apple ever made.