This Arduino Feeds The Dog

Part of the joy of owning a dog is feeding it. How often do you get to make another living being that happy? However, sometimes you can’t be there when your best friend is hungry. [El Taller De TD] built an auto dog feeder using an Arduino and stepper motor. The video and links are in Spanish, but if your Spanish is rusty, YouTube’s caption autotranslation isn’t bad and Google Translate can help you with the web site.

The electronics are reasonably simple: an Arduino, a Bluetooth module, and a stepper motor driver. Mechanically, the motor and some PVC pipe are all you need. There’s a small phone application to drive the Bluetooth using App Inventor.

Continue reading “This Arduino Feeds The Dog”

Octavo Systems Shows Off With Deadbug Linux Computer

Once upon a time, small Linux-capable single board computers were novelties, but not anymore. Today we have a wide selection of them, many built around modules we could buy for our own projects. Some of the chipset suppliers behind these boards compete on cost, others find a niche to differentiate their product. Octavo Systems is one of the latter offering system-in-package (SiP) modules that are specifically designed for easy integration. They described how simple it would be to build a minimal computer using their SC335x C-SiP, and to drive the point home they brought a deadbug implementation to Embedded World 2019. [Short video after the break.]

Most of us encounter Octavo modules as the heart of a BeagleBoard. Their increasing integration made tiny wonders like PocketBeagle possible. But bringing out all those pins for use still required a four-layer circuit board. Octavo’s pitch for hardware professionals center around how easy integration saves time for faster time to market, and fortunately for us easy integration also translates to a more accessible device for our projects. It’s one thing to publish a document describing a hypothetical single-layer PCB for an Octavo module, it’s quite something else to show that concept in action with no PCB at all.

Of course, this little machine only has access to a fraction of the module’s functionality, and it is certainly overkill if the objective is just to blink a few LEDs. If so, we’d just use 555 timers! But it does show how simple a bare bones “Hello World” machine can be built, removing intimidation factor and invite more people to come play.

One of the three top winners in our circuit sculpture contest was a wireframe Z80 computer. There’s quite a jump from a Z80 to an Octavo SC335x, but we’ve already seen one effort by [Zach] over Supercon 2018 weekend to build a deadbug computer with an Octavo module. It won’t be long before someone one-ups this minimalist LED blinker with something more sophisticated and we can’t wait to see it. Continue reading “Octavo Systems Shows Off With Deadbug Linux Computer”

RetroPie NES Clock Tells You When It’s Game Time

We’ve all seen the 3D printed replicas of classic game consoles which house a Raspberry Pi; in fact, there’s a pretty good chance some of the people reading this post have one of their own. They’re a great way to add some classic gaming emulation to your entertainment center, especially compared to the bare PCB chic of just having a Pi hanging off your TV’s HDMI port.

[Victor Heid] loved the look of these miniature consoles, but wanted to challenge himself to design something that was also multi-functional and unique. So he decided to create an NES-inspired case for the Raspberry Pi 3 A+ that doubles as a LED matrix clock with a decidedly retro feel. Frankly, even if it was just a clock we would have been impressed with the final product; but the fact that it’s also a fully functional RetroPie build really goes above and beyond.

It should be obvious just looking at the completed product that [Victor] put a lot of effort into sanding and finishing the 3D printed case. But we don’t have to imagine the process, since he was kind enough to thoroughly detail the steps and materials he used. As you might have guessed, the short version is a lot of filler and a lot of time; but it’s worth looking at the complete write-up if you’ve ever considered trying to make your own printed parts look less…printed. His method of applying the lettering on the front of case using a laser printer, some Mod Podge, and a healthy dose of patience is also something you might want to file away for a future project.

The electronics for this project are exceptionally simple, as [Victor] used the Pimoroni Scroll pHAT HD rather than trying to roll his own LED matrix in such a limited space. So it was just a matter of connecting up the wires to the Pi’s GPIO header and getting the various bits of software talking to each other, which he also details for anyone who might be interested.

It’s been a few months since the Raspberry Pi 3 A+ was unveiled, and we’re finally starting to see projects that make use of the new board’s reduced footprint. The ability of hardware like the A+, combined with the lackluster attempts by manufactures to produce official “mini” systems, seems to have set the stage for hackers to once again outshine commercial offerings. Not that we’re complaining, of course.

Mid-Winter Hacker Camp In Civilised Surroundings

Imagine a weekend of opulence in which you meet your companion at the railway station and whisk away across the continent in a 190mph express train for a relaxing couple of days enjoying the ambience of a luxury resort hotel in the fresh surroundings of a woodland in midwinter. Break out the Martinis, it’s a scene of elegance and sophistication from a byegone era! This is the general idea of Hacker Hotel 2019, and I had a wonderful time!

On a recent February weekend I broke out the Club-Mate instead stea of a Martini. My companion for the Eurostar and Thalys trip was my local hackspace friend Matt “Gasman” Westcott with his keytar in a bulky suitcase for a chiptune gig, and we were heading for the Netherlands. It’s a pivot from the summer’s hacker camps as over 200 hackers fill a resort hotel for the weekend, scoring comfortable beds instead of dust or mud!

What follows is my experience from this weekend. Join me below and find out why you simply can’t miss the next one! Continue reading “Mid-Winter Hacker Camp In Civilised Surroundings”

Hackaday Podcast 010: XKCD Graphs, Turing Complete Meta Computers, False Finger Printing 3D Printers, And Jargon

Elliot Williams and Mike Szczys walk through the past week in hackerdom. There’s a new jargon quiz! Do you know what astrictive robotic prehension means? We look at the $50 Ham series, omni-wheeled pen plotting robots, a spectrum of LED hacks, LEGO CNC for chocolate rework, and grinding lenses with a CNC mill. In the “can’t miss” category are fingerprinting 3D Printers, and how NASA designs far beyond the stated life of an engineering project.

Links for all discussed on the show are found below. As always, join in the comments as we’ll be watching those as we work on next week’s episode!

Take a look at the links below if you want to follow along, and as always, tell us what you think about this episode in the comments!

Direct download (60 MB or so.)

Continue reading “Hackaday Podcast 010: XKCD Graphs, Turing Complete Meta Computers, False Finger Printing 3D Printers, And Jargon”

This Super Realistic LED Candle Is Smoking Hot

Over the last few years, LED candles have become increasingly common; and for good reason. From a distance a decent LED candle is a pretty convincing facsimile for the real thing, providing a low flickering glow without that annoying risk of burning your house down. But there’s something to be said for the experience of a real candle; such as that puff of fragrant smoke you get when you blow one out.

Which is why [Keith] set out on an epic three year quest to build the most realistic LED candle possible, with a specific focus on the features that commercial offerings lack. So not only does it use real wax as a diffuser for the LEDs, but you’re able to “light” it with an actual match. It even ejects a realistic bit of smoke when its microphone detects you’ve blown into it. Ironically, its ability to generate smoke means it doesn’t completely remove the possibility of it setting your house on fire if left unattended, but we suppose that’s the price you pay for authenticity.

As you might have gathered by now, [Keith] is pretty serious about this stuff, and has gone to great lengths to document his candle’s long development process. If you’d care to build a similar candle, his written documentation as well as the video after the break will certainly get you on the right track. He’s even broken the design down into “milestones” of increasing complexity, so for example if you don’t care about the smoking aspect of the candle you can just skip that part of the build.

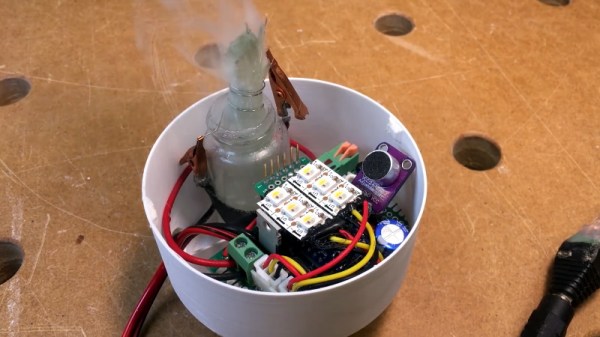
So what did [Keith] put into his ultimate LED candle? In the most basic form, the electronics consist of a Arduino Pro Mini and a chunk of RGB WS2812B strip holding six LEDs. Add in an IR sensor if you want the candle to be able to detect the presence of a match, and a microphone if you want to be able to blow into the candle to turn it off. Things only get tricky if you want to go full smoke, and let’s be honest, you want to go full smoke.

To safely produce a puff of fragrant smoke, [Keith] is using a coil of 28 gauge wire wrapped around the wick of a “Tiki Torch”, and a beefy enough power supply and MOSFET to get it nice and hot. The wick is injected with his own blend of vegetable glycerin and aromatic oil, and when the coil is fired up it produces an impressive amount of light gray smoke that carries the scent of whatever oil you add. Even if you’re not currently on the hunt for the ultimate electronic candle, it’s a neat little implementation that could be used come Halloween.

You might be surprised to learn that LED candles are a rather popular project within the hacking community. From the exceptionally simple to the exceedingly complex, we’ve seen an impressive array of electronic candles over the years. Perfect for setting the mood when listening to the smooth sounds of the latest Hackaday podcast episode. Continue reading “This Super Realistic LED Candle Is Smoking Hot”

The $50 Ham: Entry-Level Transceivers For Technicians

Last week , I covered the ridiculously low barriers to entry to amateur radio, both in terms of financial outlay and the process of studying for and passing the FCC examination. You’ve had seven days, so I assume that you’ve taken the plunge and are a freshly minted amateur radio operator. The next big question may be: Now what?

We briefly mentioned the image that ham radio is a rich old person’s hobby, and that reputation is somewhat deserved. For ham gear, there really is no upper limit on what you can spend. Glossy brochures and slick web pages hawk transceiver bristling with knobs and switches and loaded with the latest features, all of which will probably be obsolete within a few years when the Next Big Thing comes along and manufacturers respond with new, must-have models – looking at you, ICOM IC-7300. It’s no different than any other technology market, and enough people fall for that marketing to make it a going concern.

But thankfully, while there is no apparent ceiling on what you can spend on ham gear, there certainly is a floor, and it can be very, very low. Our $50 budget can go quite a long way to getting a new Technician on the air, if you’re willing to make some compromises and can forego the latest and greatest for a while.

Continue reading “The $50 Ham: Entry-Level Transceivers For Technicians”