Take Control Of Your DSLR With PiXPi

If you’ve ever tried to take a picture of a fast moving object, you know how important timing is. You might only have one chance, and if you hit the shutter a bit too early or too late, the shot could be ruined. Past a certain point, no human camera operator can react quickly enough. Which is exactly why [Krzysztof Krześlak] created PiXPi.

In the past we’ve seen high-speed flashes designed to “freeze time” by illuminating the scene at the precise moment, and while PiXPi can technically do that, it also offers a few alternate methods of capturing that perfect moment. The idea here is to give the photographer the best chance of getting the shot they’re after by offering them as many tools as possible.
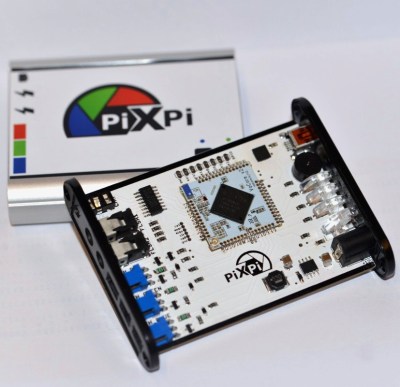
Essentially, PiXPi is a microcontroller that allows you to orchestrate your DSLR’s trigger, external flashes, and various other sensors and devices using an easy to use graphical programming interface from your smartphone. So for example, you could program the PiXPi to trigger your camera when it detected a loud enough noise.

But the device also allows you to be a bit more proactive. Rather than sitting back and waiting for a signal to fire off the camera, the PiXPi can directly take control of the action. As an example, [Krzysztof] has created an electronically triggered valve which can release a drop of liquid on command. Using PiXPi, the photographer can quickly put together a routine that triggers a drop, waits the few milliseconds it takes for it to hit the target, and then snaps a picture.

The goal of the 2019 Hackaday Prize is to develop a product fit for production, and naturally a huge part of that is having a well thought-out design. But if you’re ultimately looking to sell said product, it’s also very important to keep the needs of the end user in mind. To that end, we think [Krzysztof] has done a great job by not only making the system very flexible, but keeping it easy to use.

Continue reading “Take Control Of Your DSLR With PiXPi”

Lego-Powered Sub Built In A Water Jug

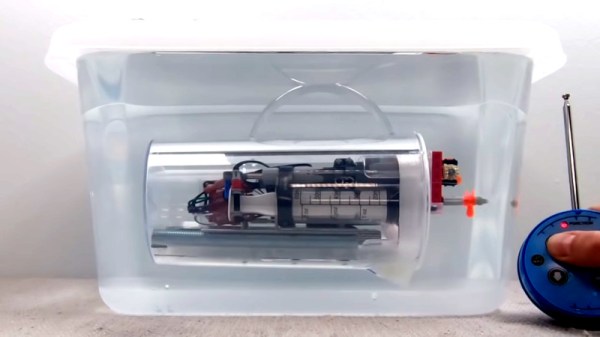
Submarines are universally considered cool, but bring several challenges to the RC modeller that aren’t there with land and air builds. Water ingress can ruin your project, and there’s always the possibility of it sinking to the bottom, never to return. That didn’t phase [Brick Experiment Channel], however, and thus a Lego sub was born. (Video embedded below the break.)

The sub uses a water jug as a hull. The video steps through the process of sealing the hull itself, before dealing with sealing the rotating propeller shafts. A large syringe is used as a ballast tank, with Lego motors used to actuate the tank and provide propulsion and steering. An existing RC submarine is cannabilized for parts, providing the necessary radio control hardware.

In testing, the sub performs admirably, with a few final tweaks necessary to improve the performance of the propellers. It’s not winning any races anytime soon, but it’s a functional underwater explorer that we’d love to take down the lake ourselves sometime.

We’ve seen Lego subs built before, even including missiles.

Continue reading “Lego-Powered Sub Built In A Water Jug”

A 3D-Printable Mecanum Wheeled Robot Platform

If your interest lies with robotics there are a multitude of different platforms for you to build. [Teemu Laurila] was frustrated with what was on offer, so designed his own with four-wheel double wishbone suspension and mecanum wheels for maximum flexibility.

It’s a design that has been through multiple revisions since its first iteration in 2015, and along the way it’s clear some thought has gone into it. That double wishbone suspension features an angle for a high ground clearance, and is fully sprung. Drive comes from small motor/gearboxes at each axle. The chassis meanwhile has plenty of space for a single-board computer, and has been specifically designed with the BeagleBone Black in mind.

This build isn’t fully DIY, as the mecanum wheels appear to be off-the-shelf items, but the rest of the project makes up for this. If you need to make your own, it’s hardly as though there aren’t any projects from which you can borrow components.

Continue reading “A 3D-Printable Mecanum Wheeled Robot Platform”

Russian EBike Goes Everywhere, Possibly Legal

Electric bikes may be taking the world by storm, but the world itself doesn’t have a single way of regulating ebikes’ use on public roads. Whether or not your ebike is legal to ride on the street or sidewalk where you live depends mostly on… where you live. If you’re lucky enough to live in a place where a bicycle is legally defined as having fewer than four wheels and capable of being powered by a human, though, this interesting bike from Russia might be the best homemade ebike we’ve ever seen. (Video embedded below the break.)

While some of the details of this build might be lost on those of us who do not know any Slavic languages, the video itself shows off the features of this electric vehicle build quite well. It has a custom built frame with two wheels up front, each with its own independent suspension, allowing it to traverse extremely rough terrain with ease even a mountain bike might not be able to achieve. It seems to be powered by a relatively simple rear hub in the single rear wheel, and can probably achieve speeds in the 20 km/h range while holding one passenger and possibly some cargo.

The impressive part of this build isn’t so much the electrification, but rather the suspension components. Anyone looking for an offroad vehicle may be able to take a bit of inspiration from this build. If you’re more interested in the drivetrain, there are plenty of other vehicles that use unique electric drivetrains to check out like this electric boat. And, if you happen to know Russian and see some other interesting details in this build that the native English speakers around here may have missed, leave them in the comments for us.

Continue reading “Russian EBike Goes Everywhere, Possibly Legal”

3D Printing A NAS Server Case

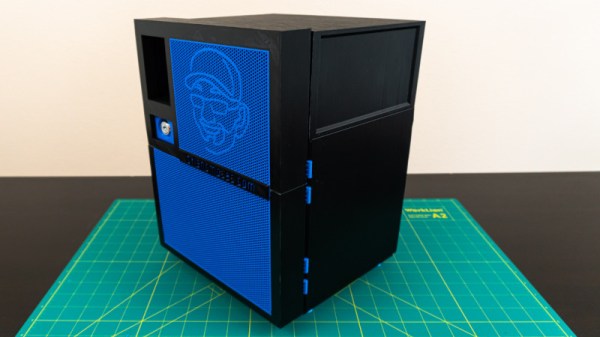
It’s good to back up, and despite that, few of us do. [Brian] we suspect is of the more diligent persuasion, given his strong enthusiasm for network attached storage. Recently, he found himself looking for a new case for his DIY build, and decided to go the 3D printed route.

The case is the design of one [Toby K], who sells the design online. [Brian] set out to produce the case himself using a Prusa i3, investing much time into the process. Total print time for the successful parts alone was over 227 hours, not including the failed parts and reprints.

Assembly caused some headaches, with various hinges and dovetails not fitting together perfectly first time. Not one to shy away from some proper down and dirty making, [Brian] was able to corral the various parts into fitting with a combination of delicate hammering, filing, and reprinting several broken pieces.

Overall, accounting for the filament used and hardware required, [Brian] spent over $200 producing the case. For those who just need a housing for their NAS, it doesn’t make a whole lot of financial sense. But for those who enjoy the build, and like the opportunity to customize their case as they see fit, the time and money can certainly be worth it. As [Brian] states, there aren’t too many cases on the market that ship with his logo on the grill.

We’ve seen other 3D printed case builds before, too. Video after the break.

Continue reading “3D Printing A NAS Server Case”

Lack Of Space Is No Longer An Excuse For Not Having A Pen Plotter

Pen plotters, those mechanical X-Y drawing machines that have in many cases been superseded by inkjet and other printer technologies, exert a fascination from a section of our community. Both analogue and digital machines are brought out of retirement for some impressive graphical effects, and we suspect that more than one of you wishes you had the space for one in your lives.

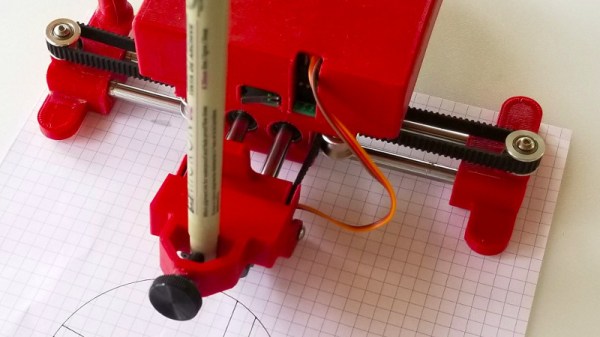
The good news is that you now no longer need room for a hefty piece of 1970s instrumentation, because the ever-inventive [Bart Dring] has produced a tiny 3D-printed plotter with an ESP32 at its heart. The ESP runs his ESP32 port of the Grbl firmware, and can handle a G-code file placed wirelessly upon the controller’s SD card.

The mechanism is particularly clever, using a single belt for both X and Y axes. The pen lift Z axis is a hinged design rather than a linear one, with a hobby servo doing the lifting. The hinge bearings are placed as close as possible to the paper surface to achieve an approximation to a vertical lift. You can see the machine in action in the video below the break, drawing its own self-portrait.

If you are a long-time reader you will recognise [Bart]’s work, he has appeared here quite a few times. His coaster-cutting machine and his CNC plotter badge are particularly memorable.

Continue reading “Lack Of Space Is No Longer An Excuse For Not Having A Pen Plotter”

Build Your Own LED Glow Poi

Spinning poi is an entertaining pastime, and LEDs can make a great addition to the experience. [MilanDer] built some LED poi of their very own, using a few maker staples along the way.

A 3D printed enclosure is first created, using “clear” PLA that in practice produces translucent white parts. This acts as a great diffuser for the APA102 LEDs inside. The LEDs are driven by an Arduino Pro Mini, which is fitted inside the enclosure along with a buck-boost converter, lithium battery and charge board. Finally, a strap is added to allow the poi to be spun easily by the user.

The visual effect is great, and through the use of an infrared receiver, the poi can be remotely controlled to deliver different RGB animations at the touch of a button. We’d love to see a group of spinners with synchronized colored poi thanks to a master controller, and this hardware would be more than capable of the task.

We’ve seen some advanced networked Poi before, too. If you’ve got a great LED build, be sure to let us know.