An Electronic Love Letter To The Wind

Home weather stations are a great way for hackers and makers to put their skills to practical use. After all, who wants to hear the current conditions for the whole city when they could setup their own station which drills that information down to their very own street? Such a setup doesn’t need to be any more complex than a temperature sensor wired up to a microcontroller, but then not all of us are quite the weather fanatic that [Richard] clearly is.

The system he’s built to monitor the wind over his home is, to put it mildly, incredible. We might not all share the obsession [Richard] apparently has with the wind, but we can certainly respect the thought and design that went into this comprehensive system. From his scratch built anemometer to the various ways he’s come up with to display the collected environmental data throughout his home, if this build doesn’t inspire you to hack together your own weather station then nothing will.
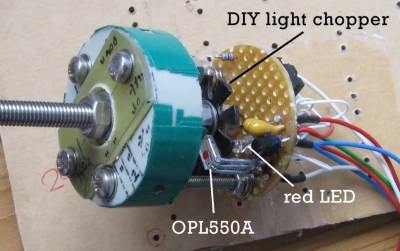
At the heart of the system is the anemometer itself, which makes use of several scavenged parts such as the bottom halves of plastic Easter eggs as wind cups. The cups spin on a short length of M5 threaded rod inside of a 635ZZ bearing, which ultimately rotates a “light chopper” placed between a red LED and a OPL550A optical sensor. In a particularly nice touch, [Richard] has even included a few power resistors arranged around the moving parts to use as a heater which keeps the device from freezing up when the temperature drops. The sensor creates eight digital pulses per revolution, and feeds data into the base station though a 30 meter (98 feet) cable.

From there, the base station uses an ESP8266 to upload wind and temperature data to ThingSpeak and Weather Underground to be viewed through their respective web interfaces and applications. The project really could have ended here and still been impressive in its own right, but the station also includes 433 MHz and NRF24L01 transmitters to send the data to the other display devices which [Richard] has designed.

The 433 MHZ display is built into the frame of a lantern, and shows the current time and temperature on an LED readout as well as historical wind and temperature graphs on a 2.2 inch ILI9341 TFT screen which [Richard] has rotated into a portrait layout. There’s a red light on top that blinks whenever a signal is received to show that the system is working, and even a touch sensor which can be used to turn off the TFT screen at a tap if you’re not interested in seeing the full charts.

The other display, which [Richard] calls the “picture frame” utilizes a dizzying array of single LEDs, a handful of digital LED readouts, and even an OLED screen for good measure. They all work together to show the current wind speed as well the averages for the past day in three hour segments. As this display features a real time display of current wind conditions and averages for as short a period of two minutes, it uses the NRF24L01 receiver to get data from the base station at a rate of 3 Hz.

In the past we’ve seen 3D printed weather stations, and of course some pretty simple affairs using little more than an ESP8266 board and some sensors. But few have ever put so much thought into how to present the collected data to the user. If you’re serious about knowing what it’s like outside the confines of your bunker, [Richard] has got some tricks to show you.

Continue reading “An Electronic Love Letter To The Wind”

Goodbye Chevy Volt, The Perfect Car For A Future That Never Was

A month ago General Motors announced plans to wind down production of several under-performers. At the forefront of news coverage on this are the consequences facing factories making those cars, and the people who work there. The human factor associated with the closing of these plants is real. But there is also another milestone marked by the cancellation of the Volt. Here at Hackaday, we choose to memorialize the soon-to-be-departed Chevrolet Volt. An obituary buried in corporate euphemisms is a whimper of an end for what was once their technological flagship car of the future.

Continue reading “Goodbye Chevy Volt, The Perfect Car For A Future That Never Was”

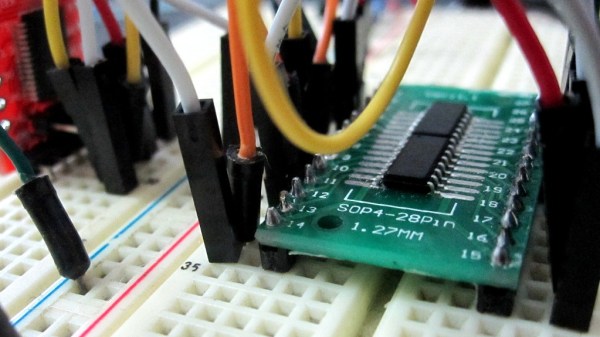
Being An SPI Slave Can Be Trickier Than It Appears

Interfacing with the outside world is a fairly common microcontroller task. Outside of certain use cases microcontrollers are arguably primarily useful because of how easily they can interface with other devices. If we just wanted to read and write some data we wouldn’t have gotten that Arduino! But some tasks are more common than others; for instance we’re used to being on the master side of the interface equation, not the slave side. (That’s the job for the TI engineer who designed the temperature sensor, right?) As [Pat] discovered when mocking out a missing SPI GPIO extender, sometimes playing the other role can contain unexpected difficulties.

The simple case for a SPI slave is exactly that: simple. SPI can be wonderful in its apparent simplicity. Unlike I2C there are no weird addressing schemes, read/write bits, stop and start clock conditions. You toggle a clock line and a bit of data comes out, as long as you have the right polarity schemes of course. As a slave device the basic algorithm is of commensurate complexity. Setup an interrupt on the clock pin, wait for your chip select to be asserted, and on each clock edge shift out the next bit of the current word. Check out [Pat]’s eminently readable code to see how simple it can be.

But that last little bit is where the complexity lies. When you’re the master it’s like being the apex predator, the king of the jungle, the head program manager. You dictate the tempo and everyone on the bus dances to the beat of your clock edge. Sure the datasheet for that SRAM says it can’t run faster than 8 MHz but do you really believe it? Not until you try driving that clock a little quicker to see if there’s not a speedier transfer to be had! When you’re the slave you have to have a bit ready every clock edge. Period. Missing even a single bit due to, say, an errant print statement will trash the rest of transaction in ways which are hard to detect and recover from. And your slave code needs to be able to detect those problems in order to reset for the next transaction. Getting stuck waiting to send the 8th bit of a transaction that has ended won’t do.

Check out [Pat]’s very friendly post for a nice refresher on SPI and their discoveries working through the problems of building a SPI slave. There are some helpful tips about how to keep things responsive in a device performing other tasks.

Arduino Fights Fire With… Water?

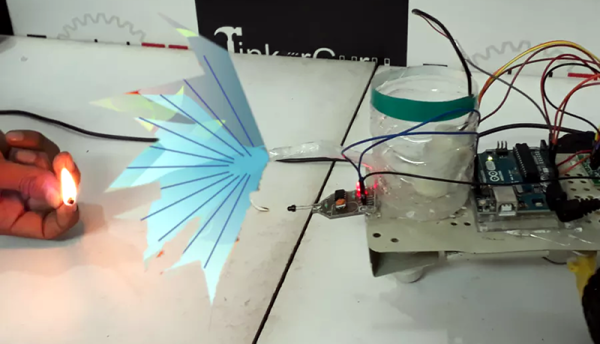
We don’t think we’d want to trust our fire safety to a robot carrying a few ounces of water, but as a demonstration or science project, [Tinker Guru’s] firefighting robot was an entertaining answer to the question: “What do I do with that flame sensor that came in the big box of Arduino sensors I bought from China?” You can see a video of the device below.

You can see, it is a pretty standard two-wheel robot with the drive wheels to the rear and a skid plate up front. There are a flame sensor and a water pump up forward, as well. You can probably guess, the device notices a flame and rushes to squirt water on it.

Continue reading “Arduino Fights Fire With… Water?”

Portable Pi Teensy Thumboard

Even on the go, there is no substitute for a physical keyboard with buttons that move and click. Sure, you could solder a bunch of tactile switches to some perfboard, but how about going all out and making something robust as [Anthony DiGirolamo] did for his Teensy Thumboard. Everything is insertion-mount so it is an approachable project for anyone who knows the dangerous end of a soldering iron, and that also makes it easy to hack on.

Each pin of the Teensy has an adjacent empty hole tied to it for easy access, and the serial data pins are exposed at the top of the board. All the holes use standard 0.1″ (2.54mm) spacing. The I/O points used by the keyboard are labeled, and the rest of them can use the space under the controller where proto-board style holes add some extra space for an IMU or whatever sensors suit your slant.

Most impressive is the shell, which is freely available on Thingiverse, where you can also find a bill of materials with links to everything you will need in case you don’t have drawers full of those tactile switches.

If this looks familiar, you have probably seen the PocketCHIP, and it is no secret that this project is an homage to that versatile pocket computer. We appreciate this kind of love for PocketCHIP, especially since they are now a limited commodity.

All About Ham Satellites

How hard is it to build a ground station to communicate with people via a satellite? Probably not as hard as you think. [Modern Ham] has a new video that shows just how easy it can be. It turns out that a cheap Chinese radio is all you need on the radio side. You do, however, benefit from having a bit of an antenna.

It isn’t unusual for people interested in technology to also be interested in space. So it isn’t surprising that many ham radio operators have tied space into the hobby. Some do radio astronomy, others bounce signals off the moon or meteors. Still others have launched satellites, though perhaps that’s not totally accurate since as far as we know all ham radio satellites have hitched rides on commercial rockets rather than being launched by hams themselves. Still, designing and operating a ham radio station in space is no small feat, but it has been done many times with each generation of satellite becoming more and more sophisticated.

Continue reading “All About Ham Satellites”

Building An ESP8266 Doorbell On Hard Mode

It certainly seems as though it should be an easy enough project; all [Miguel De Andrade] wanted was to receive a notification when somebody was pressing his doorbell, and thought it would be a good project to get his feet wet in the wonderful world of ESP8266 hacking. But as fate would have it, not everything went according to plan. In the end he got it sorted out, but it’s an interesting look at how even the “easy” projects can call the gremlins out of hiding.

Arguably, the problems started when [Miguel] picked up an ESP-01 module from a local electronics retailer. While the convenience of buying the hardware in a brick and mortar store can’t be overstated, it did mean he was stuck with a slightly more spartan experience compared to the more common ESP “development boards”. Programming it externally with a Teensy ended up not being much of an obstacle, but it did mean he was stuck with only two GPIO pins.

At any rate, with ESP in hand, the next step was figuring out how the existing bell and intercom system even worked. Unfortunately, after some experimentation [Miguel] found there was a bit more going on there than he’d hoped. According to his multimeter, the one line from the intercom sits at approximately 5 VDC when it’s open, and drops down to 2.5 VDC when pressed. If that wasn’t bad enough, picking up the handset to answer the intercom sent the voltage up to a microcontroller-killing 12 VDC. To complicate maters further, the supply line for the intercom was 23 VAC, so he’d need to rectify that somehow if he wanted to avoid a separate power supply for the ESP.

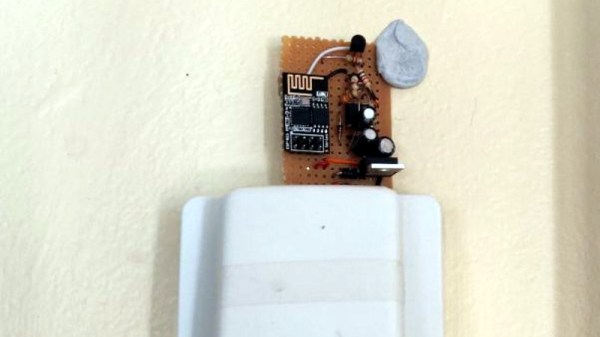
To turn this jumble of voltages into a nice clean 0 – 3.3 V signal for the ESP8266, he came up with a circuit based around the LM358 comparator that utilizes an LM117 regulator to power itself and the ESP at the same time. A couple of diodes are there to block the AC component from causing trouble, and an A2N2222A transistor is used as a buffer amplifier to boost the output of the comparator so it registers as a digital HIGH on the ESP. The circuit took a bit of fiddling to get sorted out, but in the end [Miguel] says it seems to get the job done.

You might think the problems were solved, but this is where it gets really annoying. The system would work fine for awhile, and then inexplicably go silent. In diagnosing the problem he realized that his circuit connected to GPIO_0 was inadvertently putting the ESP8266 into programming mode, since it was holding the pin LOW unless the intercom button was pressed. He assumed he could just move the circuit to the other GPIO pin, but as that one has the board’s LED on it, that caused its own problems. For now, [Miguel] hasn’t come up with a solution to this issue, and has learned to live with the fact that the system won’t come back up cleanly should it lose power for any reason.

If you’re looking for a slightly classier look than a scrap of perfboard stuck on the wall with what appears to be chewing gum, we’ve also seen the ESP8266 used in some more ornate doorbell setups. Of course if you still haven’t gotten your head wrapped around the whole Internet-connected button thing, you can always start with something a little easier.