Cheating AI Caught Hiding Data Using Steganography

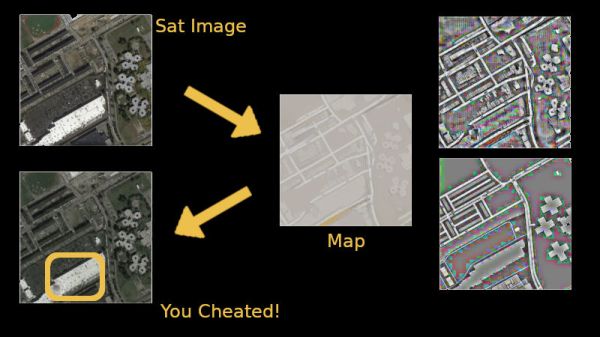
AI today is like a super fast kid going through school whose teachers need to be smarter than if not as quick. In an astonishing turn of events, a (satelite)image-to-(map)image conversion algorithm was found hiding a cheat-sheet of sorts while generating maps to appear as it if had ‘learned’ do the opposite effectively[PDF].

The CycleGAN is a network that excels at learning how to map image transformations such as converting any old photo into one that looks like a Van Gogh or Picasso. Another example would be to be able to take the image of a horse and add stripes to make it look like a zebra. The CycleGAN once trained can do the reverse as well, such as an example of taking a map and convert it into a satellite image. There are a number of ways this can be very useful but it was in this task that an experiment at Google went wrong.

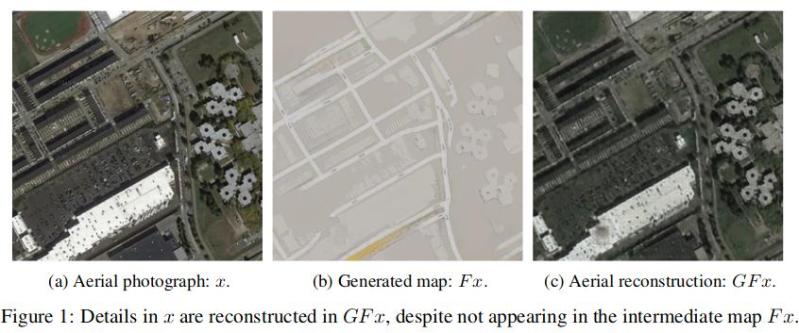
A mapping system started to perform too well and it was found that the system was not only able to regenerate images from maps but also add details like exhaust vents and skylights that would be impossible to predict from just a map. Upon inspection, it was found that the algorithm had learned to satisfy its learning parameters by hiding the image data into the generated map. This was invisible to the naked eye since the data was in the form of small color changes that would only be detected by a machine. How cool is that?!

This is similar to something called an ‘Adversarial Attack‘ where tiny amounts of hidden data in an image or other data-set will cause an AI to produce erroneous output. Small numbers of pixels could cause an AI to interpret a Panda as a Gibbon or the ocean as an open highway. Fortunately there are strategies to thwart such attacks but nothing is perfect.

You can do a lot with AI, such as reliably detecting objects on a Raspberry Pi, but with Facial Recognition possibly violating privacy some techniques to fool AI might actually come in handy.

A Low Cost VR Headset

Virtual reality systems have been at the forefront of development for several decades. While there are  commercial offerings now, it’s interesting to go back in time to when the systems were much more limited. [Colin Ord] recently completed his own VR system, modeled on available systems from 20-30 years ago, which gives us a look inside what those systems would have been like, as well as being built for a very low cost using today’s technology.

The core of this project is a head tracker, which uses two BBC Microbits as they have both the accelerometer and compass needed to achieve the project goals. It is also capable of tracking an item and its position in the virtual space. For this project, [Colin] built everything himself including the electronics and the programming. It also makes use of Google Cardboard to hold the screen, lenses, and sensors all in the headset. All of this keeps the costs down, unlike similar systems when they were first unveiled years ago.

The ground-up approach that this project takes is indeed commendable. Hopefully we can see the code released, and others can build upon this excellent work. You could even use it to take a virtual reality cycling tour of the UK.

Continue reading “A Low Cost VR Headset”

The Solderdoodle Open Source Iron Rides Again

Over the last year or so, cordless portable soldering irons have become all the rage. In fact, at this point a good number of Hackaday readers out there have likely traded in their full-size AC irons for a DC iron that’s only slightly larger than a pen. But before the big boom in portable irons, in the ye olden days of 2014, we brought you word of the open source Solderdoodle created by [Isaac Porras]. Based upon the Weller BP645 and featuring a 3D printed case, the DIY iron was designed to be charged from a standard USB port.

Now, [Isaac] is back with an updated version he calls the Solderdoodle Plus. It’s still based on the heating element from the Weller BP645, but now boasts twice the power, an improved 3D printed case, an intuitive touch-based user interface, and even some LED blinkenlights for good measure. As with the original Solderdoodle the hardware and software for the device are open source and you’re invited to build your own, though kits are also available through an already fully-funded Kickstarter campaign.

[Isaac] says that the temperature control functions on traditional corded soldering irons waste energy due to the large thermal mass they have to bring up to temperature. But with less thermal mass and a system of variable duty cycle pulsed power, he says the Solderdoodle Plus can do the same work as an old-school 60 watt iron while only consuming 10 watts. This allows the iron to maintain a constant 500°C for over an hour on the dual internal Panasonic NCR18500A lithium-ion batteries, and means you can charge it up with nothing more exotic than a micro USB cable.

Continue reading “The Solderdoodle Open Source Iron Rides Again”

Reset Your Router The Modern Way

Many Hackaday readers will be settling back into their lives after a holiday period crammed into some family matriarch’s house along with too many assorted relatives, having given up their speedy internet connection for whatever passes for broadband wherever Granny lives. The bargain-basement router supplied by the telephone company will have spent the period wilting under the pressure of a hoard of teenagers watching other teenagers inanities on YouTube, and the Christmas ritual of Resetting The Router will have been performed multiple times.

A very simple schematic for the resetter.

Wouldn’t it be nice if your router simply reset itself every time it crashed or the Internet connection went down? [Cyb3rn0id] has a solution (Italian original here), in the form of an ESP8266 that pings an online service every few seconds, and turns the router off and on again via a power relay in the event that the ping attempt is repeatedly unsuccessful. It’s brilliantly simple, requiring only a single GPIO and a MOSFET to fire the relay with an LED indicator for good measure, and it’s built upon a piece of prototyping board. The router power is switched on the low-voltage side for safety.

The software is pretty basic and has the WiFi credentials hard-coded into it, so we’re guessing a version with a web interface could be built. But as a personal device for easing the pain of router crashes it gets our vote despite that shortcoming.

This isn’t the first router resetter we have seen here, but a previous model still required human intervention.

The Mother Of All Demos, 50 Years On

If you’re like me, chances are pretty good that you’ve been taught that all the elements of the modern computer user interface — programs running in windows, menus, icons, WYSIWYG editing of text documents, and of course, the venerable computer mouse — descended from the hallowed halls of the Xerox Corporation’s Palo Alto Research Center in the early 1970s. And it’s certainly true that PARC developed these technologies and more, including the laser printer and object-oriented programming, all of which would grace first the workplaces of the world and later the homes of everyday people.

But none of these technologies would have existed without first having been conceived of by a man with a singular vision of computing. Douglas Engelbart pictured a future in which computers were tools to sharpen the human intellectual edge needed to solve the world’s problem, and he set out to invent systems to allow that. Reading a Twitter feed or scanning YouTube comments, one can argue with how well Engelbart’s vision worked out, but there’s no arguing with the fact that he invented almost all the trappings of modern human-computer interaction, and bestowed it upon the world in one massive demonstration that became known as “The Mother of All Demos.”

Continue reading “The Mother Of All Demos, 50 Years On”

2600-Inspired Handheld Brings The Faux Woodgrain

The Atari 2600 is a console from a very different time, when home appliances, furniture, and even automobiles were all covered in fake vinyl woodgrain veneer. Somehow it was the in thing for a decade, and then immediately became tacky overnight. Regardless, if you want to evoke the era, that’s what you do – and that’s exactly what [Christian] did with this handheld RetroPie build.

An early concept sketch shows off [Christian]’s art skills.
The technical side of things is fairly routine in these parts – a Pi Zero runs RetroPie so you can play emulated games from the mid-90s and earlier. It’s the visual presentation that we particularly enjoy. The look of the early Atari is evoked through clever use of materials. The body is in black plastic, with blocky red buttons for controls. It’s finished with a vinyl woodgrain applique around the screen, and we think it’s a wonderful aesthetic.

The files to print your own are available on Thingiverse, and [Christian] has provided a basic guide to sourcing similar parts. It’s all common stuff, readily available on eBay or elsewhere.

We love seeing retro throwbacks like this – the tiny Macintosh Plus from the 2017 Superconference is a particular highlight.

Compiling NodeMCU For The ESP32 With Support For Public-Private Key Encryption

When I began programming microcontrollers in 2003, I had picked up the Atmel STK-500 and learned assembler for their ATtiny and ATmega lines. At the time I thought it was great – the emulator and development boards were good, and I could add a microcontroller permanently to a project for a dollar. Then the ESP8266 came out.

I was pretty blown away by its features, switched platforms, except for timing-sensitive applications, and it’s been my chip of choice for a few years. A short while ago, a friend gave me an ESP32, the much faster, dual core version of the ESP8266. As I rarely used much of the computing power on the ESP8266, none of the features looked like game changers, and it remained a ‘desk ornament’ for a while.

About seven weeks ago, support for the libSodium Elliptic Curve Cryptography library was added. Cryptography is not the strongest feature of IoT devices, and some of the methods I’ve used on the ESP8266 were less than ideal. Being able to more easily perform public-private key encryption would be enough for me to consider switching hardware for some projects.

However, my preferred automated build tool for NodeMCU wasn’t available on the ESP32 yet. Compiling the firmware was required – this turned out to be a surprisingly user-friendly experience, so I thought I’d share it with you. If I had known it would be so quick, this chip wouldn’t have sat on my desk unused quite so long!  Continue reading “Compiling NodeMCU For The ESP32 With Support For Public-Private Key Encryption”