Rescue An Expensive Servo With Some Reverse Engineering

[Andrew] had a servo damaged by someone connecting the power supply to the wrong pins (whoops) which fried the microcontroller and a logic level shifter. With a bit of reverse engineering, he successfully restored basic servo functionality by writing some new code. The new code implements only basic features, but that’s enough to save the device from the junk bin.

FAULHABER 2232DBHHO ring any bells? Google came up empty.

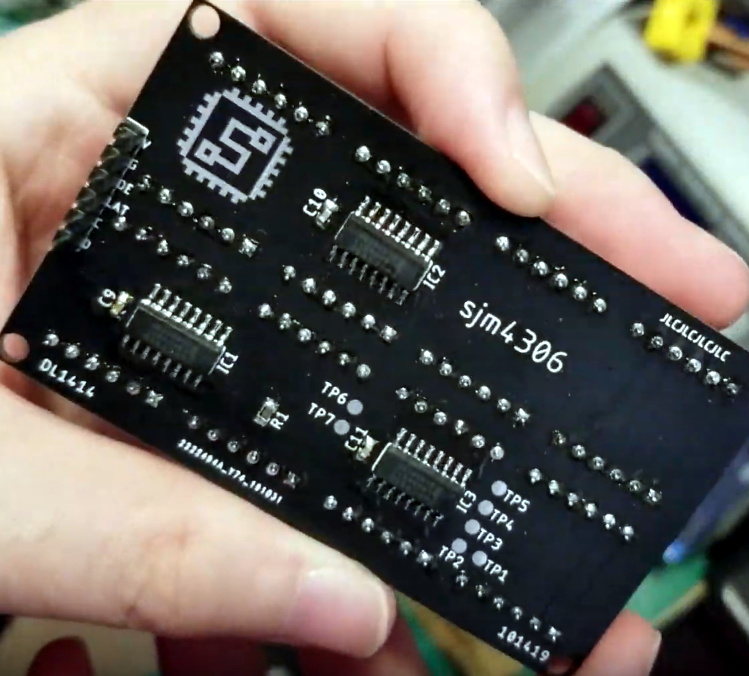
Why bother reverse engineering a servo? Well, if dollars are reasons then there are many for saving a HerkuleX DRS-0602 from the junk heap; they cost around 320 USD before shipping. Another reason to try is that the microcontroller turned out to be an AVR XMega, which gave [Andrew] confidence in writing some new code.

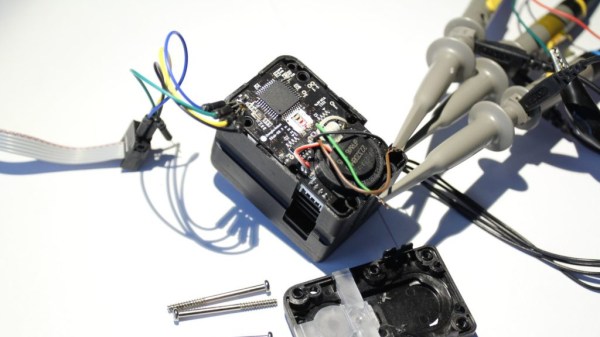
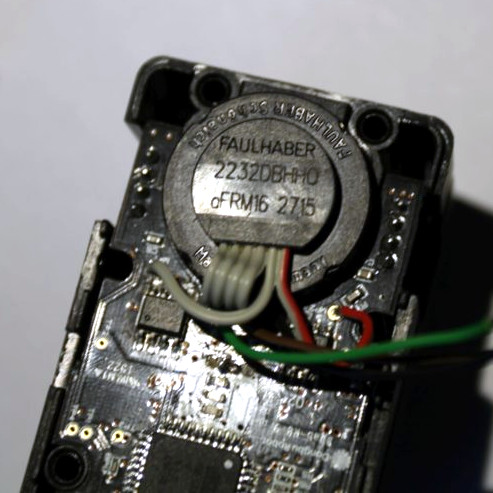
If you want to understand more about how these servos work, [Andrew] provides good photos of the insides and identifies the major components and their connections and functions. There are some mysteries (such as details of the motor and embedded encoder, which are FAULHABER 2232DBHHO) but [Andrew] figured out enough to write some basic code to allow the servo to work as a standard servo with a UART interface.

Sometimes curiosity drives reverse engineering and repair efforts, sometimes it’s cost, and sometimes it’s both. A $320 servo is certainly worth trying to save, and so are huge observatory telescopes with obsolete servo amps.

Cloned Gate Remote Does It (Slightly) Better

Ever make something just to see if you could? Yeah, we thought so. [serverframework] wanted to see if he could clone the remote that opens his neighborhood gate, inspired by the long distance ding-dong-ditch efforts of [Samy Kamkar].

This clone uses an ATtiny85 and an RF module to emulate and send the frequency that the gate is waiting for. To accomplish that, [serverframework] had to figure out both the operating frequency and the timing used by the remote. The crystal inside seemed to indicate 295 MHz, and a quick check of the device’s FCC registration confirmed it. Then he used an SDR dongle to watch the data coming across when he pressed the button, and ran it through Audacity to figure out the timing.

Unfortunately, the 295 MHz crystal is a rare beast, so [serverframework] had to transplant the original to the donor RF module. Then it was just a matter of programming the ATtiny85 to send the frequency with the right timing. It actually does a better job since the original has no timing crystal, and the ‘tiny is clocked with a standard 16 kHz oscillator. The code is available within [serverframework]’s excellent write-up, and you can see a tiny demo after the break.

There’s more than one way to clone a gate remote. This one leverages MQTT to turn friends’ phones into remotes.

Continue reading “Cloned Gate Remote Does It (Slightly) Better”

Globe Lamp Tracks The ISS For You

Assuming you don’t work at a major space agency, you probably don’t really need to know the exact location of the International Space Station at all times. If you’d like to know just because it’s cool, this lamp is for you.

The lamp is driven by a Wemos D1, which pulls in data on the space station’s current location from Open Notify. A stepper motor and servo motor serve to control a pan-tilt assembly, aiming a 405nm laser at the inside of a 3D printed globe to indicate the station’s position above Earth. As a nice touch, there’s also a ring of NeoPixel LEDs that are controlled to glow on the sunny side of the planet, too.

This is a fun project that makes it easy to know when to bust out your ham gear to chat to the team overhead, and would also make a great conversation starter. It’s not the first hardware ISS monitor we’ve seen, either! Video after the break.

Continue reading “Globe Lamp Tracks The ISS For You”

AI Knows If The Pitch Is On Target Before You Do

Pitching a baseball is about accuracy and speed. A swift ball on target is the goal, allowing the pitcher to strike out the batter. [Nick Bild] created an AI system that can determine a ball’s trajectory in mid-flight, based on a camera feed.

The system uses an NVIDIA Jetson AGX Xavier, fitted with a USB camera running at 100FPS. A Nerf tennis ball launcher is used to fire a ball towards the batter. Once triggered, the AI uses the camera to capture two successive images of the ball in flight. These images are fed into a convolutional neural network (CNN), and the software determines whether the ball is heading for the strike zone, or moving off-target. It uses this information to light a green or red LED respectively to alert the batter.

While such a system is unlikely to appear in professional baseball anytime soon, it shows the sheer capability of neural network systems to quickly and effectively analyse data in ways simply impossible for mere humans. [Nick]’s future goals involve running the system on faster hardware, and expanding it to determine effects like spin and more accurate positioning within the strike zone.

We’ve seen CNNs do everything from naming tomatoes to finding parking spaces. Video after the break.

Continue reading “AI Knows If The Pitch Is On Target Before You Do”

Tracking Wasted Time With A Ferrofluid Clock

We know this project is supposed to be about developing a fine-looking ferrofluid clock, and not about the value of procrastination. But after watching the video below, see if you don’t think that procrastination has taken these two students further than expected.

We first ran into [Simen] and [Amund] several months ago when they launched their ferrofluid project in a fit of “There’s got to be more to life than studying.” It seemed then that building a good-looking, functional ferrofluid display would be a temporary distraction, but the problems posed proved to be far deeper and thornier than either of the electrical engineering students expected. The idea is simple: contain a magnetic fluid between two transparent panels and create pixels using an array of electromagnets to move dots of the fluid around. The implementation, however, was another matter, with the ferrofluid itself proved to be the biggest obstacle. All the formulas they tried seemed to coagulate or degrade over time and tended to stain the glass. While the degradation was never fully sorted, they managed to work around the staining by careful cleaning of the glass and using a saturated brine solution to fill the container.

Backed by 252 electromagnets and drivers on ten custom PCBs, the video below shows the (mostly) finished panel in action as a clock. We’re impressed by the smoothness of the movements of each pixel, even if there’s a bit of drooping at the bottom thanks to gravity. As for the future of the project, that’s unclear since [Simen] is headed off for a NASA internship. We’re not sure if that was despite or because of this procrastination-driven project, but we congratulate him either way and look forward to hearing more from both of them in the future.

Continue reading “Tracking Wasted Time With A Ferrofluid Clock”

Chaining Together A 16×2 Bubble LED Display

We’ve recently noticed an uptick of interest in so-called “bubble displays”: vintage alphanumeric LEDs which are probably best remembered as being used in watches and calculators before the LCD took over. Today they’re available as surplus or even salvage for literally pennies, but unfortunately they only provide four or five characters to work with. Or rather they did, until [sjm4306] built a board that chains them into a 16×2 array.

For the princely sum of 71 cents each, [sjm4306] picked up ten HPDL-1414 displays, each capable of showing four characters. He then designed a PCB that would accept eight of the displays at once, and even thought ahead to use headers so they could be pulled out and swapped as needed. Of course mounting them is only half the battle, you still need to drive the things.

Each display has its own dedicated driver chip on board, but trying to address each one individually would take far too many pins. So [sjm4306] opted to use a trio of 74HC595 shift registers, allowing him to toggle the three dozen pins necessary over SPI from a microcontroller. He’s even written up a little library and some example code that you can grab on the project’s Hackaday.io page.

Unfortunately, after all his hard work, tragedy struck. As these displays were a couple decades old given their date code, [sjm4306] thought he would clean them up with a bit of alcohol before their big video debut. But whatever plastic the clear panels are made of didn’t take kindly to the IPA, and they all shattered. They still work, but it’s definitely a quirk to keep in mind if you pick up some of these vintage displays to play with yourself.

In the past we’ve seen a much smaller PCB that allowed similar displays to more easily be interfaced with modern microcontrollers; perfect if you just want to bang out a few retro LED characters with a minimum of fuss.

Continue reading “Chaining Together A 16×2 Bubble LED Display”

With PowerCore And FluxLamp, Reflow Is Possible

[nathan] sends in this combo of projects which combine to make a very interesting reflow oven.

First is PowerCore which has two microcontrollers, an ATmega and a ESP8366 working in tandem to turn the AC on and off at set intervals. A GLCD displays the current profiles and WiFi allows for remote control as well. Input is handled by a momentary switch rotary controller. He decided to go this route after reading forums on the commercial controllers and deciding they needed too much fiddling and weren’t hacker friendly enough.

The PowerCore then attaches to a halogen work light. He took the front glass off the halogen light and covered it in aluminum foil. This becomes the base of the oven. The PowerCore and a sensor are attached to the back. Using the lighting element as a heating one makes sense and, as we can see from the curves, appears to provide a very accurate response.

On top of all this [nathan] has documented the project beautifully. The small size and great control bump it way up in our list of reflow builds to recommend.