Spectrum Chiptunes On An STM

Some of us here at Hackaday are suckers for a bit of chiptune music as the backdrop for many excellent times. The authentic way to create chiptunes is of course the original hardware, but in 2019 it’s far more common to do so with an emulator on a modern computer. That computer doesn’t have to sport a high-end processor and desktop operating system though, as [Deater] shows us with his ZX spectrum chiptune player on an STM32L46G Discovery board.

The impetus for the project came he tells us while teaching students to code simple sine wave music players, having code already in the bag for emulating the classic AY-3-8910 sound chip on the Raspberry Pi and the Apple II he decided to port that to the STM32L476 dev board. An earlier version used the internal DAC, but this was refined to send I2S data to an external DAC. The code can be had from GitHub (confusingly buried among code for an LED driver), and we’ve attached a video below of it playing some chiptune goodness.

Of course, Sinclair chiptunes don’t grab all the limelight. There have been plenty of Nintendo and Sega players too. You might also recognize [Deater] from his non-chiptune work, porting Portal to the Apple ][.

Continue reading “Spectrum Chiptunes On An STM”

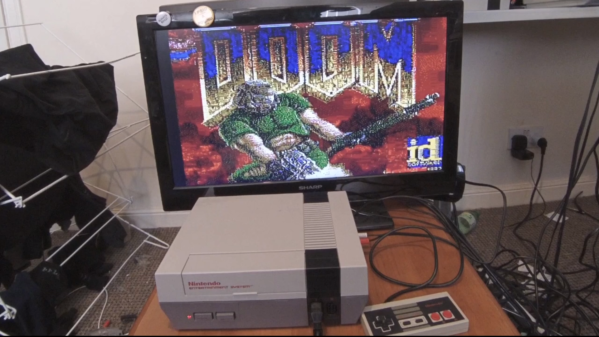
Doom On The NES

“But can it run Doom?” is perhaps the final test of hacking a platform. From calculators to thermostats, we’ve seen Doom shoehorned into a lot of different pieces of hardware. Many times we’re left scratching our heads at the mashup, and this is no exception.

[TheRasteri] wasn’t satisfied with the existing ports of Doom, so he decided to bring the classic game to a classic console, the NES. In the video embedded after the break, he helpfully points out the system requirements for running Doom, and compares them with the specifications of the NES. Spoilers: not nearly enough.

How did he manage the feat? Taking inspiration from Nintendo’s own SuperFX chip, he embedded a co-processor in the cartridge, and fed the video stream from the cartridge back into the NES. It might not be fair to call it a co-processor, since it’s a Raspberry Pi with thousands of times the processing power of the 6502 that powers the NES. The idea might seem familiar, and in fact it was partially inspired by [Tom7]’s similar hack last year.

Using a Cypress USB controller to feed the graphics bus, [TheRasteri] is able to run Doom on the Raspberry Pi, take the visuals from the game, and convert them into blocks of graphics the NES expects to load from the cartridge. The best trick is that he apparently managed to squeeze everything into a normal NES cartridge. He plans to release a build video on his channel, so keep an eye out.

Meanwhile, don’t forget to take a look at those calculators and thermostats we mentioned.

Continue reading “Doom On The NES”

Autodrop3D Continues Working At 3D Printer Automation

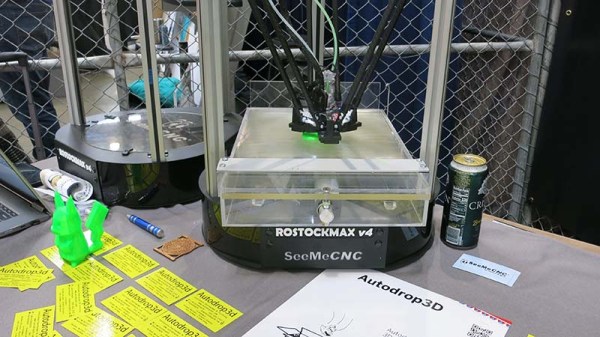
It is an unfortunate fact that 3D printers spend most of their time sitting idle, waiting for a human to remove finished prints or waiting for the next print to start. Hackers see such inefficiency as an open invitation to devise a better way, and we’ve seen several innovative ideas come across these pages. Some have since been abandoned, but others have kept going. At Maker Faire Bay Area 2019 we had the chance to revisit one presented as Autodrop3D.

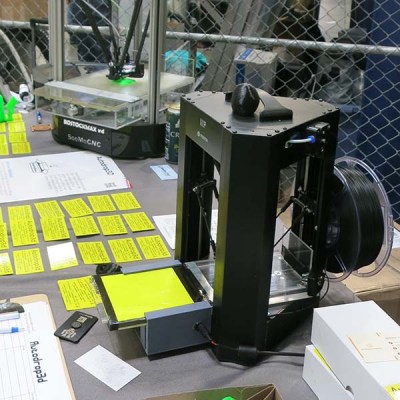
We saw a much earlier iteration entered in our Hackaday Prize in 2017 and it was fascinating to see how the basic ideas have developed over the past few years. The most visible component of the system is their print ejection system, which has greatly improved in robustness. Because the mechanism modifies the print bed and adds significant mass, it is best suited to delta printers as their print bed remains static. The concept might be adaptable to printers where the print bed only has to move along Z axis, but for now the team stays focused on deltas. There were two implementations on display at Maker Faire: a large one built on a SeeMeCNC RostockMAX v4, and a small one built on a Monoprice Mini Delta.

The ejection system is novel enough by itself, but the hardware is only one part of the end-to-end Autodrop3D vision. Their full software pipeline starts with web-based CAD, to integrated slicing, to print queue management, before G-code is fed to a printer equipped with their ejection system.

We admire inventors who keep working away at turning their vision to reality, and we look forward to seeing what’s new the next time we meet this team. In the meantime, if you like the idea of an automated print ejection mechanism but want more cartoon style, look at this invention from MatterHackers.

Repurposed Plastic Protects PCBs

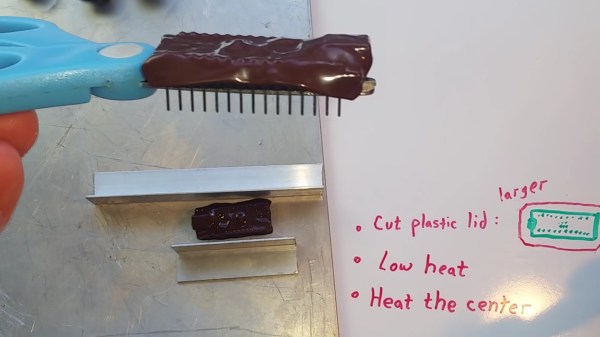
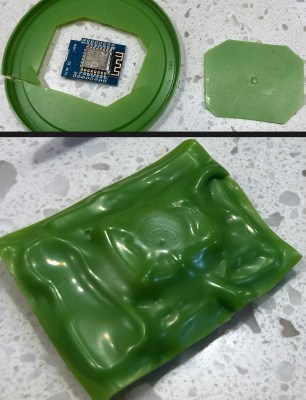
An errant wire snipping across the wrong electrical pins spells the release of your magic smoke. Even if you are lucky, stray parts are the root of boundless malfunctions from disruptive to deadly. [TheRainHarvester] shares his trick for covering an Arduino Nano with some scrap plastic most of us have sitting in the recycling bin. The video is also after the break. He calls this potting, but we would argue it is a custom-made cover.

The hack is to cut a bit of plastic from food container lids, often HDPE or plastic #2. Trim a piece of it a tad larger than your unprotected board, and find a way to hold it in place so you can blast it with a heat gun. When we try this at one of our Hackaday remote labs and apply a dab of hot glue between the board and some green plastic it works well. The video suggests a metal jig which would be logical when making more than one. YouTube commenter and tip submitter [Keith o] suggests a vacuum former for a tighter fit, and we wouldn’t mind seeing custom window cutouts for access to critical board segments such as DIP switches or trimmers.

We understand why shorted wires are a problem, especially when you daisy-chain three power supplies as happened in one of [TheRainHarvester]’s previous videos.

Continue reading “Repurposed Plastic Protects PCBs”

Designing A Drone To Fire From A Grenade Launcher

You might think that tiny autonomous drones that can be fired out of a standard 40 mm grenade launcher for rapid deployment would be the kind of thing the military would love to get their hands on. Which is true, of course, and a number of companies are working on the idea for police and military applications. But [Glytch] thinks the technology could also be used for search and rescue operations, so he’s working on creating a version for us civilians.

During his presentation “3D Printing Canister-Launchable Drones for City-Scale Wardriving” at the 2019 CircleCityCon, [Glytch] gave an overview of his progress towards creating a small fixed-wing Unmanned Aerial Vehicle (UAV) that can be built even by those of us who don’t have the budgets of a three letter government agency. He’s not at the point where he can do a test launch just yet, but the design is coming along nicely, and we’re extremely interested in seeing where it goes from here.
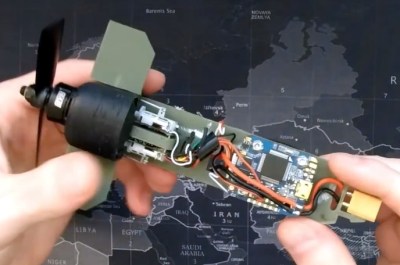
The only way you’re fitting a winged aircraft into the bore of a 40 mm launcher is by folding it up, and so far, that’s where [Glytch] has directed most of his efforts. The wings of his UAV will use a rigid leading edge that folds flat until deployment. When in flight mode, ripstop nylon attached between the body of the drone and the leading edge will be pulled taught to form the actual wing surface; think of it sort of like a bat’s wing. A similar trick will be used for the two control surfaces at the rear of the craft.

Internally, the UAV is using all off-the-shelf components which [Glytch] hopes will keep it cheap enough that they could eventually be mass produced. As he explained in a recent YouTube video, the motor, speed controller, receiver, and flight controller, are all the sort of thing you’d expect to find in a small RC quadcopter. To make it easier to manage the UAV in the field, the batteries and payload will be housed in a detachable nose cone; allowing the user to rapidly configure the hardware for different missions.

Right now, [Glytch] says the biggest obstacle keeping his drone out of the air is finding a foldable propeller with the specific characteristics he requires. Unable to find anything commercially available, he’s currently looking into designing it himself and having it 3D printed on an SLA machine. He also needs to design a sabot to hold the drone as it travels through the barrel of the launcher. Incidentally, he’s currently testing his design with an Airsoft grenade launcher, as he doesn’t want to wade through the paperwork involved in getting the real deal.

[Glytch] is no stranger to the world of high-tech UAVs. The “Watch Dog” inspired hacking drone he created last year was a huge hit, and he’s recently been working on a HD video and telemetry link over WiFi with the Raspberry Pi Zero for his flying creations.

Continue reading “Designing A Drone To Fire From A Grenade Launcher”

The Finest Linux Tablet You Can Build

For the last few years now, we’ve all had access to tiny, affordable Systems on a Module. These wunderchips are complete Linux systems with WiFi, a halfway decent GPU, and enough memory to run a real system. This is the perfect platform to base a tablet build on, the only problem is that someone has to actually do it. The DLT One is the ‘Damn Linux Tablet’ from [Prof. Fartsparkle]. It’s the answer to the question of when someone is going to build a tablet computer around one of these cheap Systems on a Chip that are floating around.

With many modules to choose from, the first task is actually choosing one of these Linux modules. [Fartsparkle] ended up with the Nvidia Jetson Nano, an impressive little board that has one distinct advantage: it’s drop-in compatable with the Raspberry Pi Compute Module, the Raspberry Pi-on-an-SODIMM. Given a single chassis, [Prof. Fartsparkle] can simply upgrade his tablet by getting a newer version of the Jetson Nano (or the Compute Module).

The current state of the board is basically an SODIMM socket on a board, with breakouts for Ethernet, a power jack, USB, and HDMI. That’s all there is to it, and design on the tablet chassis is ongoing.

Future updates for this tablet build will include USB-C PD, an mPCI-E connector that would allow for M.2 storage, LTE in some form or another and a dock that would allow you to turn this into a Surface-like laptop. It’s an amazing build, and one of the best entries we’ve seen in this year’s Hackaday Prize.

Fablab Saigon Celebrates A Belated Arduino Day

Okay, we’ve just left May and stepped into June, why are we talking about Arduino Day — traditionally a March 16th event where makers congregate and share projects? I live in Ho Chi Minh City, and the event tends to take place in mid-May, but the enthusiasm and collaborative spirit are just as strong. Organized by the awesome local maker group Fablab Saigon with the venue provided by Intek Institute, there were some neat projects on display along with some talks from local companies.

The first thing that struck me about the event was how young the maker movement is here – most attendees were still in high school or early university. By contrast, I was 23 when I first learned to use AVR microcontrollers with assembly language (by the time Arduino started to get traction the boat effectively missed me). I couldn’t help but feel like a bit of a relic, at least until we all started talking excitedly about robots (I had brought a couple). It seems that geeking out about electronics is the great equalizer which knows no age limits.

Continue reading “Fablab Saigon Celebrates A Belated Arduino Day”