Generate 3D Printable QR Codes With This Web Tool

Since most people are carrying a camera-equipped computer in their pockets these days, QR codes can be a great way to easily share short snippets of information. You can put one on your business card so people can quickly access your contact information, or on your living room wall with your network’s SSID and encryption key. The design of QR codes also make them well suited to 3D printing, and thanks to a new web-based tool, you can generate your own custom STL in seconds.

Created by [Felix Stein], the website provides an easy to use interface for the many options possible with QR codes. Obviously you have full control over the actual content of the code, be it a simple URL or a something more specific like a pre-formatted SMS message. But you can also tweak physical parameters like size and thickness.

Once you’re happy with the 3D preview, you can have the website generate an STL for either single or multi-extrusion printers. For those of us who are puttering along with single extruder machines, you’ll need to swap the filament color at the appropriate layer manually. With so many variables involved, you’ll also need figure out which layer the swap should happen on your own.

Incidentally, this is an excellent example of where STL leaves something to be desired. When using a format like 3MF, color and material information could be baked right into the model. Once opened in a sufficiently modern slicer, all the tricky bits would automatically sorted out. Or at least, that’s what Prusa Research is hoping for.


USB Password Keeper Runs On Tiny Chip

The most important rule of password use, especially when used for online logins, is to avoid reusing passwords. From there, one’s method of keeping track of multiple passwords can vary considerably. While memorization is an option in theory, in practice a lot of people make use of a password manager like Lastpass or KeePass. For those with increased security concerns, though, you may want to implement a USB password keeper like this one based on an ATtiny.

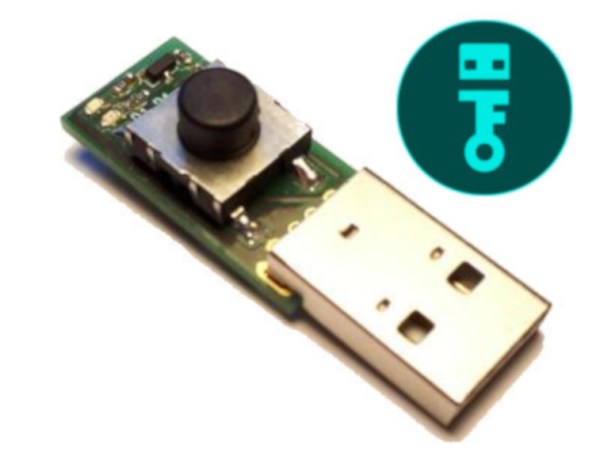
This password keeper, called “snopf”, is a USB device with an ATtiny85 which adds a layer of separation to password keeping that increases security substantially. Passwords are created by the USB device itself using a 128-bit key to generate the passwords, which are physically detached from the computer. Password requests are made by the computer to the USB device, but the user must push a button on the snopf in order to send the password to the computer. It does this by emulating a keyboard, keeping the password information off of the computer’s clipboard.

Of course, snopf isn’t perfectly secure, and the project’s creator [Hajo] goes into detail on the project’s page about some of the potential vulnerabilities. For most use cases, though, none of these are of serious concern. Upgrading your password keeper to a physical device is likely to be a huge security improvement regardless, and one was actually developed on Hackaday a few years ago.

A 3.3 V Tube Preamp Without An Inverter

If you’ve ever worked with vacuum tubes, you’ll probably have a healthy appreciation for high voltage power supplies. These components require higher potentials to get those electrons moving, or so we’re told. It’s not the whole truth though, as [Albert van Dalen] demonstrates with his tube preamplifier running from only 3.3 V. If your first thought is that he must have made a flyback converter to step that voltage up to something more useful then you’re in for a surprise, because the single 6J6 pentode really does run from just 3.3 volts. Even its heater, normally supplied with 6.3 V, takes the lower voltage.

The circuit appears at first sight to be a conventional single-ended design, but closer examination reveals a grid bias circuit more reminiscent of a bipolar transistor. This results in a positive grid voltage rather than the more usual negative, and an unusually high 0.3 mA grid current. The cathode current is only  0.15 mA, but the preamplifier delivers a 3.5x gain. There is more detail on his website.

It would be interesting to subject this circuit to a full audio analysis and comparison with a more conventional design. As with so much in the world of audio there’s some smoke and mirrors around what constitutes the so-called “valve sound”, and it’s a question whether the satisfaction comes through the sound itself or the bragging rights of having a unit with a vacuum tube on show.  Still, this is a simple enough design which takes few resources to build, so we look forward to seeing further experimentation. Careful though – down the vacuum audio route can lie folly.

This PIC Is A Squarewave Generator

When we use a microcontroller to flip a few GPIOs or talk SPI to a peripheral chip, we are often overlooking that it will usually contain an array of built-in peripherals that were once the preserve of extra hardware. Analogue ports, timers, UARTs, and clock generators, to name just a few. [Giovanni Bernardo] has been experimenting with one of these, the internal frequency synthesiser on many PIC microcontrollers, and he’s  produced a handy square wave generator for which he’s placed code on GitHub and produced a write-up (Italian language, Google translate link).

The board used is a PIC16F375 Curiosity Nano, and code takes input from a rotary encoder to set the frequency, with a button to select different step sizes and an alphanumeric LCD display to show the current settings. Frequencies from 1 Hz to 15 MHz are possible, with a clever switch between two of the PICs internal clocks to be used as the reference frequency. Stability depends upon whatever source the PIC uses for its own clock, and while we suspect that will be enough for most users it’s not inconceivable that the PIC could be clocked from a GPS-disciplined source or similar were there a requirement for it.

There are plenty of ways to generate square waves from a microcontroller. Most projects use waveform generator ICs.

A Very Buttoned Up Raspberry Pi Media Server

Projects that turn the Raspberry Pi into a low-cost Network Attached Storage (NAS) solution are very common; all you need is the right software, the Pi itself, and some USB storage devices. But unless you particularly like the “Medusa” look, with loose cables running all over the place, you’ll probably want to put the hardware into a suitable enclosure. Unfortunately, that’s where the somewhat unusual layout of the Pi can make things tricky.

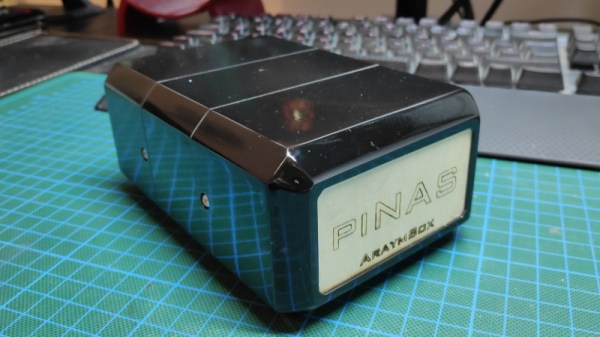
Which is why [AraymBox] came up with this unique “capsule” enclosure for the Raspberry Pi and two USB-attached hard drives. Every effort has been made to keep the outside of this design as clean and streamlined as possible. The asymmetrical loops of wires that we so often see on other projects are gone, with everything been brought inside thanks to some clever wiring. This enclosure looks like a professional product, and if you’re willing to put in the effort, you can have one to call your own.

The good news is that the 3D printed enclosure only has four parts, albeit rather large ones, and none of which require support material. So it should be an easy print even on a relatively low-end machine. Of course, you’re not going to get that futuristic metallic look without a little work. You’ll need to do a considerable amount of sanding, filling, and paint work to get that kind of a surface finish. Then again, that rough “just printed” look has a certain cyberpunk appeal to it as well.

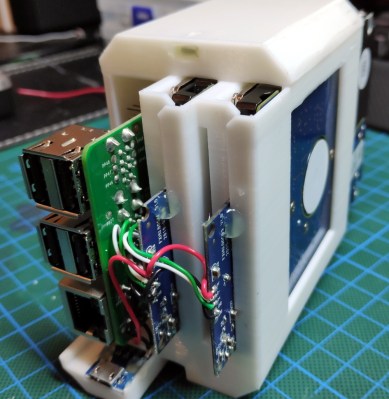
But the printed enclosure is only half the battle. Inside, [AraymBox] has soldered the USB to SATA adapter cables directly to the Raspberry Pi to keep things tight and compact. A micro USB breakout board was then used to add a power connector on the back of the device where the Ethernet and USB ports are, solving the issue of having one lonely USB cable coming out of the side of the case.

In the past we’ve seen other attempts to create a 3D printable enclosure for Pi servers, with varying levels of success. While some would argue that the better solution is to just throw the Pi and the drives in a large enough enclosure that it doesn’t matter what the wiring looks like, we appreciate the effort that some hackers are willing to put in to make something custom.

Hacking Multiplication: Binary Multiply On Paper

We’ve often noted that whether had ancient man known binary, we could all count to 1023 on our fingers. We thought about that while watching [Numberphile’s] latest video about “Russian” multiplication (see below). Apparently, the method dates back quite a way, sometimes known as Ethiopian or peasant multiplication. Even the ancient Egyptians did a form of it.

If you’ve ever written long multiplication code for a microcontroller, you can probably tell how this works. Each halving of the number amounts to a right shift. Each doubling is a left shift. Throwing out the even numbers means you only take the values when the least-significant bit is zero. Booth’s algorithm is more efficient, but the “Russian” method is simple to do on paper.

Continue reading “Hacking Multiplication: Binary Multiply On Paper”

Stylish Outfit Packs A Solar Charging Rig

Being out and about with your devices rapidly running out of battery power can rapidly turn into a sticky situation. Suddenly you find yourself unable to hail rideshares and incapable of transferring money around. For the fashion conscious who wish to avoid this, [Kitty Yeung]’s design may be a valuable addition to their summer closet.

The project starts with [Kitty] sewing an elegant bodice and shorts out of a silky silver material. This fabric tends to fray when cut, so fabric glue and iron-on tape was used to protect the edges. This also makes sure the garment doesn’t fall to pieces when washed or worn often. Ribbons, pockets, and other features were designed into the garments to integrate them with hardware to enable the garments to act as a portable charging solution. 3D-printed brackets are affixed to the shoulders, holding a solar panel in an upward-facing angle to catch a good amount of sun. The panel chosen integrates circuitry to output a nice, clean 5V output for charging devices over USB.

It’s a fashionable outfit that also packs useful hardware, and we agree with [Kitty] that it really would be perfect for Burning Man. The cone hat was a nice touch, too. It’s not the first time we’ve heard from [Kitty] either – she appeared as a speaker at 2018’s Hackaday Superconference, too!