Bodge Wire Saves A Vintage Mac SE/30 From The Heap

Anyone who pokes around old electronics knows that age is not kind to capacitors. If you’ve got a gadget with a few decades on the clock, there’s an excellent chance that some of its capacitors are either on the verge of failure or have already given up the ghost. Preemptively swapping them out is common in retrocomputing circles, but what do you do if your precious computer has already fallen victim to a troublesome electrolytic?

That’s the situation that [Ronan Gaillard] recently found himself in when he booted up his Mac SE/30 and was greeted with a zebra-like pattern on the screen. The collected wisdom of the Internet told him that some bad caps were almost certainly to blame, though a visual inspection failed to turn up anything too suspicious. Knowing the clock was ticking either way, he replaced all the capacitors on the Mac’s board and gave the whole thing a good cleaning.

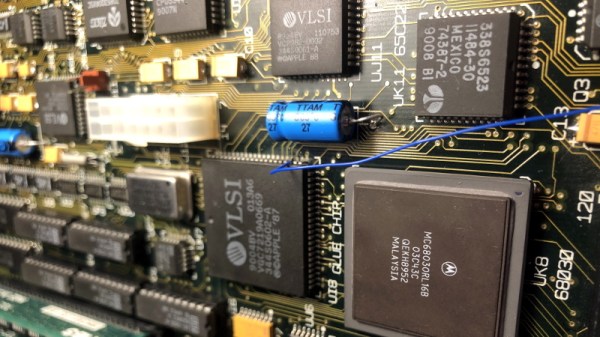
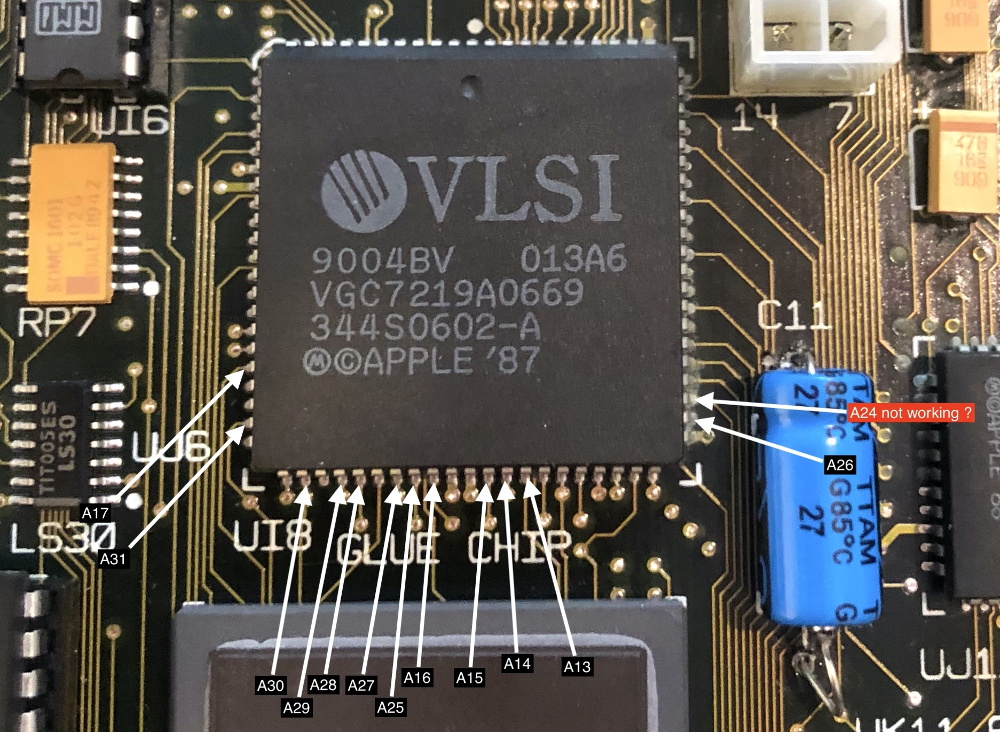
Unfortunately, nothing changed. This caught [Ronan] a bit by surprise, and he took another trip down the rabbit hole to try and find more information. Armed with schematics for the machine, he started manually checking the continuity of all the traces between the ROM and CPU. But again, he came up empty handed. He continued the process for the RAM and Glue Chip, and eventually discovered that trace A24 wasn’t connected. Following the course it took across the board, he realized it ran right under the C11 axial capacitor he’d replaced earlier.

Suddenly, it all made sense. The capacitor must have leaked, corroded the trace underneath in a nearly imperceptible way, and cut off a vital link between the computer’s components. To confirm his suspicions, [Ronan] used a bodge wire to connect both ends of A24, which brought the 30+ year old computer roaring back to life. Well, not so much a roar since it turns out the floppy drive was also shot…but that’s a fix for another day.

It seems like every hardware hacker has a bad capacitor story. From vintage portable typewriters to the lowly home router, these little devils and the damage they can do should always be one of the first things you check if a piece of hardware is acting up.

Brassy, Classy WiFi Clock Shows Weather, Too

Circuit sculpture is a great way to elevate your soldering and electronics skills to the realm of three-dimensional art. In this case, art can be practical, too. Take [romaindurocher]’s interactive WiFi clock for example. Left alone, the clock cycles through showing the time, temperature, and if applicable, the precipitation forecast.

But [romain] doesn’t have to watch and wait for the info they want. Thanks to an IR proximity sensor, [romain] can interrupt the cycle and get the date, time, temperature, or even a smiley animation depending on the number of hand passes over the sensor. The clock itself is based on an Adafruit Feather HUZZAH ESP8266 and a Featherwing display. It uses the OpenWeather API to retrieve all the information.

We really like the way this looks, and the angle reminds us of oscilloscopes and other lab equipment. If you want to make your own version, this project is wide open, though the hardest part would be making it look as clean as [romain] did. Take a second and check out the brief demo after the break. It’s a wonderful entry in our Circuit Sculpture Challenge which is accepting entries for ten more days.

Not so much into straight lines and utility? Circuit sculpture takes many forms, some of them human.

Continue reading “Brassy, Classy WiFi Clock Shows Weather, Too”

Flexible Actuators Spring Into Action

Most experiments in flexible robot actuators are based around pneumatics, but [Ayato Kanada] and [Tomoaki Mashimo] has been working on using a coiled spring as the moving component of a linear actuator. Named the flexible ultrasonic motor (FUSM), [Yunosuke Sato] built on top of their work and assembled a pair of FUSM into a closed-loop actuator with motion control in two dimensions.

A single FUSM is pretty interesting by itself, its coiled spring is the only mechanical moving part. An earlier paper published by [Kanada] and [Mashimo] laid out how to push the spring through a hole in a metal block acting as the stator of this motor. Piezoelectric devices attached to that block minutely distorts it in a controlled manner resulting in linear motion of the spring.

For closed-loop feedback, electrical resistance from the free end of the spring to the stator block can be measured and converted to linear distance to within a few millimeters. However, the acting end of the spring might be deformed via stretching or bending, which made calculating its actual position difficult. Accounting for such deformation is a future topic for this group of researchers.

This work was presented at IROS2020 which like many other conferences this year, moved online and became IROS On-Demand. After a no-cost online registration we can watch the 12-minute recorded presentation on this project or any other at the conference. The video includes gems such as an exaggerated animation of stator block deformation to illustrate how a FUSM works, and an example of the position calculation challenge where the intended circular motion actually resulted in an oval.

Speaking of conferences that have moved online, we have our own Hackaday Remoticon coming up soon!

Continue reading “Flexible Actuators Spring Into Action”

Big Workshop Clock Is 3D Printing Done Right

Time is something uniquely important to humans, and they remain the only creatures on the planet to build devices to regularly track its progress. [Ivan Miranda] is one such creature, and built a giant 7-segment clock for his workshop that really ties the room together.

The clock is a testament to [Ivan]’s design skills in the 3D printed space. Taking advantage of his large format printer, each segment consists of a front panel, large single-piece diffuser, LED carrier, and backing plate. There are plenty of nice touches, from the interlocking ridges between each digit, to integral printed arrows on the inside that guide installation of the LED strips. Fit and finish approaches the level of a commercial product, a reward for [Ivan]’s years of practice in the field.

Electronically, an ESP8266 runs the show, synchronizing the time over its in-built WiFi connection. Each segment contains 9 WS2812B LEDs, wired up in a single long strip that’s addressed by the microcontroller. This means that the segments can be lit up to any color of the rainbow, though [Ivan] is a man who best appreciates the look of classic red.

[Ivan]’s long been a proponent of big 3D-printed builds — his tank-tracked electric skateboard is a particularly good example. Video after the break.

Continue reading “Big Workshop Clock Is 3D Printing Done Right”

Burning Your Own PS1 Modchip Is Easy

The original Sony PlayStation came out just in time for CD piracy to really start taking off. Aware of this threat to sales, Sony engineers included a copy protection and region locking mechanism that placated executives and annoyed end-users alike. [MattKC] explores how this copy protection worked, and how you can burn your own modchip at home for just a few dollars.

Sony’s method of copy protection relied on steps taken during the manufacturing process, pressing a special groove into the game media that regular CD burners couldn’t replicate, a topic our own [Drew Littrell] has covered in depth. This groove contained a four letter code that could be read by the console, corresponding to the region in which the game was sold. The console would read this groove on startup, and check that the code in the game matched the code in the console before booting. Modchips circumvent this by injecting a spoof code into the console that matches the local region, regardless of what is read off the disc. This has the effect of both allowing users to run bootleg CD-Rs, homebrew code, as well as games from other regions.

Today, we’re blessed with the Internet and cheap hardware. As [MattKC] demonstrates, it’s no longer necessary to mail-order a chip from a dodgy ad in the back of a games magazine; instead, one can download source code and flash it to a commodity PIC microcontroller for just a few bucks. With the chip soldered in to the relevant points of the PS1’s motherboard, you’re good to go.

As far as console modding goes, the PS1 is a great platform to start with — simple to work on, and also the best selling console of all time, so the stakes are low if you mess up. Video after the break. Continue reading “Burning Your Own PS1 Modchip Is Easy”

Fuel Cell Drone Aims For Extended Flight Times

The RC world was changed forever by the development of the lithium-polymer battery. No longer did models have to rely on expensive, complicated combustion engines for good performance. However, batteries still lack the energy density of other fuels, and so flying times can be limited. Aiming to build a drone with impressively long endurance, [Игорь Негода] instead turned to hydrogen power.

The team fitted a power meter to the plane, aiming a camera at it to measure power draw during flight.

With a wingspan of five meters, and similar length, the build is necessarily large in order to carry the hydrogen tank and fuel cell that will eventually propel the plane, which uses a conventional brushless motor for propulsion. Weighing in at 6 kilograms, plenty of wing is needed to carry the heavy components aloft. Capable of putting out a maximum of 200W for many hours at a time, the team plans to use a booster battery to supply extra power for short bursts, such as during takeoff. Thus far, the plane has flown successfully on battery power, with work ongoing to solve handling issues and determine whether the platform can successfully fly on such low power.

We’re eager to see how the project develops, particularly in regards to loiter time. We can imagine having a few pilots on hand may be necessary with such a long flight time planned — other drones of similar design have already surpassed the 60-minute mark. Video after the break.

Continue reading “Fuel Cell Drone Aims For Extended Flight Times”

Kelvin Probes Review Shows How 4-Wire Resistance Measurement Works

You might think the probes in the picture are just funny looking alligator clips. But if you watch [tomtektest’s] recent video, you’ll learn they are really Kelvin probes. Kelvin probes are a special type of probe for making accurate resistance measurements using four wires and, in fact, the probe’s jaws are electrically isolated from each other.

We liked [Tom’s] advice from his old instructor: you aren’t really ever measuring a resistance. You are measuring a voltage and a current. With a four-wire measurement, one pair of wires carries current to the device under test and the other pair of wires measure the voltage drop.

Continue reading “Kelvin Probes Review Shows How 4-Wire Resistance Measurement Works”