Circuit Sculpture Vibration Sensor

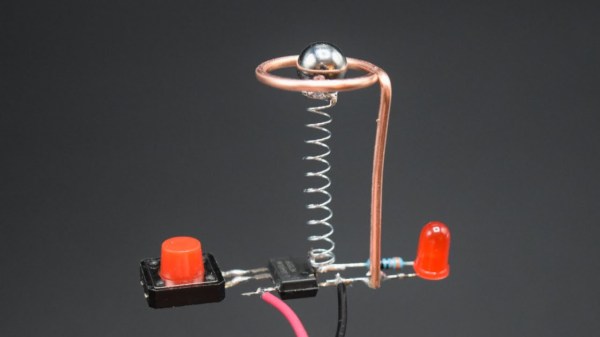
Here’s your useful and beautiful circuit for the day — [New Pew]’s vibration sensor takes manual control of the flip-flop inside a 555 timer and lights an LED in response. Use it to detect those vibrations you expect, like laundry machines, or those you only suspect, like the kind that might be coming from your engine. This gadget isn’t super-precise, but it will probably get the job done.

The vibration-detecting bit is a tiny ball bearing soldered to the spring from an old pen, which is tied between the trigger and ground pins of the 555. When the chip is powered with a 9 V battery, nearby vibrations will induce wiggle in the spring, causing the ball bearing to contact the brass rod and completing the circuit. When this happens, the internal flip flop’s output goes high, which turns on the LED. Then the flip flop must be reset with a momentary button. Check out the build video after the break.

Want to pick up Earthly vibrations? You can detect earthquakes with a homemade variable capacitor, a 555, and a Raspberry Pi.

Continue reading “Circuit Sculpture Vibration Sensor”

Wooden Cassette Tape Is A Veneer Stackup Seeking A Few Good Walkmen

While the days of audio cassette tapes are long over for almost everyone, magnetic tape still enjoys extensive use in some other realms such as large-scale data backup. Those that are still using it to store their tunes are a special subset of audio enthusiasts. [Frank] still has a working tape deck, and enthusiasm for classic non-vinyl sound. His homage to audio tape? Building a working cassette made (almost) entirely of wood.

The cassette is modeled on the formerly popular Maxell XL-II and the first versions of this build were modeled in paper. Once the precise dimensions of the enclosure were determined, [Frank] got to work building the final version from wood in a decidedly 2D process. He used a plotter to cut layers out of a wood veneer and glued them together one-by-one. The impressive part of this build is that the tape reel bearings are also made from wood, using a small piece as a race that holds the reels without too much friction.

Once everything was pieced together and glued up, [Frank] had a perfect working cassette tape made entirely from wood with the exception of the magnetic tape and a few critical plastic parts that handle the tape directly. The build is an impressive piece of woodworking, not unlike the solid wood arcade cabinet from a few days ago.

Continue reading “Wooden Cassette Tape Is A Veneer Stackup Seeking A Few Good Walkmen”

Hackaday Links Column Banner

Hackaday Links: January 10, 2021

You know that feeling when your previously niche hobby goes mainstream, and suddenly you’re not interested in it anymore because it was once quirky and weird but now it’s trendy and all the newcomers are going to come in and ruin it? That just happened to retrocomputing. The article is pretty standard New York Times fare, and gives a bit of attention to the usual suspects of retrocomputing, like Amiga, Atari, and the Holy Grail search for an original Apple I. There’s little technically interesting in it, but we figured that we should probably note it since prices for retrocomputing gear are likely to go up soon. Buy ’em while you can.

Remember the video of the dancing Boston Dynamics robots? We actually had intended to cover that in Links last week, but Editor-in-Chief Mike Szczys beat us to the punch, in an article that garnered a host of surprisingly negative comments. Yes, we understand that this was just showboating, and that the robots were just following a set of preprogrammed routines. Some commenters derided that as not dancing, which we find confusing since human dancing is just following preprogrammed routines. Nevertheless, IEEE Spectrum had an interview this week with Boston Dynamics’ VP of Engineering talking about how the robot dance was put together. There’s a fair amount of doublespeak and couched terms, likely to protect BD’s intellectual property, but it’s still an interesting read. The take-home message is that despite some commenters’ assertions, the routines were apparently not just motion-captured from human dancers, but put together from a suite of moves Atlas, Spot, and Handle had already been trained on. That and the fact that BD worked with a human choreographer to work out the routines.

Looks like 2021 is already trying to give 2020 a run for its money, at least in the marketplace of crazy ideas. The story, released in Guitar World of all places, goes that some conspiracy-minded people in Italy started sharing around a schematic of what they purported to be the “5G chip” that’s supposedly included in the SARS-CoV-2 vaccine. The reason Guitar World picked it up is that eagle-eyed guitar gear collectors noticed that the schematic was actually that of the Boss MetalZone-2 effects pedal, complete with a section labeled “5G Freq.” That was apparently enough to trigger someone, and to ignore the op-amps, potentiometers, and 1/4″ phone jacks on the rest of the schematic. All of which would certainly smart going into the arm, no doubt, but seriously, if it could make us shred like this, we wouldn’t mind getting shot up with it.

Remember the first time you saw a Kindle with an e-ink display? The thing was amazing — the clarity and fine detail of the characters were unlike anything possible with an LCD or CRT display, and the fact that the display stayed on while the reader was off was a little mind-blowing at the time. Since then, e-ink technology has come considerably down market, commoditized to the point where they can be used for price tags on store shelves. But now it looks like they’re scaling up to desktop display sizes, with the announcement of a 25.3″ desktop e-ink monitor by Dasung. Dubbed the Paperlike 253, the 3200 x 1800 pixel display will be able to show 16 shades of gray with no backlighting. The videos of the monitor in action are pretty low resolution, so it’s hard to say what the refresh rate will be, but given the technology it’s going to be limited. This might be a great option as a second or third monitor for those who can work with the low refresh rate and don’t want an LCD monitor backlight blasting them in the face all day.

Continue reading “Hackaday Links: January 10, 2021”

ESP8266 Socket Is A Snap-Fit, Breadboard-Friendly Wonder

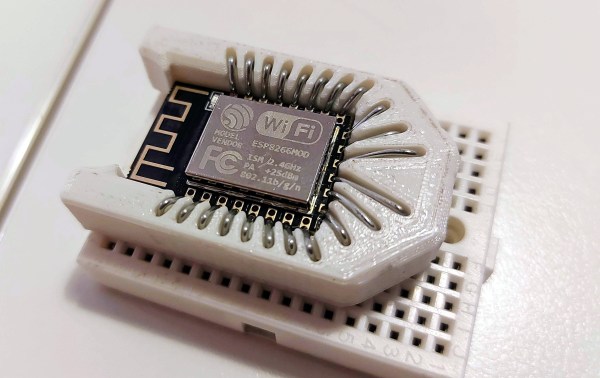
It all started with wanting to program an ESP-12 variant of an ESP8266 module without involving any solder. Displeased with all the socket offerings on Thingiverse, [tweeto] set out to design their own breadboard-friendly snap-fit socket.

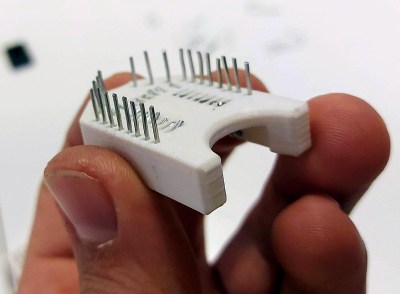
This certainly looks like a handy solution. All you have to do is print the thing, add all the wires, and stick your ESP in there. Even that wire is easy to find; [tweeto] used 0.8 mm paper clips which are sturdy, conductive, and haunting the darkest corners of every desk drawer. They’re also a little bit on the thick side, so [tweeto] plans to test out 0.6mm copper wire in the future.

The challenge with this type of print is to design something that will stand up to repeated breadboardings without losing legs or falling apart. [tweeto]’s elegant solution is a tiny groove for each wire in the bottom of the socket — it keeps the wire in place by countering the play caused by inserting it into and removing it from a breadboard. See how [tweeto] bends the paper clips in the short video after the break.

There’s more than one way to use 3D printing to your circuit-building advantage, even in permanent circuits — just take a look at this PCB-free Arduboy.

Continue reading “ESP8266 Socket Is A Snap-Fit, Breadboard-Friendly Wonder”

Cyberpunk Mazda MX-5 Packs Onboard Cyberdeck

Back in April of 2019, inspired by iconic films such as Blade Runner and Akira, [Chris Watson] embarked on a journey to create his very own cyberpunk roadster from a 1991 Mazda MX-5. After pouring an incredible amount of blood, sweat, and fiberglass into the project, he now has a vehicle that wouldn’t look out of place cruising the streets of Neo Tokyo. Even if you’re not usually into car mods, his impeccably photographed build log is an absolutely fascinating journey.

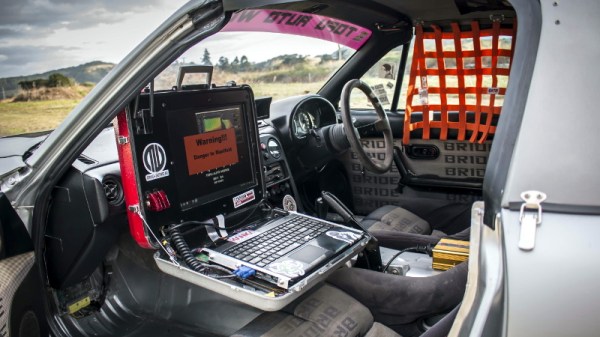
But as impressive as the car itself might be, what really caught our attention was the computer sitting on the dash. From early on, [Chris] wanted the vehicle to have a companion cyberdeck that would be used to control various onboard systems. At this point it’s just for show, but he says ultimately it will be integrated with the electric motor he plans to install in place of the MX-5’s original power plant. We can’t wait to see it.

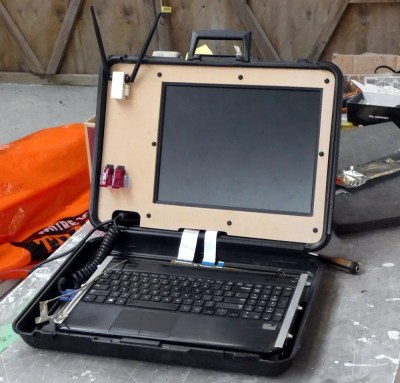
Of course, the lack of a practical application has hardly stopped us from admiring any of the other cyberdecks we’ve covered thus far. This one started out life as a laptop with a broken screen, which [Chris] beheaded and connected it to 15″ external display mounted in the top of a heavy-duty case. With a new SSD and a fresh copy of Linux Mint to verify all the hardware was still functional, he put together an MDF bezel for the display that includes some faux antennae and covered aircraft style switches.

When this futuristic roadster is making an appearance at a car show or contest, [Chris] makes sure to load up some suitably high-tech looking imagery on the display. It even shows some flashing technobabble error messages pulled from The Fast & The Furious.

Traditionally we haven’t covered many custom car projects, though to be fair, we traditionally haven’t seen many that looked like this either. But between ever more technologically advanced vehicles and the insightful car modding column helmed by our very own [Lewin Day], we expect tricked out rides may become an increasingly common sight on these pages.

Knockoff Kapton Nearly Sinks DIY Flex PCB Project

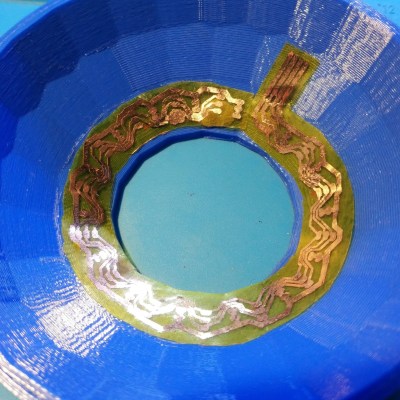
[TinkersProjects] experimented with making their own flexible PCB for LED modules inside a special fixture, and the end result was at least serviceable despite some problems. It does seem as though the issues can be at least partially blamed on some knockoff Kapton tape, which is what [TinkersProjects] used as a backing material.

Incomplete etching on this DIY flexible PCB, but still salvageable.

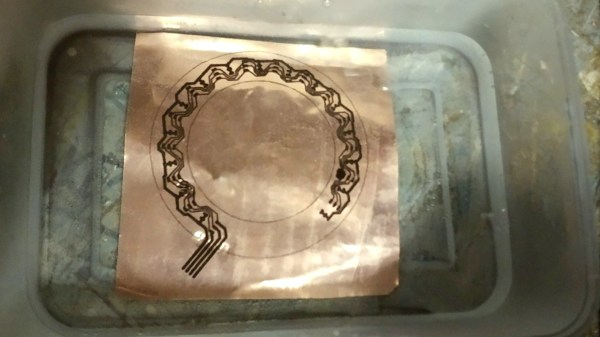
The approach was simple: after buying some copper foil and wide Kapton tape, simply stick the foil onto the tape and use the toner transfer method to get a PCB pattern onto the copper. From there, the copper gets etched away in a chemical bath and the process is pretty much like any other DIY PCB. However, this is also where things started to go wonky.

Etching was going well, until [TinkersProjects] noticed that the copper was lifting away from the Kapton tape. Aborting the etching process left a messy board, but it was salvageable. But another problem was discovered during soldering, as the Kapton tape layer deformed from the heat, as if it were a piece of heat shrink. This really shouldn’t happen, and [TinkersProjects] began to suspect that the “Kapton” tape was a knockoff. Switching to known-good tape was an improvement, but the adhesive left a bit to be desired because traces could lift easily. Still, in the end the DIY flexible PCB worked, though the process had mixed results at best.

Flexible PCBs have been the backbone of nifty projects like this self-actuating PoV display, so it’s no surprise that a variety of DIY PCB methods are getting applied to it.

Turning A Waffle Iron Into A Reflow Station

There are a ton of ways to go about building your own reflow oven. Most of these builds start with, well, an oven — usually a toaster oven — with a small but significant minority choosing to modify a hotplate. But this might be the first time we’ve seen a waffle iron turned into a reflow oven.

Of course, what [Vincent Deconinck] came up with is not an oven per se. But his “RefloWaffle” certainly gets the job done. It started with an old waffle maker and a few experiments to see just how much modification it would take to create the various thermal reflow profiles. As it turned out, the original cooking surfaces had too much thermal inertia, so [Vincent] replaced them with plain copper sheets. That made for quicker temperature transitions, plus created some space between the upper and lower heating elements for the SMD board.

As for control, [Vincent] originally used an Arduino with a relay and a thermocouple, but he eventually built a version 2.0 that used a hacked Sonoff as both controller and switch. Adding the thermocouple driver board inside the Sonoff case took a little finagling, but he managed to get everything safely tucked inside. A web interface runs on the Sonoff and controls the reflow process.

We think this is a great build, one that will no doubt see us trolling the thrift stores for cheap waffle irons to convert. We’ve seen some amazing toaster oven reflows, of course, but something about the simplicity and portability of RefloWaffle just works for us.