Turning The Virtual Boy Into A Handheld Console

The Virtual Boy, Nintendo’s most infamous failure, was plagued by several issues. The most glaring problem was the red monochrome stereoscopic display technology which gave many users a headache after even a short time playing, but it’s sky-high price and extremely limited library of games kept many prospective buyers at bay as well. There was also the issue of portability: unlike the Game Boy it was named after, the Virtual Boy barely qualified as a portable system due to the fact it needed to be set up on a table to use.

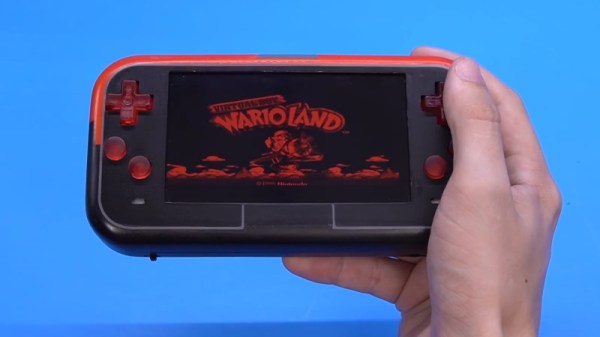
But now, thanks to the tireless efforts of [Shank], at least a few of those issues have been resolved. He’s built the world’s first truly portable Virtual Boy, which swaps the system’s troubled 3D display for a modern IPS LCD panel. The custom handheld, designed to merge the Virtual Boy’s unique aesthetic with the iconic styling of the Game Boy Advance, looks like it came from some alternate timeline where Nintendo decided to produce a cheaper and less cumbersome version of the system rather than abandoning it.

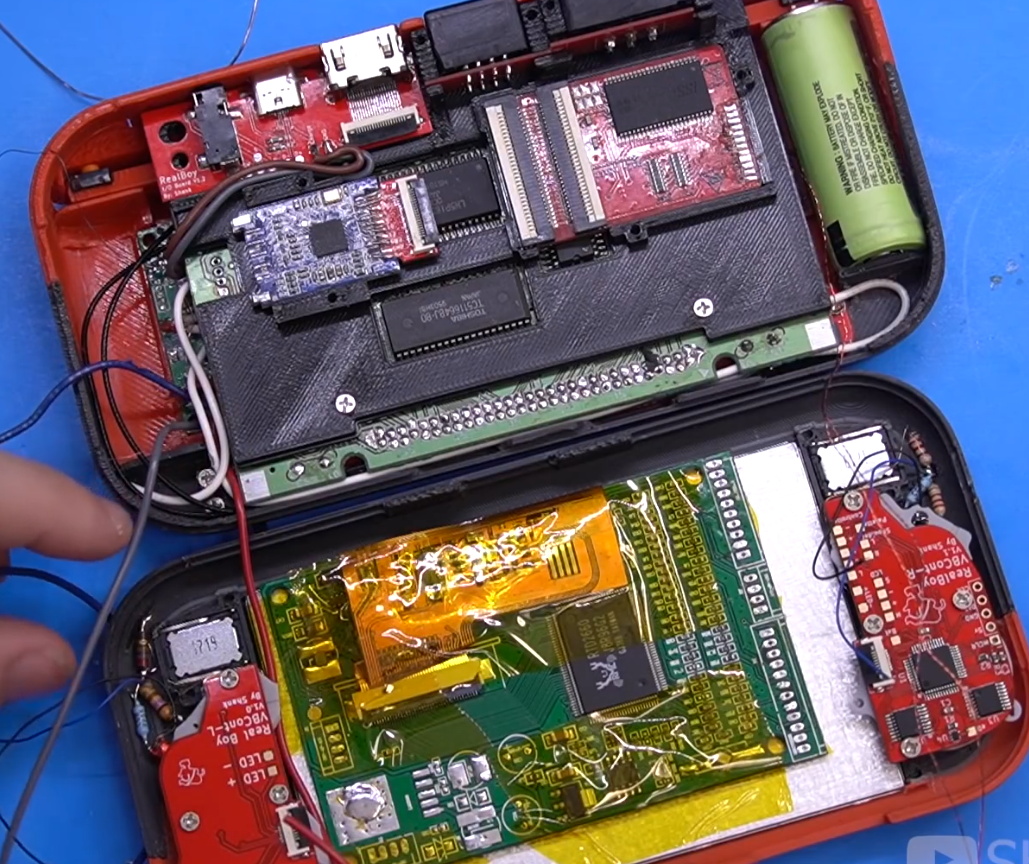
While the work [Shank] has put into the project is unquestionably impressive, it should be said that it took the efforts of several talented hackers to create the handheld Virtual Boy. The key component that made the modification possible in the first place is the VirtualTap by [Furrtek], which not only provides the VGA output that’s driving the LCD panel, but fools the system’s motherboard into believing the servo-actuated stereoscopic display is still connected and active.

It’s also using the open source power management board that [GMan] originally developed for his own portable N64, [Bassline] chipped in to cast the custom buttons and D-pad in translucent resin, and [Mitch 3D] put an untold number of hours into printing and reprinting the system’s multicolored enclosure until it came out just right.

All the little details of the final system, which [Shank] calls the Real Boy, put this project into a league of its own. Special combinations of button presses allows the user to change the color of the display, should you get sick of the infamous red-tint. The buttons also have RGB LEDs behind them that correspond with the color scheme of the display itself, for that extra bit of gamer cred. He even made sure to include the system’s original link port, despite the fact that no officially released game ever made use of it.

Our first run in with [Shank] was when he demoed a portable Wii built into a mint tin. It made for a pretty pitiful gaming experience, but the project demonstrated his dedication to seeing a project through to the end. Watching his skills improve over the last few years has been inspiring, and we can’t wait to see what he comes up with next.

Continue reading “Turning The Virtual Boy Into A Handheld Console”

Sand Hack Boosts Power On InSight Mars Lander

We love that part in Apollo 13 where the NASA engineers have to fit a square carbon dioxide filter in a round hole. We love basically every scene of The Martian where Mark Watney hacks together any piece of hardware he can get his hands on to survive on a hostile planet. What we love even more is watching actual NASA engineers trying out a hack and ordering the InSight lander to scoop sand on itself to increase the power from its solar panels.

InSight, which recently had its two-year mission to study the interior geology of Mars extended, has been suffering from a buildup of dust on its solar panels. This dust is only adding on to the expected power loss which occurs as the red planet approaches aphelion — the maximum distance from the Sun in its orbit. Attempts to shake the panels clear by pulsing their deployment motors were unsuccessful. Other solar-powered missions have experienced a cleaning effect from the Martian winds; however, despite seeing plenty of gusts, InSight has not seen any significant improvement.

Counterintuitively, operators instructed the lander to slowly trickle more dust and sand from its scoop close to (not on top of) one of the solar panels. As the wind blew, larger particles were carried by the breeze across the panels and bounced off the surface, carrying away some accumulated dust. While that may sound like a minuscule effect, the experiment resulted in about 30 extra watt-hours per Sol. Margins are still thin, and science instruments will still need to be disabled to conserve power. But this boost alone was enough to delay the powerdown for a few weeks.

There are so many exciting missions operating on Mars right now. Though, it’s also fun to take a look back at some of the earliest probes. And we’re always amazed at the resources NASA makes available for us to have some DIY fun.

Tiny Mechanical Keyboard, Powered By Pi Pico

For some applications, smaller is better and that is precisely the thinking behind a diminutive keyboard like the PiPi Gherkin, which is designed to use the Raspberry Pi Pico as its controller. This keyboard may have only 30 keys in total, but they are full-sized for comfort and don’t let the scant layout mislead you. It has more functionality than it would seem to at first glance; the entire bottom row acts as dual function tap/hold keys, allowing the keyboard to shift layers on the fly.

This keyboard definitely has a a thoughtful layout, and we’re not just talking about the tap/shift functionality. We especially like the way the Pi Pico is tucked neatly underneath the main PCB, taking up very little room while exposing its USB connector between two standoffs for easy access without requiring an adapter, or wiring a separate plug.

If the Gherkin sounds familiar, we’ve seen it before as part of this lunchbox cyberdeck build, where the small size allowed it to take up impressively little room. The shifting might take a little getting used to, but it’s a clean design that uses full sized keys, so when it comes to small keyboards one could certainly do worse.

Robot Clings To Ceiling

Imagine you are at the movies and you see a Roomba-like robot climbing a wall or clinging to a ceiling. How would that work? If you are like us, you might think of suction cups or something mechanical or magnetic in the wall. Then again, it is a movie, so maybe it is just a camera trick. The robots from the Bioinsipired Robotics and Design Lab at UCSD are no camera trick, though. As [Evan Ackerman] mentions in a post on IEEE Spectrum, “It’s either some obscure fluid effect or black magic.” You can watch a video about the bots, below.

It turns out, the answer is closer to a suction cup than you might think. According to the paper from the lab, a small flexible disk vibrates at 200 Hz. This generates a thin (less than 1 mm) layer of low pressure air in between the disk and the underlying surface. The robot can resist a force of up to 5 newtons from the suction from the disk.

Continue reading “Robot Clings To Ceiling”

Old Phone Becomes MIDI Controller

MIDI controllers come in all shapes and sizes. Commercial products based on keyboards or matrixes of buttons are popular, but there’s nothing stopping you from whipping up your own creations out of whatever strikes your fancy. [Kevin] has done just that, turning an old telephone into a working MIDI device.

The phone in question is a Doro X20 wired landline phone. Being surplus to [Kevin’s] requirements left it ripe for the hacking. A Raspberry Pi Pico was wired in to the phone’s keypad, slimmed down with a hacksaw in order to allow it to neatly fit inside the original enclosure. Then it was a simple matter of whipping up some code to read the buttons and output MIDI data via the Pico’s serial output.

Later, [Kevin] brought the design into the modern world, setting it up to talk USB MIDI using the Pico’s onboard USB hardware. This makes using it with a computer a cinch, and lets [Kevin] control a DAW using the handset controller.

It’s a fun build, and one that shows how you can easily build your own MIDI hardware using nothing but a soldering iron, some buttons, and a modern microcontroller. From there, the sky really is the limit. Whether you like big knobs, easy playing, or have your own personal tastes, you can build what you like to suit your own style. When you do, drop us a line! Video after the break.

Continue reading “Old Phone Becomes MIDI Controller”

Restoring A Vintage Tube Tester To Its Former Glory

It can be difficult for modern eyes to make much sense of electronics from the 1960s or earlier. Between the point-to-point soldering, oddball components, and the familiar looking passives blown up to comical proportions like rejected props from “Honey, I Shrunk the Kids”, even experienced hardware hackers may find themselves struggling to understand what a circuit is doing. But that didn’t stop [Cat0Charmer] from taking the time to lovingly restore this Hickok Cardmatic KS-15874-L2 tube tester.

The good news was that the machine had nearly all of its original parts, down to the Hickok branded tubes in the power supply. Unfortunately it looks like a few heavy handed repairs were attempted over the years, with a nest of new wires and components intermixed with what [Cat0Charmer] actually wanted to keep. The before and after shots of individual sections of the machine are particularly enlightening, though again, don’t feel to bad if you still can’t make heads or tails of the cleaned up version.

Hiding new capacitors inside of the old ones.

As you’d expect for a machine of this age, many of the original components were way out of spec. Naturally the capacitors were shot, but even the carbon composition resistors were worthless after all these years; with some measuring 60% away from their original tolerances.

We particularly liked how [Cat0Charmer] hollowed out the old capacitors and installed the new modern ones inside of them, preserving the tester’s vintage look. This trick wasn’t always feasible, but where it was applied, it definitely looks better than seeing a modern capacitor adrift in a sea of 60’s hardware.

After undoing ham-fisted repairs, replacing the dud components, and installing some new old stock tubes, the tester sprung to life with renewed vigor. The previously inoperable internal neon lamps, used by the tester’s voltage regulation system, shone brightly thanks to all the ancillary repairs and changes that went on around them. With a DIY calibration cell built from the schematics in an old Navy manual, [Cat0Charmer] got the tester dialed in and ready for the next phase of its long and storied career.

We love seeing old hardware get restored. It not only keeps useful equipment out of the scrap heap, but because blending new and old technology invariably leads to the kind of innovative problem solving this community is built on.

Improved Technique For Resistive Divider Keypads

[Lauri Pirttiaho] from the [Swiss Knife of Electronics] channel explains how to simplify your resistive divider keypad design on Hackaday.io.

The usual method involves building a resistive ladder that gives unique and equally spaced voltages for each keypress. If you have just four or five discrete buttons, it isn’t terribly difficult, but if you have a 12- or 16-keypad matrix, things get complicated. [Lauri] looked into the past to come up with a better way, specifically a 646 page, 1 kg textbook from 1990 — Analogue Ic Design: The Current-Mode Approach by Toumazou, Lidgey, and Haigh. He learned that sometimes what’s hard to do in the voltage domain is easy in the current domain.

Normally you’d throw in some resistors to form different voltage dividers depending on which key is pressed, and read the resulting voltage off of a voltage divider with an ADC. But that means using the voltage divider equation, and the difference in voltage between keys can get very small. Dropping the voltage divider and measuring the current through a current mirror generates a linear voltage across its output load resistor that can be easily read by your microprocessor. And [Lauri] has posted an example of just such a program on his GitHub repository for an Arduino.

Heavy analog electronics, for sure, but something to keep in mind if you’re reading more than 12 keys. Do you have any examples of solving problems by looking into old and/or less-common techniques? Let us know in the comments below.

Continue reading “Improved Technique For Resistive Divider Keypads”