Trippy Bicycle Uses Multiple Partial Wheels

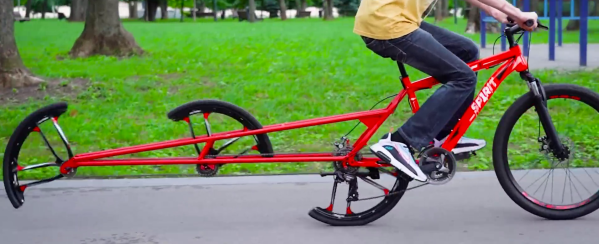
Bicycles need at least two wheels to be rideable, but [The Q] realized you don’t necessarily need the wheels to be in one piece. As long as you have at least two points of rolling contact with the ground, you can spread the load across multiple partial wheels. He demonstrated this by splitting the rear wheel of his bike first in half and then thirds to create an absolute head turner.

Since a conventional bicycle wheel with tensioned spokes would collapse if cut apart, [The Q] used single-piece aluminum wheels instead. The tires were cut into pieces, and the inner tubes were replaced with sections of thick-walled HDPE pipe that won’t collapse under the weight of a human. The tires and the HDPE “inner tubes” were riveted to the wheels.

To mount the additional wheels on the frame, [The Q] welded a set of extensions to the back with mounting points for the partial wheels. To keep them synced, timing is done with chains running on sprockets welded to the disc brakes. In the second video, he tries to also split the front wheels, but found the front forks can’t handle the torque and would flex dangerously when the contact point is too far forward. Instead, he settled for three wheels on the back.

Much like his hubless bicycle, it’s not designed to be better than a standard bicycle, but is excellent for attracting attention. Though at least in some situations, the all-wheel drive bike he built last year might come in handy.

Continue reading “Trippy Bicycle Uses Multiple Partial Wheels”

Industrial Robot Repurposed To Make S’Mores

It’s summer time in the Northern Hemisphere, and that means campfires for cooking hot dogs, keeping the mosquitoes away, and of course, making s’mores. For our far-flung friends, that’s a fire roasted marshmallow and a square of chocolate smashed between two graham crackers. So called because when you’re done, you’ll want s’more. It’s an easy enough recipe that any child can tell you how to make it. But what if you’re not a child? What if you don’t even have hands, because you’re an industrial robot? This is the challenge that [Excessive Overkill] has taken on in the video below the break.

Starting with a Fanuc S-420 i W industrial robot built in 1997, [Excessive Overkill] painstakingly taught his own personal robot how to make S’Mores. Hacking the microwave with pneumatic cylinders to get the door open was a nice touch, and so are the vacuum grippers at the business end of the S’More-bot.

We know, we said you were supposed to make them on a campfire — but who wants to risk cooking their vintage robotic arm just to melt some chocolate?

There’s a lot of story behind this hack, and [Excessive Overkill] explains how they acquired, transported, and three phase powered an out of date industrial robot in another of their videos. Of course, this is Hackaday so it’s a subject that’s come up before in the reverse engineering of an industrial robot that we covered some time back.

Continue reading “Industrial Robot Repurposed To Make S’Mores”

Hackaday Links Column Banner

Hackaday Links: July 31, 2022

Don’t look up! As of the time of this writing, there’s a decent chance that a Chinese Long March 5B booster has already completed its uncontrolled return to Earth, hopefully safely. The reentry prediction was continually tweaked over the last week or so, until the consensus closed in on 30 Jul 2022 at 17:08 UTC, give or take an hour either way. That two-hour window makes for a LOT of uncertainty about where the 25-ton piece of space debris will end up. Given the last prediction by The Aerospace Corporation, the likely surface paths cover a lot of open ocean, with only parts of Mexico and South America potentially in the crosshairs, along with parts of Indonesia. It’s expected that most of the material in the massive booster will burn up in the atmosphere, but with the size of the thing, even 20% making it to the ground could be catastrophic, as it nearly was in 2020.

[Update: US Space Command confirms that the booster splashed down in the Indian Ocean region at 16:45 UTC. No word yet on how much debris survived, or if any populated areas were impacted.]

Good news, everyone — thanks to 3D printing, we now know the maximum height of a dive into water that the average human can perform without injury. And it’s surprisingly small — 8 meters for head first, 12 meters if you break the water with your hands first, and 15 meters feet first. Bear in mind this is for the average person; the record for surviving a foot-first dive is almost 60 meters, but that was by a trained diver. Researchers from Cornell came up with these numbers by printing models of human divers in various poses, fitting them with accelerometers, and comparing the readings they got with known figures for deceleration injuries. There was no mention of the maximum survivable belly flop, but based on first-hand anecdotal experience, we’d say it’s not much more than a meter.

Humans have done a lot of spacefaring in the last sixty years or so, but almost all of it has been either in low Earth orbit or as flybys of our neighbors in the Sol system. Sure we’ve landed plenty of probes, but mostly on the Moon, Mars, and a few lucky asteroids. And Venus, which is sometimes easy to forget. We were reminded of that fact by this cool video of the 1982 Soviet landing of Venera 14, one of only a few attempts to land on our so-called sister planet. The video shows the few photographs Venera 14 managed to take before being destroyed by the heat and pressure on Venus, but the real treat is the sound recording the probe managed to make. Venera 14 captured the sounds of its own operations on the Venusian surface, including what sounds like a pneumatic drill being used to sample the regolith. It also captured, as the narrator put it, “the gentle blow of the Venusian wind” — as gentle as ultra-dense carbon dioxide hot enough to melt lead can be, anyway.

Continue reading “Hackaday Links: July 31, 2022”

Hackaday Prize 2022: An Eastern Bloc NES Clone

If Nintendo is known for anything outside of their characters and admittedly top-notch video games, it’s being merciless to fans when it comes to using their intellectual property. They take legal action against people just for showing non-Nintendo hardware emulating games of theirs, and have even attempted to shut down the competitive scene for games like Super Smash Bros. To get away from the prying eyes of the Nintendo legal team extreme measures need to be taken — like building your Nintendo console clone behind the Iron Curtain.

[Marek Więcek] grew up in just such a place, so the only way to play Famicom (a.k.a NES) games was to use a clone system like this one circulating in the Eastern Bloc at the time called the Pegasus which could get the job done with some tinkering. [Marek] recently came across CPU and GPU chips from this clone console and got to work building his own. Using perf board and wire he was able to test the chips and confirm they functioned properly, but had a problem with the video memory that took him a while to track down and fix.

After that, he has essentially a fully-functional Famicom that can play any cartridge around. While we hope that living in Eastern Europe still puts him far enough away to avoid getting hassled by Nintendo, we can never be too sure. Unless, of course, you use this device which lets you emulate SNES games legally.

Continue reading “Hackaday Prize 2022: An Eastern Bloc NES Clone”

Adding Perlin Noise To 3D Printed Parts, With Python

Want to add a bit of visual flair to 3D printed parts that goes maybe a little more than skin-deep? That’s exactly what [volzo] was after, which led him to create a Python script capable of generating a chunk of Perlin noise, rendered as an STL file. What does that look like? An unpredictably-random landscape of hills and valleys.

The script can give printed parts a more appealing finish.

The idea is to modify a 3D model with the results of the script, leaving one with something a bit more interesting than a boring, flat surface. [volzo] explains how to use OpenSCAD to do exactly that, but it’s also possible to import the STL file the script creates into the CAD program of one’s choice and make the modifications there with some boolean operations.

If the effect looks a bit bit familiar, it’s likely because he used the method to design part of the 3D printed “toy” camera that we featured recently.

[volzo]’s method isn’t entirely plug and play, but it could still be a handy thing to keep in your back pocket when designing your next part. There are also other ways to modify the surfaces of prints for better aesthetics; we’ve previously covered velocity painting (also known as ‘tattooing’ in some slicers) and also fuzzy skin.

Perlin noise was created by [Ken Perlin] in the early 80s while working on the original Tron movie as a way to help generate more realistic-looking textures. It still fulfills that artistic function in a variety of ways, even today.

Cool Face Mask Turns Into Over-Engineered Headache

Seeing his wife try to use a cool face mask to get through the pain of a migraine headache, [Sparks and Code] started thinking of ways to improve the situation. The desire to save her from these debilitating bouts of pain drove him to make an actively cooled mask, all the while creating his own headache of an over-engineered mess.

Void spaces inside the printed mask are filled with chilled water.

Instead of having to put the face mask into the refrigerator to get it cold, [Sparks and Code] wanted to build a mask that he could circulate chilled water through. With a large enough ice-filled reservoir, he figured the mask should be able to stay at a soothing temperature for hours, reducing the need for trips to the fridge.

[Sparks and Code] started out by using photogrammetry to get a 3D model of his wife’s face. Lack of a compatible computer and CUDA-enabled GPU meant using Google Cloud to do the heavy lifting. When they started making the face mask, things got complicated. And then came the unnecessary electronics. Then the overly complicated  and completely unnecessary instrumentation. The… genetic algorithms? Yes. Those too.

We won’t spoil the ending — but suffice it to say, [Sparks and Code] learned a cold, hard lesson: simpler is better! Then again, sometimes being over-complicated is kind of the point such as in this way-too-complex gumball machine.

Continue reading “Cool Face Mask Turns Into Over-Engineered Headache”

Building A Tube-Based Stereo Amp, In Classic Style

It’s not every day we see the results of someone putting their own spin on a vintage tube amp, but that’s exactly what [lens42] did in creating the McIntosh 217, created as a “mini” version of the McIntosh MC275, a classic piece of audio equipment. Both are pictured next to each other, above.

When it comes to vintage hi-fi stereo amplifiers, two units had particular meaning for [lens42]: the McIntosh MC275 Power Amp, and the Dynaco ST35. The Dynaco was a more budget-friendly amplifier, but looked like a plain box. The McIntosh, however, proudly showed off its tubes and transformers in all their glory. The “McIntosh 217” is design-wise basically a smaller McIntosh MC275, with the innards of a Dynaco ST35.

With so much needing to be designed from the ground up, CAD was invaluable. Component layout, enclosure design, and even wiring and labeling all had to be nailed down as much as possible before so much as heating up the soldering iron. Even so, there were a few hiccups; a vendor had incorrect measurements for a tube socket which meant that the part would not fit. A workaround involved modifying the holes and as luck would have it, the change wasn’t an eyesore. Still, [lens42] reminds us all that whenever you can, have the required parts in-hand for confirmation of dimensions before sending CAD files off for cutting or fabrication.

Many of us can relate to the fact that the whole project was a labor of love and made no real financial sense, but the end result is fantastic, and creating such a thing is something all of us — not just chasers of that elusive “tube sound” — can appreciate.