3D Printed Strain-Wave Gearbox Turns Up The Torque

3D printers are good for a lot of things, but making parts for power transmission doesn’t seem to be one of them. Oh sure, some light-duty gears and timing belt sprockets will work just fine when printed, but oftentimes squooshed plastic parts are just too compliant for serious power transmission use.

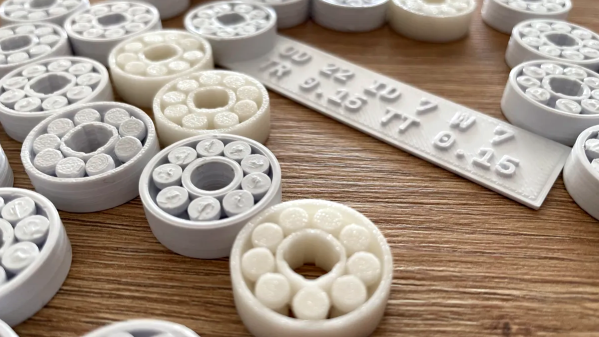
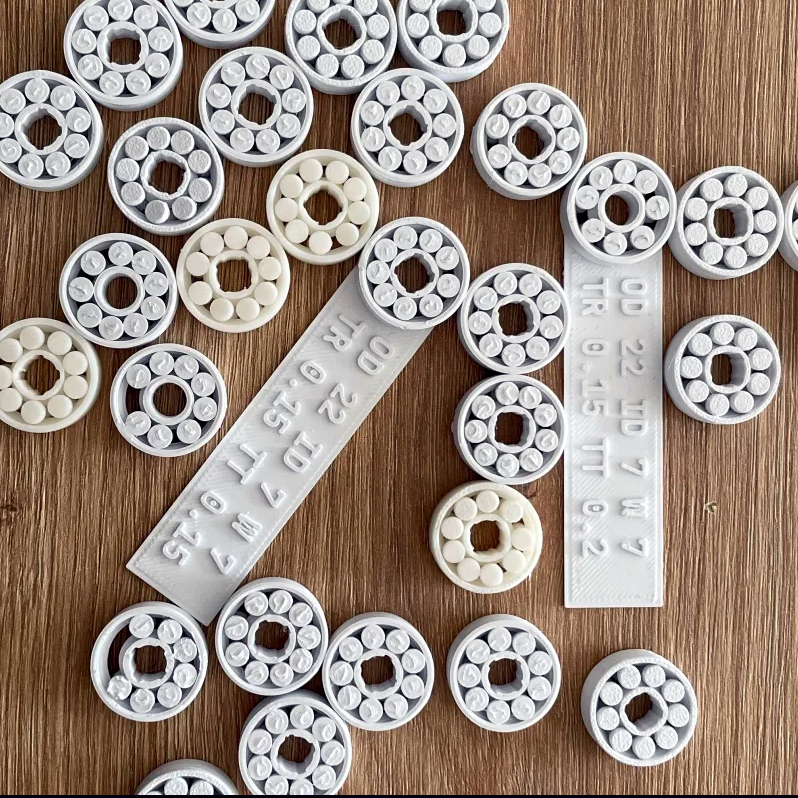
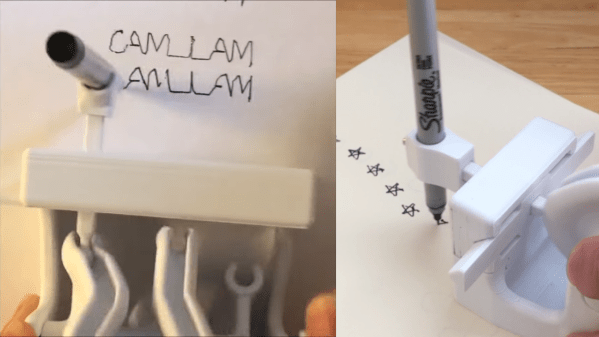
But that’s not a hard and fast rule. In fact, this 3D-printed strain-wave transmission relies on the flexibility of printed parts to work its torque amplification magic. In case you haven’t been briefed, strain-wave gearing uses a flexible externally toothed spline nested inside an internally toothed stationary gear. Inside the flexible spline is a wave generator, which is just a symmetrical cam that deforms the spline so that it engages with the outside gear. The result is a high ratio gear train that really beefs up the torque applied to the wave generator.

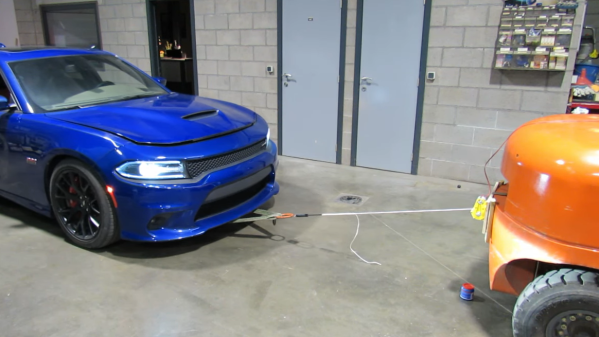
It took a couple of prototypes for [Brian Bocken] to dial in his version of the strain-wave drive. The PLA he used for the flexible spline worked, but wasn’t going to be good for the long haul. A second version using TPU proved better, but improvements to the motor mount were needed. The final version proved to pack a punch in the torque department, enough to move a car. Check it out in the video below.

Strain-wave gears have a lot of applications, especially in robotic arms and legs — very compact versions with the motor built right in would be great here. If you’re having trouble visualizing how they work, maybe a Lego version will clear things up.

Continue reading “3D Printed Strain-Wave Gearbox Turns Up The Torque”

3D Printable Bearings That Actually Work, No CAD Tweaking Required

3D printing bearings with an FDM printer can be an iffy endeavor, but it doesn’t have to be that way. [Matvey Kukuy]’s Ultimate 608 Bearing with Calibration Kit is everything you’ll need to dial in and print functional 608-style print-in-place bearings on your 3D printer.

Calibration pieces have a handy label attached for identification.

[Matvey] found that there are two key tolerances to get right. And by “get right” he means “empirically determine which works best with your filament and printer”. But don’t worry, there’s no need to get into CAD work to make that happen. [Matvey] has exported a staggering 64 slightly different calibration models (and their matching production versions) along with a printable testing tool. With the help of a step-by-step process that resembles a sort of binary search, one can take the Goldilocks approach to find just the right model for one’s filament and printer in a minimum of steps.

There’s one more tip as well: [Matvey] says that once you determine the best model to use, don’t fill the print bed with copies, unless you want a bed full of possibly non-working bearings! Why is this? A 3D printer prints a bed full of objects slightly differently than it prints a single one, and since the margin for error on the perfectly-selected bearing is so small, that can be enough to keep it from working. To print more than one bearing at a time, position them far from each other and use something like PrusaSlicer’s sequential printing, which is an option to print each object completely before starting the next one.

[Matvey]’s own best results came from printing with PLA at a layer height of 0.16 mm. He also used grease in the bearing to improve performance and extend its life. He doesn’t specify what kind of grease he used, but we’d recommend a plastic-safe grease like PTFE-based Super Lube.

Have you used 3D printed bearings in a project? Would [Matvey]’s design be helpful to you? Let us know all about it in the comments.

Why Can’t We Have Pretty Things?

I was reading [Al Williams]’ great rant on why sometimes the public adoption of tech moves so slowly, as exemplified by the Japanese Minister of Tech requesting the end of submissions to the government on floppy diskettes. In 2022!

Along the way, [Al] points out that we still trust ballpoint-pen-on-paper signatures more than digital ones. Imagine going to a bank and being able to open an account with your authentication token! It would be tons more secure, verifiable, and easier to store. It makes sense in every way. Except, unless you’ve needed one for work, you probably don’t have a Fido2 (or whatever) token, do you?

Same goes for signed, or encrypted, e-mail. If you’re a big cryptography geek, you probably have a GPG key. You might even have a mail reader that supports it. But try requesting an encrypted message from a normal person. Or ask them to verify a signature.

Honestly, signing and encrypting are essentially both solved problems, from a technical standpoint, and for a long time. But somehow, from a societal point of view, we’re not even close yet. Public key encryption dates back to the late 1970’s, and 3.5” diskettes are at least a decade younger. Diskettes are now obsolete, but I still can’t sign a legal document with my GPG key. What gives?

3D Printer Upcycles Computer Case To DAS

Storage technologies are a bit of an alphabet soup, with NAS, SAN, and DAS systems being offered. That’s Network Attached Storage, Storage Area Network, and Direct Attached Storage. The DAS is the simplest, just physical drives attached to a machine, usually in a separate box custom made for the purpose. That physical box can be expensive, particularly if you live on an island like [Nicholas Sherlock], where shipping costs can be prohibitively high. So what does a resourceful hacker do, particularly one who has a 3d printer? Naturally, he designs a conversion kit and turns an available computer case into a DAS.

There’s some clever work here, starting with the baseplate that re-uses the ATX screw pattern. Bolted to that plate are up to four drive racks, each holding up to four drives. So all told, you can squeeze 16 drives into a handy case. The next clever bit is the Voronoi pattern, an organic structure that maximizes airflow and structural strength with minimal filament. A pair of 140mm fans hold the drives at a steady 32C in testing, but that’s warm enough that ABS is the way to go for the build. Keep in mind that the use of a computer case also provides a handy place to put the power supply, which uses the pin-short trick to provide power.

Data is handled with 4 to 1 SATA to SAS breakout cables, internal to external SAS converters, and an external SAS cable to the host PC. Of course, you’ll need a SAS card in your host PC to handle the connections. Thankfully you can pick those up on ebay for $20 USD and up.

If this looks good, maybe check out some other takes on this concept!

AntRunner Is The Satellite Antenna Mount You Need To Take With You

It stands to reason, that should you wish to communicate with a satellite, whatever antenna you use should point at that satellite. Some of us have done this by hand, following the bright dot of the space station in the night sky. Still, for anything more serious than trying to catch a fleeting SSTV image, a more robust solution is called for. In other words, a motorized antenna rotator, and AntRunner from [Wuxx] is just the ticket. Better still, it’s portable for those /p operating sessions off the beaten track.

The rotator itself is an az-el design with a couple of geared stepper motors. The full mechanism design has been published, but it shouldn’t be too difficult to copy. The interesting part is the controller and software, which can work with Gpredict, Hamlib, and SDR for automated satellite tracking. The controller is as straightforward as an ESP32 running the ESP port of GRBL.

So here’s a portable antenna rotator that’s accessible and widely supported, what’s not to like? As you might expect though, it’s not the first we’ve seen. In fact, the 2014 Hackaday Prize was won by SatNOGs, which includes a 3D printed antenna positioner.

Thanks [Abe Tusk] for the tip!

Hand-Cranked Doodler Made Using A 3D Printer

3D printers are great at creating complex geometry out of plastic, and that geometry can often pull off some impressive tricks. [DaveMakesStuff] found a way to generate geometry that draws 2D shapes with a pen and some fancy cams, and it’s really fun to watch.

The build is relatively simple. It consists of a frame which holds a 3D-printed cam turned by a hand crank. That cam controls the movement of a pen in two dimensions, letting it draw all manner of shapes. Videos on Reddit demonstrate it drawing squares, figure eights, and stars, while on YouTube, it writes the phrase “CAM I AM.”

According to [DaveMakesStuff], he figured out how to create the cams with “hours and hours of tedious CAD work.” We imagine there’s a way to do this with maths instead in parametric modelling software, and await such a build on the Hackaday tipsline. Those eager to recreate the build can explore the files on Thingiverse.

We’ve seen some great 3D-printed mechanisms before, too, like this zig-zag cam for a sewing machine. Video after the break.

Continue reading “Hand-Cranked Doodler Made Using A 3D Printer”

What’s Old Is New Again: GPT-3 Prompt Injection Attack Affects AI

What do SQL injection attacks have in common with the nuances of GPT-3 prompting? More than one might think, it turns out.

Many security exploits hinge on getting user-supplied data incorrectly treated as instruction. With that in mind, read on to see [Simon Willison] explain how GPT-3 — a natural-language AI —  can be made to act incorrectly via what he’s calling prompt injection attacks.

This all started with a fascinating tweet from [Riley Goodside] demonstrating the ability to exploit GPT-3 prompts with malicious instructions that order the model to behave differently than one would expect.

Continue reading “What’s Old Is New Again: GPT-3 Prompt Injection Attack Affects AI”