Variable Width 3D Printing The Hard Way

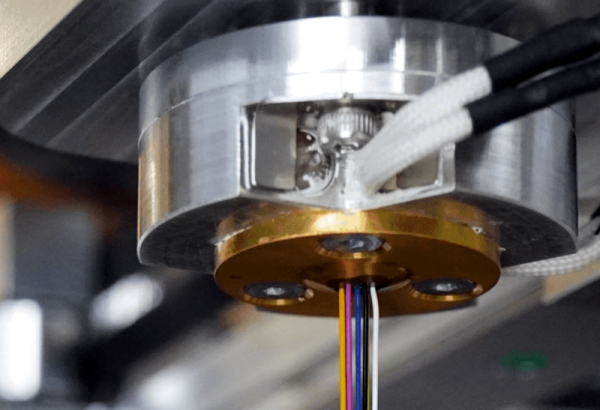
The problem: you want to produce varying line thicknesses when 3D printing. The solution, if you are the Liqtra company, appears to be to put seven print heads together and enable one for thin lines, all of them for thick lines, and something in between for everything else. The technical details are scant, but from the video below and some pictures, you can get a general idea.

There are some obvious benefits and drawbacks. You’d expect that for the right kind of part, this would be fast since you are essentially laying down seven tracks at once. The downside is your track width varies in pretty course steps, assuming you have to use the maximum width of each nozzle to prevent gaps. New slicing software is a must, too.

The demos and pictures show multiple filament colors because it photographs well, but you’d assume in practice that you would use seven spools of the same material. The good thing is that you could print with a single nozzle where that’s important. We assume all the nozzles are the same size, and that will control the practical layer height, but that’s a small price to pay.

The company claims a much faster print, but as we mentioned, this will depend on the specific printed part. They also claim inter-layer strength increases as well, although we found that surprising. This is probably overkill for home users, but we imagine this would be an interesting technology for people trying to run production quantities through a printer.

We don’t remember seeing this approach with a homebrew printer, although having multiple extruders into one or multiple nozzles isn’t unusual anymore. It seems like you could experiment with this kind of technology pretty readily. Of course, there’s more than one way to speed up production.

Continue reading “Variable Width 3D Printing The Hard Way”

An All-Billet, Single-Piece, Flexure-Based Nutcracker

Typical nutcrackers rely on simple pin hinges to join two handles for the cracking task. However, [adam the machinist] has demonstrated that a single-piece nutcracker is possible by using the flexural properties of the right grade of steel.

The nutcracker is manufactured out of 17-4 PH stainless steel, heat treated to the H900 condition. A flexural spring section at the top of the nutcracker takes the place of the usual hinge, allowing the handles to be squeezed together and the teeth of the cracker to open the nut. Machining the flexural section is first achieved with a series of CNC drill operations on the billet stock, before regular milling is used to shape the rest of the spring section and tool. The video dives deep into the finer points of the CNC operations that produce such a great finish on the final part. It even covers the use of a tiny scissor jack to help hold the handles still during machining.

The result is a highly attractive and desirable nutcracker that looks far more special than the regular fare you might pick up at Walgreens. The all-billet tool is a nutcracker very much fit for a sci-fi set. We’ve seen some other kitchen tools around here before, too, albeit of more questionable utility.

Continue reading “An All-Billet, Single-Piece, Flexure-Based Nutcracker”

CUTTING CABLES CURES TANGLED CORD CHAOS

The Toniebox is a toy that plays stories and songs for kids to listen to. Audio content can be changed by placing different NFC enabled characters that magnetically attach to the top of the toy. It can play audio via its built-in speaker or through a wired headphone connected to the 3.5 mm stereo jack. Using the built in speaker could sometimes be quite an irritant, especially if the parents are in “work from home” mode. And wired headphones are not a robust alternative, specially if the kid likes to wander around or dance while listening to the toy. We guess the manufacturers didn’t get the memo that toddlers and cables don’t mix well together. Surprisingly, the toy does not support Bluetooth output, so [g3gg0] hacked his kids Toniebox to add Bluetooth audio output.

[g3gg0] first played with the idea of transmitting audio via an ESP32 connected to the I²S interface, running a readily available A2DP library. While elegant, it is a slightly complex and time consuming solution. Using the ESP32 would also have affected the battery life, given the ESP32’s power hungry nature. Continue reading “CUTTING CABLES CURES TANGLED CORD CHAOS”

A robotic machine turning the wheel of a safe

Adventures In Robotic Safe Cracking

When [Zach Hipps] was faced with a locked safe and no combination, it seemed like calling a locksmith was the only non-destructive option. Well, that or doing something crazy like building a safe-opening robot. Since you’re reading this on Hackaday, we bet you can guess which path he took.

So far, [Zach] has managed to assemble the custom chuck and spindle for the safe cracker. This construction is then mated with an appropriately precise Trinamic controller for the motor, which is perfect for this heist project. After some early consternation around the motor’s stall detection capabilities, the project was able to move forward with extra microcontroller code to ensure that the motor disengages when sensing a ‘hard stop’ during cracking.

Precision is absolutely essential in a project like this. When dealing with a million potential combinations, any potential misconfiguration of the robot could cause it to lose its place and become out-of-sync with the software. This was encountered during testing — while the half-assembled robot was (spoilers) able to open a safe with a known combination, it was only able to do so at slow speed. For a safe with an unknown combination, this slow pace would be impractical.

While the robot isn’t quite ready yet, the Part 1 video below is a great introduction to this particular caper. While we wait for the final results, make sure to check out our previous coverage of another auto dialing robot cracking the code in less than a minute.

Continue reading “Adventures In Robotic Safe Cracking”

A small 16x2 LCD display housed in a green and yellow hobby box.

Arduino-Powered Info Display For Your Windows Computer

If you’ve been pining for a retro-chic 16×2 LCD display to enhance your Windows computing experience, then [mircemk] has got you covered with their neat Windows-based LCD Info Panel.

Your everyday garden variety Arduino is the hero here, sitting between the computer’s USB port and the display to make the magic happen. Using the ‘LCD Smartie‘ software, the display can serve up some of your typical PC stats such as CPU and network utilization, storage capacity etc. It can also display information from BBC World News, email clients, various computer games and a world of other sources using plugins.

It’s clear that the intention here was to include the display inside your typical PC drive bay, but as you can see in the video below, this display can just about fit anywhere. It’s not uncommon to see similar displays on expensive ‘gamer’ peripherals, so this might be an inexpensive way for someone to bring that same LED-lit charm to their next PC build. You probably have these parts sitting in your desk drawer right now.

If you want to get started building your own, there’s more info over on the Hackaday.io page. And if PC notifications aren’t your jam, it’s worth remembering that these 16×2 displays are good for just about anything, like playing Space Invaders.

Continue reading “Arduino-Powered Info Display For Your Windows Computer”

ImHex: An Open Hex Editor For The Modern Hacker

It’s little surprise that most hackers have a favorite text editor, since we tend to spend quite a bit of time staring at the thing. From writing code to reading config files, the hacker’s world is filled with seemingly infinite lines of ASCII. Comparatively, while a hex editor is a critical tool to have in your arsenal, many of us don’t use one often enough to have a clear favorite.

But we think that might change once you’ve taken ImHex for a spin. Developer [WerWolv] bills it specifically as the hex editor of choice for reverse engineering, it’s released under the GPL v2, and runs on Windows, Linux, and macOS. Oh, and did we mention it defaults to a slick dark theme designed to be easy on the eyes during those late night hacking sessions — just like your favorite website? Continue reading “ImHex: An Open Hex Editor For The Modern Hacker”

Virgin Not-Quite-Orbit-Yet

A country’s first orbital satellite launch from home soil is a proud moment, even when as is the case with Virgin Orbit, it’s not from the soil itself but from a Boeing 747 in the stratosphere over the sea. The first launch of the under-wing rocket took place yesterday evening, and pretty much every British space enthusiast gathered round the stream to watch history being made somewhere over the Atlantic south of Ireland. Sadly for all of us, though the launch itself went well and the rocket reached space, it suffered an anomaly in its second stage and failed to reach orbit.

No doubt we will hear more over the coming days as we’re sure they have a ton of telemetry data to work through before they find a definitive answer as to what happened. Meanwhile it’s worth remembering that the first launch of a new platform is a test of a hugely complex set of systems, and this one is certainly not the first to experience problems. It’s the under-wing launch that’s the interesting bit here, and in that we’re glad to see that part of the mission as a success. We know there will be a secomd launch and then many more, as not just the UK’s but Europe’s first launch platform from native soil becomes a viable and hopefully lower-cost launch option than its competitors.

People with very long memories will remember that this wasn’t the first time a British satellite launch attempt failed at the second stage and then went on to launch successfully, but Black Arrow launched Prospero back in 1971 from the Australian outback rather than the chilly North Atlantic.

Header: Österreichisches Weltraum Forum, CC BY-SA 4.0.