A desk fan with an air filter. On the side, the final assembled PCB is visible.

Making A PCB The Old-Fashioned Way

Nearly all modern PCBs are designed with the help of EDA software, but not all of them. [ALTco] shows us the process of plotting out a board the old-fashioned way — by hand.

Back in the day, drawing out the traces on a PCB lead to beautiful, smooth lines that [ALTco] wanted to imitate. But first, he needed to figure out how the rest of the fabrication process worked. He starts by just experimenting, both with the “resist” markers and paint, and the etching compound. Things rarely work first-try, and neither did his home-made etchant. So then it was time to buy some ferric chloride, the standard copper etchant for PBCs. A few more tests sorted out which permanent marker worked best.

[ALTco] starts by thoroughly cleaning a raw copper-clad board so the marker sticks properly, then draws the circuit for a little analog fan controller. The board is then laid in a bath of the etchant for several minutes while gently rocking it to keep the reaction going. Finally the board is taken out, etchant stored for re-use, and the board washed with water and then presumably IPA to remove the remaining marker. Some assembly of the newly-printed circuit board later and you have a cute little smoke absorber for your soldering projects.

Continue reading “Making A PCB The Old-Fashioned Way”

Get That Windows 7 Feel In An OS That Still Gets Updates

Do you want to go back to an era when Windows was… simpler? Back when things worked, before the AI and the bloat took over your hard drive and RAM space in equal measure? You might like to give Classic 7 a spin (via The Register).

From the drop, we should state that Classic 7 is not Windows 7 at all. Instead, it’s a reskin of Windows 10, specifically, the IoT Enterprise LTSC version. This is a particularly attractive version of Windows 10, as Microsoft has promised long-term support in terms of security updates until 2032. It also strips out annoying consumer-focused bloat like the Xbox gaming overlay and Cortana, and it eliminates forced feature updates that have become the norm in modern Windows installs. Combine all those niceties with the clean and simple feel of the recreated Windows 7 interface, and you have a beautiful operating system that has everything you need and nothing you don’t.

There are, of course, some hurdles to jump over; you’d need to find an appropriate license for this version of Windows and all that jazz. But if you long for the days before Microsoft so cruelly eviscerated the Start Menu and started making everything worse, you might find that Classic 7 is for you.

[Thanks to Stephen Walters for the tip!]

A tiny, rectangular, 3D-printed box with an e-paper display and a fortune cookie design beneath it. The fortune reads: "Your next firmware update will both solve and create problems."

E-Fortune Cookie Will Humble, But Never Crumble

Will your next project be a success? Only time will tell, but if you build [gokux]’s tiny ESP32 fortune cookie, we predict that, at the very least, there won’t be any crumbs involved.

After briefly entertaining the idea of shoving an ESP32 in a standard fortune cookie, [gokux] thought better of it and came up with this instead. Once shaken, this small gadget displays a fortune on its e-paper screen. It can store over 3,000 fortunes and works entirely offline, so you’re never without an oracle.

Inside you’ll find a Seeed Xiao ESP32-S3 Plus and a matching e-paper display board. [gokux] is detecting the shakes with an MPU-6050 accelerometer, and powers everything with a small Li-Po pouch.

If you tire of the fortunes that shake out, the small buttons on the left side will get you into the other modes, which are a dice roller and a coin flipper. Again, you just shake the thing until you get what you want. Be sure to check it out in the video after the break.

Want to know how an MPU-6050 works, and what it looks like under the hood? Yeah, we thought so.

Continue reading “E-Fortune Cookie Will Humble, But Never Crumble”

Sliding-Screen Cyberdeck Has Chunky, Rugged Design

[Jankbu] needed a new computer, but had little interest in purchasing a modern laptop off the shelf. Instead, it was time to build a cyberdeck with a neat modular design to suit his exact needs.

The heart of the build is a Raspberry Pi 5, which provides a good amount of computing power for regular tasks. It’s wrapped up in a 3D-printed enclosure with rail mounts on the back, along with a NOS 450 TKL mechanical keyboard, offering full-travel keys in a compact layout. The 10.1″ IPS touchscreen display is mounted on sliding rails to cover the keyboard when it’s not needed. A smattering of buttons live around the screen, in a manner akin to so many industrial controllers. On either side, the deck has large grab handles, with one side featuring custom horizontal and vertical scroll controls, while the other rocks a trackball.  Power is via NP-F batteries, which are more commonly used to run Sony camcorders.

Unlike so many cyberdecks, [Jankbu] didn’t just build the device to look cool—it also serves a practical purpose. It’s great for running Freecad, and the rail mounts on the rear make it perfect for mounting around the workshop during a job as needed. Files are on Github for those eager to learn more.

What’s fun about this build is that it’s not just a show piece, it’s something that gets used every day. That’s a testament to [Jankbu’s] well-reasoned design, that considered what the device was for before it was put together. We’ve featured plenty of other fantastic cyberdecks in the past, too. Video after the break.

Continue reading “Sliding-Screen Cyberdeck Has Chunky, Rugged Design”

Why The Smart Home Bubble Popped

Circa 2015 or so, it seemed like you couldn’t move a finger without being bombarded with ads and articles about ‘smart homes’ and the ‘internet of things’ — all of which would make our lives so much easier and more automated. Fast-forward a decade and this dream has mostly evaporated along with many of the players in the space. Why this happened is the topic of a recent video by [Caya].

An interesting bit of context that the video starts off with is that home automation really kicked off back in 1975, when the X10 protocol and related devices using power lines for signaling began being sold. These fully integrated solutions generally worked reasonably well, but what all changed when the IoT and ‘smart home’ craze kicked off and brought with it an explosion of new standards.

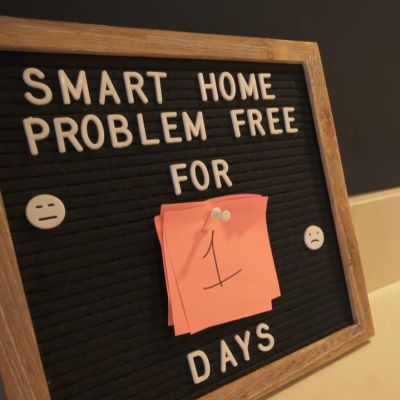
Over the past decade we have seen the concept of a ‘smart home’ collapse into a nightmare of abandoned IoT devices, subscription services, forced ads, privacy violations, and an increasingly more congested 2.4 GHz spectrum that everything from WiFi and Zigbee to Bluetooth and others ended up competing for, with a corresponding collapse in reliability of data transmissions.

As raised in the video, a big issue is that of the financial viability of running the remote services for a smart home solution, even if this is the part that should make it as plug-and-play as a 1990s-era smart home solution. To the average user setting up their own locally hosted smart home solution isn’t really a straightforward option.

Although at the end [Caya] demonstrates using Home Assistant (HA) as a locally hosted alternative, this is still not something that a non-techie will be able to set up or maintain. Even if you shell out a cool two-hundred clams for the Home Assistant Green plug-and-play hardware solution, the average person will be lost the second any of the prescribed steps in provided documentation do not work. Woe to whoever is the person who is ‘good with computers’ in those cases.

Ultimately another problem with ‘smart homes’ is that they’re really not that smart, as you can definitely set up all kinds of rules in HA and similar solutions, but this is more painstaking manual automation with all the excitement of programming PID controllers. Having an actual intelligence behind the system that could react to what’s happening would make it a far easier sell, yet which is where all the ‘smart assistants’ like Alexa keep falling flat.

Currently [Caya] has set up his HA-based lighting configuration to be used by OpenClaw ‘agentic AI’, as a way to add some actual ‘smarts’, but it’s telling that he hasn’t integrated the smart lock of his apartment into the system yet. Nobody wants to have the OpenClaw agent tell you that it ‘cannot open the front door’ for you, after all.

Continue reading “Why The Smart Home Bubble Popped”

Tech In Plain Sight: The Mechanics Of String Trimmers

My old friend Jeff was always vocally upset that he didn’t come up with the idea of a string trimmer, commonly known as a Weed Eater or Weed Whacker. On the one hand, the idea is totally simple: spin some nylon line and cut grass and other relatively soft things. But, it turns out, that making the device actually usable requires a little bit of mechanical engineering.

Of course, the noisy part is a motor. The motor — driven by an engine, a battery, or a power cord — spins a flexible nylon line fast enough that the line becomes rigid from centrifugal force. That’s not the important part.

The humble spool at the bottom of the trimmer is where decades of mechanical engineering, questionable patents, consumer frustration, and genuine cleverness all meet. The earliest string trimmers were primitive. [George Ballas], who patented the Weed Eater in the early 1970s, reportedly got the idea from the rotating brushes in a car wash. Attach flexible cords to a spinning head, and they become cutting tools. In fact, the prototype used a tin can for the head. Elegant. But once the line wears down — which it does constantly — you need a way to expose fresh line. That turns out to be harder than it sounds.

The Simplest System

The easiest approach is fixed-length line. Some trimmers still work this way. You cut short pieces of heavy line (or buy it precut) and insert them into holes in the head. No spool. No springs. No moving parts.

These systems are rugged and are popular on commercial units designed to survive abuse. They also work well with thicker lines or even plastic blades. But they are annoying because every time the line wears out, you stop working and manually replace it. Spool-based systems became dominant very quickly.

The basic spool idea is straightforward enough. Wind a long nylon filament onto a reel. Some reels have two sections to feed line out on two sides of the rotating head. As the line wears away, feed out more line from the spool. But how do you do that while the thing is spinning at several thousand RPM?

Continue reading “Tech In Plain Sight: The Mechanics Of String Trimmers”

Transforming Lamp Built With LED Filaments

[Nick Electronics] had an idea to build a stylish lamp that could transform its shape while lit. This goal was achieved beautifully with the aid of many, many filament LEDs.

If you’re unfamiliar with filament LEDs, they’re basically thin plastic filaments stuffed with lots of individual LEDs that are very close together. This effectively creates a continuous, flexible, glowing string that can be used for all sorts of creative purposes.

[Nick] packed the lights into an interlocking stack of PCBs that make up the lamp’s structure. Each PCB layer hosts four filaments mounted around the outer edge, and has a pin that locks into a groove in the next layer to allow them to tug each other around as they turn. The PCBs rotate around a central shaft, with power passed from one to the other via interlinking wires. Drive is via a stepper motor on top of the lamp, controlled by an A4988 driver. There’s also an ATmega48 microcontroller onboard, which is the brains of the operation. A DC-DC converter onboard steps up the 5 V input voltage from USB-C to 10 volts for the stepper motor.

It’s neat to watch the lamp in action, glowing and slowly shifting in patterns as the layers catch and rotate in and out of alignment. We’ve seen interesting builds in this vein before, like this fantastic origami lamp from a few years ago.

Continue reading “Transforming Lamp Built With LED Filaments”