You Won’t Believe How Much Tech Is Hiding In This Desk

Say what you will about office life: there were definitely some productivity perks, but the coffee is much better at home. Like many of us, [Pierre] has been working from home for the last year or so. And as much as he might enjoy spending so much time in his small Parisian apartment, it lacks many of the amenities of the office such as a scanner, printer, and, you know, a reasonable amount of space in which to work.

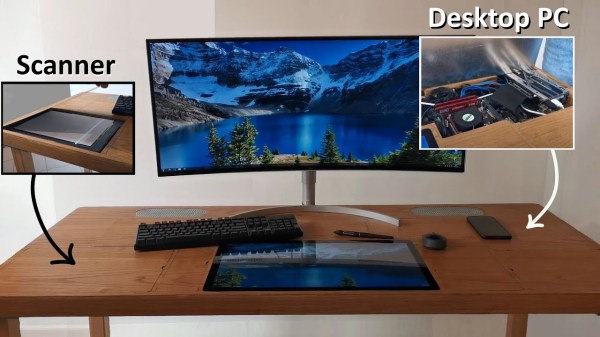
Inspired by another build, [Pierre] set out to build his dream desk that is maximum PC power in minimum space. It is chock full of easily-accessible cavities that hide everything you’d expect, plus a few things you don’t, like a flatbed scanner, a printer, a router, and a wireless charging pad. One cavity is dedicated to I/O, and another has three international power sockets. The only thing it doesn’t hide is the 22″ pen display that [Pierre] uses for sketching, signing documents, and occasionally as a second monitor.

A home-brew jig makes consistent dowel drilling much easier.

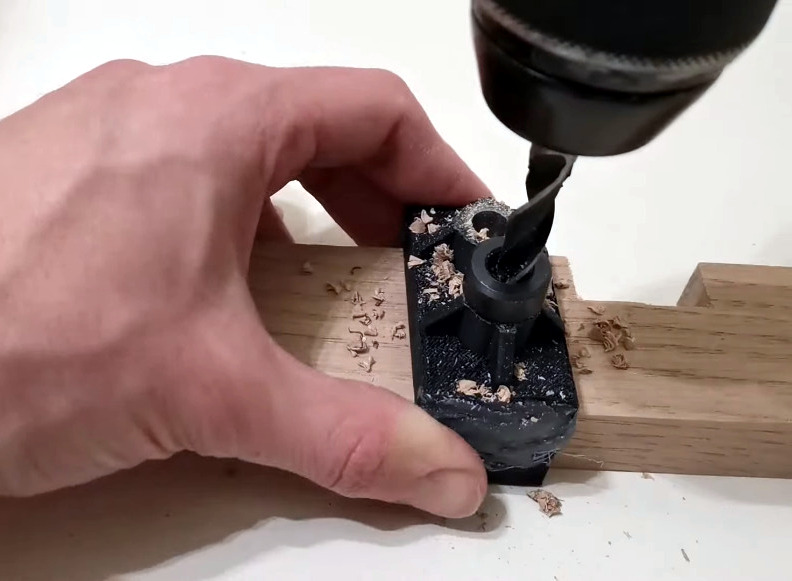
This desk may look like solid wood, but the top is a veneer that’s glued on to a custom-cut 1mm steel sheet. The inside frame is made of hardwood and so are the legs — one of them has a hidden channel for the only two cords that are even somewhat visible — the power and Ethernet cables. He joined all the frame pieces with dowel rods, and made a 3D-printed and metal-reinforced drilling jig to get the holes just right.

[Pierre] started this build by planning out the components and making meticulous notes about the dimensions of every piece. Then he sketched it and modelled it in FreeCAD to get all the cavities and cable runs correct and ensure good airflow through the desk. After that it was on to woodworking, metalworking, and PCB fab for relocated and hidden display controls and a custom-built amplifier.

It’s obvious that a lot of thought went in to this, and there’s a ton of work appreciate here, so clear off that inferior desk of yours and check out the build video after the break. Wish you had a PC desk? [Pierre] is seriously considering a Kickstarter if enough people show interest.

Are you into minimalism, but don’t want to build something of this magnitude? There’s more than one way to get there.

Continue reading “You Won’t Believe How Much Tech Is Hiding In This Desk”

This Pineapple Keyboard Is The Bomb

Now why didn’t we think of this? While building a dactyl manuform — a semi-ergonomic split keyboard — [dapperrogue] had the life-changing epiphany that keyboards can be any shape or size, as long as there is room for wiring and a microcontroller inside. [dapperrogue]’s first foray into the world of fictional ordnance came in the form of an F-bomb — a round macro keeb made in the classic round explosive shape and covered with function keys. Building on the explosive feedback from that, [dapperrogue] built this bomb of a pineapple keeb, the only anti-personnel factor being the clickiness of the key switches.

This groovy grenade has 25 keys total, 24 of which are in a 4×6 grid around the body. The 25th key, the best one, is hiding under the lever and you bet it can only be actuated by pulling the pin first. We love the use of the lever because it makes us think of Morse code keyers, which might be what we would use that switch for.

Inside is an Arduino Pro Micro running QMK and some skillful wiring. The entirely 3D-printed enclosure is in two main pieces that are connected with M3 screws, plus the top. If you want to pack one of your own, the STLs and firmware are out on GitHub. Just don’t take it to the airport.

Be sure to check out the demos after the break — in the stock firmware, every key types out a different onomatopoeic boom-type sound. Are you more of a pacifist when it comes to macro pad design? That’s understandable. We have plenty of different builds to admire.

Continue reading “This Pineapple Keyboard Is The Bomb”

Toggle Switch Puzzle Boggles The Mind, Opens The Box

We all have too much stock of one component or another. Maybe you have more audio pots than you know what to do with, or maybe it’s zener diodes. For [technologyguy], that thing is a pile of toggle switches.  Fortunately he’s always wanted to build a locking box with a binary code that’s laid out in switches — as in, find the right code, and a solenoid unlatches the box. This lovely parts bin special only responds to two combinations out of a possible 4,000+, so anyone who tries to open it should probably block out the afternoon.

Inside you’ll find two 9 V batteries, a home-brew metal latch, a solenoid, and the undersides of four DPDT and eight SPDT toggle switches. If you just picked this thing up and had no idea what was going on, you’d be so screwed as to what to do first. The box needs power, so you’d have to figure out which switch is which. But it’s so much harder than that, because the bottom left switch selects between the two paths that result in an unlocked book-box.

The next two toggles in from the left are on/off selectors for code A and code B, so not only do you have to have the right path chosen, you have to power it, too. The only progress indicators are the LEDs — there’s one for main power, and the other lets you know that the box is unlatched. What a fun conversation piece for the coffee table Zoom-viewable area!

Want to do something far less useful with your throng of toggles? How about a complicated useless machine?

Guide To Mastering OpenSCAD Costs Roughly The Same As OpenSCAD

OpenSCAD is a fantastic free tool for 3D modeling, but it’s far less intuitive to use for non-programmers than mouse-driven programs such as Tinkercad. Powerful as it may be, the learning curve is pretty steep. OpenSCAD’s own clickable cheat sheet and manual comes in handy all the time, but those are really more of a reference than anything else. Never fear, because [Jochen Kerdels] had quite the productive lockdown and wrote a free comprehensive guide to mastering OpenSCAD.

[Jochen]’s book opens with a nice introduction to OpenSCAD and it’s user environment and quickly moves into 10 useful projects of increasing complexity that start with simple stuff like wall anchors and shelf brackets and ends with recursive trees.

There are plenty of printing tips along the way to help realize these projects with minimum frustration, and the book wraps up by covering extra functions not expressly used in the projects.

Of course, you could always support [Jochen]’s Herculean effort by buying the print edition and forcing yourself to type everything in instead of copy/pasting, or give it to someone to introduce them to all the program has to offer.

Need help mastering OpenSCAD workflow? We’ve got that. Just want to make some boxes or airfoils? We have those in stock, too.

Main and thumbnail images via [Devlin Thyne]

Three Ways To Detect The Silver Ball

We speak from experience when we say that making pinball targets is harder than you might think. The surface area of the part of the ball that touches is oh-so-small, and you really need to have gravity on your side for best results. Luckily, [TechnoChic] did the work for us and came up with these three versatile sensor designs that would be good for any game, not just pinball. They all use fresh, pristine cardboard from the Bezos Barn and a conductive fabric tape made by Brown Dog Gadgets that they call maker tape.

With the possible exception of not being solderable (can you solder it? ours hasn’t showed up yet), maker tape is seemingly superior to copper tape because it is designed to be conductive in the Z-direction, and if you’ve ever laid out a copper tape circuit, you know that tape overlaps are pretty much par for the course.

First on the list is the track switch, which we think is pretty much necessary. After all, what fun is a pinball machine without at least one pair of rails to ride? Might as well score some points at the same time. This one looks to be the trickiest since the rails have to be consistently spaced, otherwise the ball will fall. The drawbridge target uses a cardboard hinge and the weight of the ball to force two pieces of tape together to complete the circuit.

The flappy hole target is probably our favorite because it’s the most adaptable. You could use it for all kinds of things, like getting the ball to a basement level of a pinball game, or if you want to be evil, set it up in the drain area and deduct points every time you lose the ball, or just use it to trigger the next ball to drop. This one would also be really good for something like Skee-Ball and would really keep the BoM cost down compared to say, IR break-beam targets or coin slot switches.

You can check out these sensors in a brief demo after the break, and then see how [TechnoChic] put these ideas to use in this winter-themed pinball machine we showed you a few weeks ago.

Continue reading “Three Ways To Detect The Silver Ball”

You Need An Automated Overhead Camera Assistant

It’s 2021. Everyone and their mother is filming themselves doing stuff, and a lot of it is super cool content. But since most of us have to also work the video capture devices ourselves, it can be difficult to make compelling footage with a single, stationary overhead view, especially when there are a lot of steps involved. A slider rig is a good start, but the ability to move the camera in three dimensions programmatically is really where it’s at.

[KronBjorn]’s excellent automated overhead camera assistant runs on an Arduino Mega and is operated by typing commands in the serial monitor. It can pan ±20° from straight down and moves in three axes on NEMA-17 stepper motors. It moves really smoothly, which you can see in the videos after the break. The plastic-minimal design is interesting and reminds us a bit of an ophthalmoscope phoropter — that’s that main rig at the eye doctor. There’s only one thing that would make this better, and that’s a dedicated macro pad.

If you want to build your own, you’re in luck — there’s quite a lot of detail to this project, including a complete BOM, all the STLs, code, and even assembly videos of the 3D-printed parts and the electronics. Slide past the break to check out a couple of brief demo videos.

Not enough room for a setup like this one? Try the pantograph version.

Continue reading “You Need An Automated Overhead Camera Assistant”

Treatment Triggers Teeth To Thrive

We humans like to think we’re pretty advanced, but we can’t regrow missing teeth in adulthood like sharks, alligators, and crocodiles. Once those pearly whites are gone, they’re gone for good, and we don’t even have a way to regenerate the protective enamel. However, this may not always be the case, because scientists at Kyoto University and University of Fukui in Japan have discovered a monoclonal antibody treatment that triggers tooth regeneration in laboratory mice.

Image by Katsu Takahashi/Kyoto University via Medical Express

Monoclonal antibodies are lab-fabbed molecules that act as substitute antibodies to enhance the body’s natural defenses against diseases like cancer and arthritis. These antibodies are also used to develop vaccines and treat COVID-19. In the case of cancer, monoclonal antibodies bind to antigens on cancer cells, effectively flagging them for removal, but they also do much more, such as deliver chemo and radioimmunotherapies.

By blocking the gene USAG-1, the scientists saw an increase in Bone Morphogenic Protein (BMP), which is a molecule that dictates the number of teeth a given creature will have in the first place. Because of this increase in BMP, the mice were able to regrow teeth. This proposition was a challenging one — BMP affects other aspects of development, and the early attempts did more harm than good by causing birth defects. The good news is that the treatment also worked in ferrets, whose teeth are much closer to human dentition than mice. Before moving on to human trials, the scientists will test it out on pigs and dogs. If you were given a second shot at a set of teeth, would you treat them better than the first, or even worse because you can just grow new ones again?

Speaking of pigs, it seems that pig-to-human organ transplants are on track for 2021.