Refurbishing Six Commodore 64s In Parallel

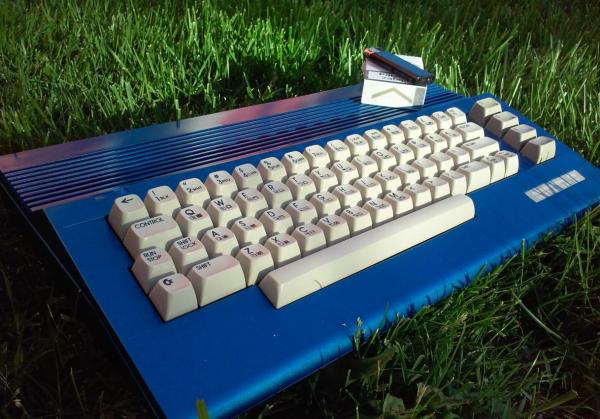
[Drygol] found himself with six Commodore 64’s in various states of disrepair. Because batch work is often more efficient, he detailed the process of restoring all of them in parallel in this one-, two-, three-part series.

The first step was to whiten the cases. Old cases turn yellow from the degradation of the fire retardant additives in the plastic. The proven method to fix this is with a paste called Retr0bright. [Drygol] used hair bleaching paste which is very similar. The cases came out nicely whitened from their treatment.

Next he repaired the keyboard PCB and whitened the keys as well. Drinking was involved, but it all came out okay. The circuit boards were cleaned and inspected. There were a few corroded spots, broken chips, and bad solder joints to be repaired. A few common mods were also installed.

In the final part of the series two of the C64s have SD cards installed into them. A few interesting fixes were done to repair broken plastics. Lastly the two worst cases were painted. In the end [Drygol] found himself with six perfectly working and attractive C64s. Who know’s what he’ll do with them, but we all know that was not the point.

Hackaday Prize Entry: The Strength Of 3D Printed Parts

[Sam Barrett] is doing something that is sorely needed. He’s doing real materials research on FDM parts.

There’s nothing wrong with the rough experiments like hanging a 1 L bottle of water from the end of a rectangular test print to compare strengths. We also have our rules-of-thumb, like expecting the print to perform at 30% of injection molded strength. But these experiments are primitive and the guidelines are based on hearsay. Like early metallurgy or engineering; 3D printing is full of made-up stuff.

What [Sam] has done here is really amazing. He’s produced a model of a printed ABS part and experimentally verified it to behave close enough to the real thing. He’s also set a method for testing and proposed a new set of questions. If it couldn’t be better, he also included his full research notebook. Make sure to read the FDMProperties-report (PDF) in the files section of Hackaday.io.

Sam finally answered a question we've had of what it looks like when the printer over extrudes.
Sam finally answered a question we’ve had of what it looks like when the printer over extrudes.

If research like this is being done elsewhere, it’s either internal to a large 3D printer manufacturer, or it’s behind a paywall so thorough only the Russians can help a regular peasant get through to them. Anyone with access to a materials testing lab can continue the work (looking at you every single engineering student who reads this site) and begin to help everyone achieve an understanding of 3D printed parts that could lead to some really cool stuff one day.

Hackaday Prize Entry: Helping Millions See Clearly

Slit lamps are prohibitively expensive in the third world areas of India where they are most needed. An invention that’s been around for over a hundred years, the slit lamp is a simple-in-concept way to see and diagnose a large array of ocular issues.

Since they are relatively old by technological standards, the principles behind them have become more and more understood as time has gone on. While a nice lab version with a corneal microscope is certainly better, innovations in manufacturing have brought the theoretical minimum cost of the device way down, or at least that’s what [Kewal Chand Swami] hopes.

His design aims for portability and cost reduction. It must be able to travel to remote locations and it must be significantly cheaper than the lab versions. It uses off-the-shelf lenses in a 3D printed housing with a simple LED torch, the kind you can buy for a dollar at the check-out stand.

The assembly slides onto the user’s head and is held there with straps. The doctor can adjust where the slit the lamp shines and also look through a microscope to diagnose the issue. Hopefully devices like this will see similar community support to the prosthetic projects we’ve covered.

Keytar Made Out Of A Scanner To Make Even The 80s Jealous

Do any of you stay awake at night agonizing over how the keytar could get even cooler? The 80s are over, so we know none of us do. Yet here we are, [James Cochrane] has gone out and turned a HP ScanJet Keytar for no apparent reason other than he thought it’d be cool. Don’t bring the 80’s back [James], the world is still recovering from the last time.

Kidding aside (except for the part of not bringing the 80s back), the keytar build is simple, but pretty cool. [James] took an Arduino, a MIDI interface, and a stepper motor driver and integrated it into some of the scanner’s original features. The travel that used to run the optics back and forth now produce the sound; the case of the scanner provides the resonance. He uses a sensor to detect when he’s at the end of the scanner’s travel and it instantly reverses to avoid collision.

A off-the-shelf MIDI keyboard acts as the input for the instrument. As you can hear in the video after the break; it’s not the worst sounding instrument in this age of digital music. As a bonus, he has an additional tutorial on making any stepper motor a MIDI device at the end of the video.

If you don’t have an HP ScanJet lying around, but you are up to your ears in surplus Commodore 64s, we’ve got another build you should check out.

Impressive Custom Built Blacksmith’s Forge

[EssentialCraftsman] is relatively new to YouTube, but he’s already put out some impressive videos. We really enjoyed an episode dedicated to a fixture in his shop, his large custom blacksmith’s forge.

The forge is a custom cast vault of refractory that sits on a platter of fire bricks suspended on a heavy-duty rotating frame. Two forced air natural gas burner provide the heat.  The frame is plasma CNC cut steel welded together.

A lot of technical challenges had to be solved. How does one hold a couple hundred pound piece of refractory in such a way that it can be lifted, especially when any steel parts exposed to the heat of the forge would become plastic and fail? When the forge turns off, how do you keep the hot air in the forge from rising into the blowers and melting them? There were many more.

We were really impressed by the polished final appearance of the forge, and the cleverness of its design. Everything is well thought out, and you can even increase the height of the forge by propping it up on more fire bricks. We hope [EssentialCraftsman] will continue to produce such high quality videos. We also enjoyed his episode on Anvils as well as a weirdly informative tirade on which shape of stake (round or square) to use when laying out concrete jobs. Videos after the break.

Continue reading “Impressive Custom Built Blacksmith’s Forge”

1980s Toy Robot Arm Converted To Steam And Other Explorations

We were doing our daily harvest of YouTube for fresh hacks when we stumbled on a video that eventually led us to this conversion of a 1980s Armatron robot to steam power.

The video in question was of [The 8-bit Guy] doing a small restoration of a 1984 Radio Shack Armatron toy. Expecting a mess of wiring we were absolutely surprised to discover that the internals of the arm were all mechanical with only a single electric motor. Perhaps the motors were more expensive back then?

The resemblance is uncanny.

The arm is driven by a Sarlacc Pit of planetary gears. These in turn are driven by a clever synchronized transmission. It’s very, very cool. We, admittedly, fell down the google rabbit hole. There are some great pictures of the internals here. Whoever designed this was very clever.

The robot arm can do full 360 rotations at every joint that supports it without slip rings. The copper shafts were also interesting. It’s a sort of history lesson on the prices of metal and components at the time.

Regardless, the single motor drive was what attracted [crabfu], ten entire years ago, to attach a steam engine to the device. A quick cut through the side of the case, a tiny chain drive, and a Jensen steam engine was all it took to get the toy converted over. Potato quality video after the break.

Continue reading “1980s Toy Robot Arm Converted To Steam And Other Explorations”

The Othermill Is Something Else

I’ll admit. When I saw the Othermill for the first time I thought it was just another mill with cheap Chinese hardware inside sold as a premium. I’m ashamed to say that I even trash talked it a little bit. It gave me another chance to relearn that I should always do my research before being a jerk, check my assumptions thoroughly, and even then it’s not recommended. Other Machine Company was kind enough to let me swing by the office in Berkeley California. [Danielle], the CEO, led me through the design of the mill as well as the challenges in running the operation.

The Othermill is a serious machine, and with the recent release of the Othermill Pro, it’s only getting better. The components are not bargain basement. This is something that could be more obvious, but it’s almost entirely made from US sourced parts, including the custom stepper motors. There aren’t any ball bearings that will start to make strange noises in a year. It can now cut 6mil traces in a PCB all day long. To put it into perspective. The Othermill Pro costs a third of the price of an equivalent machine from LPKF and has the same capabilities.

Continue reading “The Othermill Is Something Else”