Interactive Game Board Helps Toddler Learn Colors And Shapes

Most parents would do anything to enrich their kids’ worlds and teach them what they need to know. Hacker parents often take it one step further by modifying the kid’s world to allow them to work past a disability. To wit we have an interactive game board to help a toddler learn her shapes and colors.

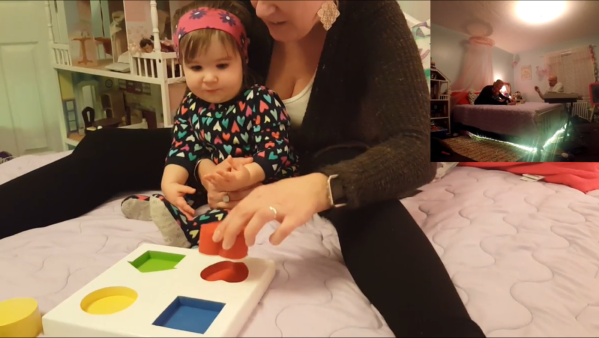
The toddler in question is [Becca], and her needs are special because of the progressive nature of the blindness that will result from her Usher Syndrome. [Becca] will need visual acuity testing much earlier than most toddlers, but a standard eye chart is meaningless to kids before they get their letters. This is where Lea shapes come in – a set of four shapes that are used to make visual testing a game and help practitioners assess what a child can and cannot see.

[Jake] and his wife [Beth] were advised to familiarize [Becca] with the shapes, but all she wanted to do was eat the printed sheet. In order to make the task more entertaining, [Jake] built an interactive board where brightly colored Lea shapes trigger the room lights to change to the same color as the block when it’s inserted into the correct spot on the board, as a visual reward. Reed switches, magnets, and an Arduino comprise the game logic, and the board communicates to the Philips Hue smart bulbs over an NRF24L01. The video below also shows some cool under-bed lights and a very engaged [Becca] learning her shapes and colors.

As we expected when we last covered his efforts to help [Rebecca], [Jake] has leveraged the Raspberry Pi he used as a hub for the stairwell lighting project. We’re looking forward to seeing what else he comes up with, and to see how [Becca] is thriving.

Continue reading “Interactive Game Board Helps Toddler Learn Colors And Shapes”

Decorate Your 3D Prints With Detailed Hydrographic Printing

It’s like the old quip from [Henry Ford]: You can have your 3D prints in any color you want, as long as it’s one. Some strides have been made to bringing more color to your extruded goodies, but for anything beyond a few colors, you’re going to need to look at post-print processing of some sort. For photorealistic 3D prints, you might want to look into a simple hydrographic printing method that can be performed right on a printer.

If some of the prints in the video below look familiar, it’s because we covered the original method when it was presented at SIGGRAPH 2015. [Amos Dudley] was intrigued enough by the method, which uses computational modeling of complex surfaces to compose a distorted image that will be stretched back into shape when the object is dipped, to contact the original authors for permission to use the software. He got a resounding, “Nope!” – it appears that the authors’ institution isn’t big into sharing information. So, [Amos] hacked the method.

In place of the original software, [Amos] used Blender to simulate the hydrographic film as a piece of cloth interacting with the 3D-printed surface. This allowed him to print an image on PVA film that will “un-distort” as the object is dipped. He built a simple tank with overflow for the printer bed, used the Z-axis to dip the print, and viola! Photo-realistic frogs and globes.

[Amos]’ method has its limitations, but the results are pretty satisfying already. With a little more tweaking, we’re sure he’ll get to the point that the original authors did, and without their help, thank you very much.

Continue reading “Decorate Your 3D Prints With Detailed Hydrographic Printing”

The Fab Lab Next Door: DIY Semiconductors

You think you’ve got it going on because you can wire up some eBay modules and make some LEDs blink, or because you designed your own PCB, or maybe even because you’re an RF wizard. Then you see that someone is fabricating semiconductors at home, and you realize there’s always another mountain to climb.

We were mesmerized when we first saw [Sam Zeloof]’s awesome garage-turned-semiconductor fab lab. He says he’s only been acquiring equipment since October of 2016, but in that short time he’s built quite an impressive array of gear; a spin-coating centrifuge, furnaces, tons of lab supplies and toxic chemicals, a turbomolecular vacuum pump, and a vacuum chamber that looks like something from a CERN lab.

[Sam]’s goal is to get set up for thin-film deposition so he can make integrated circuits, but with what he has on hand he’s managed to build a few diodes, some photovoltaic cells, and a couple of MOSFETs. He’s not growing silicon crystals and making his own wafers — yet — but relies on eBay to supply his wafers. The video below is a longish intro to [Sam]’s methods, and his YouTube channel has a video tour of his fab and a few videos on making specific devices.

[Sam] credits [Jeri Ellsworth]’s DIY semiconductor efforts, which we’ve covered before, as inspiration for his fab, and we’re going to be watching to see where he takes it from here. For now, though, we’d better boost the aspiration level of our future projects.

Continue reading “The Fab Lab Next Door: DIY Semiconductors”

Ham Goes Nuts For Tiny Transmitter

What’s the minimal BOM for a working amateur radio transmitter? Looks like you can get away with seven parts, or eight if you include the walnut. You’ve got to have a walnut.

Some hams really love the challenge of QRP, or the deliberate use of low-power transmitters to provide a challenge to making long-distance contacts. We’ve covered the world of QRP before and noted that while QRP rigs don’t throw a lot of power, it doesn’t mean that they need to be simple. Some get quite complex and support many different modulation schemes, even digital modes. With only a single 2N3904 transistor,  [Jarno (PA3DMI)]’s tiny transmitter won’t do much more than send Morse using CW modulation, but given that it’s doing so from inside a walnut shell, we have no complaints. The two halves of the shell are hinged together and hold a scrap of perfboard for the simple quartz crystal oscillator. The prototype was tuned outside the shell,  and the 9-volt battery is obviously external, but aside from that it’s nothing but nuts.

We’d love to see [Jarno] add a spring to the hinge and contacts on the shell halves so no keyer is required. Who knows? Castanet-style keying might be all the rage with hams after that.

Continue reading “Ham Goes Nuts For Tiny Transmitter”

IPhone Brain Surgery

You think you’re good at soldering? Can you solder a CPU? A CPU inside an iPhone? A decapped CPU inside an iPhone? Can you solder inside a decapped CPU inside of an iPhone?

If you can’t, fear not – someone can, and we found him or her courtesy of a video that [Bunnie Huang] tweeted a while back. There’s not much information in the video, but from what we can gather it comes from an outfit called G-Lon Technology in Guang Zhou. Their Facebook page suggests that they teach cellphone repair, and if they take their repairs this far, we’d say the students are getting their tuition’s worth.

The reason for the repair is unclear, although the titles refer to a “CPU to U0301 AP31 AR31 broken repair,” which we take to refer to a boot error that can be repaired by exposing a couple of pads inside the CPU and wiring them to another chip. We’d love to hear comments from anyone familiar with the repair, but even in the absence of a clear reason for undertaking this, the video is pretty impressive. The epoxy cap of the CPU is painstakingly ground away under a microscope, then tiny tools are used to scrape down to the correct layers. Solder mask is applied, hair-thin wires are tacked to the pads, and a UV-curing resin is applied to fill the CPU’s new gaping hole and to stabilize the wires. It seems like a lot of work to save an iPhone, but it sure is entertaining to watch.

Can’t get enough of poking around the innards of chips? We’ve got decapping stories aplenty: one, two, and three that you might like. We’ve even covered at least one CPU internal repair before too.

Continue reading “IPhone Brain Surgery”

Bring Saturday Mornings Back To Life With This Cartoon Server

It was an American ritual for over four decades: wake up early on Saturday morning, prepare a bowl of sugar, and occupy the couch for four glorious hours of cartoons. The only interruptions came when the least-significant sibling had to be commanded to get up to change the channel to one of the two other networks, or when your mom decided to vacuum the TV room. It was a beautiful ritual, but now it’s gone.

Or is it? If you really want to recapture your misspent youth, you can try this Raspberry Pi multi-channel cartoon server with retro TV display. [FozzTexx] started with a yard sale 13″ Zenith set, which languished in his shop for want of a mission. When he found a four-channel video modulator, he knew he had the makings of the full channel-changing Saturday morning experience.

Four Raspberry Pis were configured to serve up four separate streams of cartoons from his Plex server, and after a late Friday night of hacking the whole thing together, each stream was ready to go live at 7:00 AM on Saturday. [FozzTexx] thought of everything — from the pre-“broadcast day” test pattern to actual commercials spliced into the cartoons to the static between the channels, it’s all there in low-definition glory. He even printed up faux TV Guide pages! You can watch a brief demo on [FozzTexx]’ Twitter feed, or you can watch the entire 2-hour Periscope feed if you’re feeling nostalgic.

[FozzTexx] chose UHF channels for his “stations,” so if you want to replicate this build it may pay to bone up on analog TV tuner basics. Or if it’s just the retro look you’re going for, this custom case inspired by a 40s TV might be nice to check out.

Continue reading “Bring Saturday Mornings Back To Life With This Cartoon Server”

What The Flux: How Does Solder Work Anyway?

I’ve been soldering for a long time, and I take pride in my abilities. I won’t say that I’m the best solder-slinger around, but I’m pretty good at this essential shop skill — at least for through-hole and “traditional” soldering; I haven’t had much practice at SMD stuff yet. I’m confident that I could make a good, strong, stable joint that’s both electrically and mechanically sound in just about any kind of wire or conductor.

But like some many of us, I learned soldering as a practical skill; put solder and iron together, observe results, repeat the stuff that works and avoid the stuff that doesn’t. Seems like adding a little inside information might help me improve my skills, so I set about learning what’s going on mechanically and chemically inside a solder joint.

Continue reading “What The Flux: How Does Solder Work Anyway?”