A Baby Named DJ

Some of us are guilty of picking up questionable hardware from garage sales, fleamarkets, and well-meaning relatives. There is a balance between turning down a good investment and hoarding, and if we figure out how to tell the difference you will be the first to know. [Clem Mayer] may start on the side of unwise acquisition, but he pushes a broken fetal detector into the realm of awesome by converting it to an analog synthesizer, born to headline at an Eastern European dance party.

He starts with a basic teardown, and we get to see how old hardware was serviceable with only two standard screws. It is a good thing too, because the nickel-cadmium batteries are older than some of you and they are in need of replacement. New nickel-metal hydride batteries got it up and running but [Clem] does not have a baby bump so its functionality turned to Pink Floyd era synthesizer circuit bending. Circuit bending involves modifying a circuit for sound it was not intended to make.

Continue reading “A Baby Named DJ”

Dead Bug Arduino Is Lively And Shield-Compatible

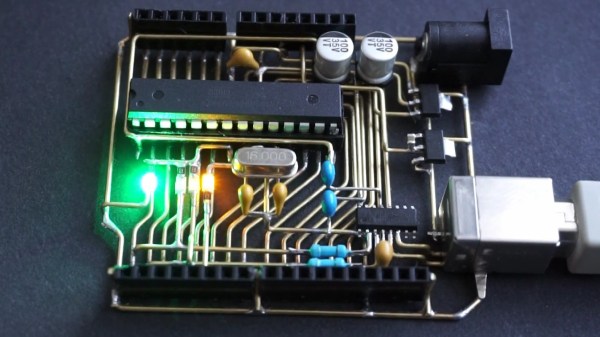
Microcontroller demo boards such as the Arduino UNO are ubiquitous on Hackaday as the brains of many a project which inevitably does something impressive or unusual. Sometime someone builds a particularly tiny demo board, or an impressively large one. In the case of the board featured here, the Arduino is a gorgeous labor of love which can’t really be called a board since there is no PCB. Instead of the traditional fiberglass, [Jiří Praus] formed brass bars into the circuitry and held it together with solder.

This kind of dedication to a project leaves an impression. His notes show he saw the barest way to operate an ATMega328, built it, tested, and moved on to the power supply to make it self-sustaining, then onto the communication circuit, and finally the lights. The video below shows a fully-functional Arduino happily running the blink program. He plans to encase the brass portion in resin to toughen it up and presumably keep every bump from causing a short circuit. The components are in the same position due to a custom jig which means a standard shield will fit right into place.

The Arduino started far less flashy yet nearly as fragile, and it has grown. And shrunk.

Continue reading “Dead Bug Arduino Is Lively And Shield-Compatible”

Repurposed Plastic Protects PCBs

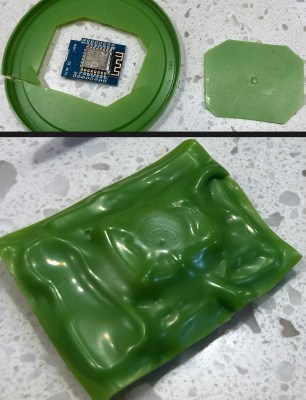
An errant wire snipping across the wrong electrical pins spells the release of your magic smoke. Even if you are lucky, stray parts are the root of boundless malfunctions from disruptive to deadly. [TheRainHarvester] shares his trick for covering an Arduino Nano with some scrap plastic most of us have sitting in the recycling bin. The video is also after the break. He calls this potting, but we would argue it is a custom-made cover.
The hack is to cut a bit of plastic from food container lids, often HDPE or plastic #2. Trim a piece of it a tad larger than your unprotected board, and find a way to hold it in place so you can blast it with a heat gun. When we try this at one of our Hackaday remote labs and apply a dab of hot glue between the board and some green plastic it works well. The video suggests a metal jig which would be logical when making more than one. YouTube commenter and tip submitter [Keith o] suggests a vacuum former for a tighter fit, and we wouldn’t mind seeing custom window cutouts for access to critical board segments such as DIP switches or trimmers.

We understand why shorted wires are a problem, especially when you daisy-chain three power supplies as happened in one of [TheRainHarvester]’s previous videos.

Continue reading “Repurposed Plastic Protects PCBs”

Teardown The Things You Love

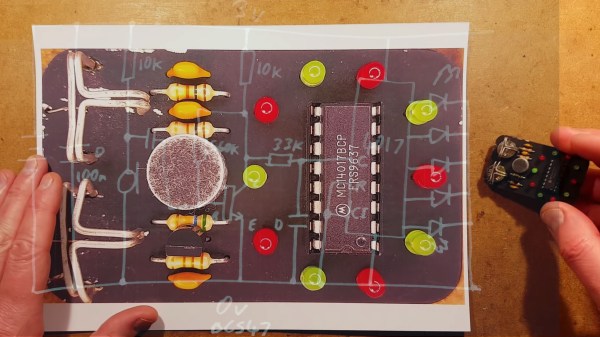
This two-decade old blinkenlights project (YouTube link, and also below the break) would look at home among current $1 soldering kits except for a few key differences. Firstly, it has the teardown artist’s name on the back and comes from an era when DIY circuit boards really meant doing things yourself including the artwork, etching, and drilling. The battery holders are our favorite feature. Instead of being a part on a BOM, this board has some wire loops soldered in place and relies on a pair of venerable LR44 alkaline cells instead of the CR2032s we all enjoy today.

Given the age of the project, [Big Clive] is not revisiting his old masterpiece just for nostalgia, he is having to retrace his old circuit and do a teardown on his own work because the schematic was lost to time. We think there is value to revisiting old work like an archaeologist would approach an ancient necklace. Some of us used to comment our code religiously for fear that we would forget what went through our learning minds and need to be reminded of that rigor.

If you want another battery holder that doesn’t need a part number, check out one that leverages the semi-flexible nature of thin PCBs or fake the batteries altogether. Continue reading “Teardown The Things You Love”

Breakout Board Becomes Pogo Pin Programmer

Making a programming jig becomes exponentially more difficult after two pins and who would even consider building one if they were not setting up more than twenty boards? If it were easy for novices to construct jigs, we might all have a quiver of them on the shelf next to our microprocessors. Honestly, a tackle box full of homemade programming fixtures sounds pretty chic. The next advantage to ditching the demo boards is that bare processors take up less room and don’t draw power for unnecessary components like unused voltage regulators and LEDs. [Albert David] improves the return-on-time-investment factor by showing us how to repurpose a WeMos board to program a bare ESP8266 module.

[Albert]’s concept can apply to many other surface-mount chips and modules. The first step is to buy a demo board which hosts a programmable part and remove that part. Since you’ve exposed some solder pads in the process, put pogo pins in their place. Pogo pins are small spring-loaded probes that can be surface mounted or through-hole. We’ve used them for programming gorgeous badges and places where the ESP8266 has already been installed. When you are ready to install your software, clamp your Franken-porcupine to the controller and upload like normal. Rinse, wash, repeat. We even get a view of the clamp [Albert] uses.

Ripping Up A Rothult

NFC locks are reaching a tipping point where the technology is so inexpensive that it makes sense to use it in projects where it would have been impractical months ago. Not that practicality has any place among these pages. IKEA carries a cabinet lock for $20USD and does not need any programming but who has a jewelry box or desk drawer that could not benefit from a little extra security? Only a bit though, we’re not talking about a deadbolt here as this teardown shows.

Rothult has all the stuff you would expect to find in an NFC scanner with a moving part. We find a microcontroller, RFID decoder, supporting passives, metal shaft, and a geartrain. The most exciting part is the controller which is an STM32L051K8 processor by STMicroelectronics and second to that is the AS3911 RFID reader from AMS. Datasheets for both have links in the teardown. Riping up a Rothult in the lab, we find an 25R3911B running the RFID, and we have a link to that PDF datasheet. Both controllers speak SPI.

There are a couple of things to notice about this lock. The antenna is a flat PCB-mounted with standard header pins, so there is nothing stopping us from connecting coax and making a remote antenna. The limit switches are distinct so a few dabs of solder could turn this into an NFC controlled motor driver. Some of us will rest easy when our coworkers stop kidnapping our nice pens.

Rothult first came to our attention in a Hackaday Links where a commenter was kind enough to tip us off to this teardown. Thanks, Pio! If this whets your appetite for NFC, we have more in store.

Magnets Versus Laundry Detergent

Soap cleans clothes better than magnets. There, we are spoiling the ending so don’t accuse us of clickbaiting. The funny thing is that folks believe this is plausible enough to ask magnets experts so often that they dedicate a blog entry to comparing magnets and soap. Since you already know how this ends, let’s talk about why this is important. Science. Even though some magnet retailers, herein referred to as [the experts] can easily dismiss this question as fanciful or ridiculous, they apply the scientific method to show that their reasoning is sound and clean evidence is on their side. [The experts] detail the materials and techniques in their experiment so peers may replicate the tests and come to the same results themselves. We do not doubt that the outcome would be equally conclusive.

The experiment includes a control group which processes dirty clothes without detergent or magnets, one group with only magnets, one group with only detergent, and one group with both. White clothing was soiled with four well known garment killers and manually agitated in a bin of warm water. We guessed that magnets would be on par with the control group, and we were pleased to be right. [The experts] now have a body of work to reference the next time someone comes at them with this line. The only question now is if tricky spouses used science to get nerds to do the laundry.

In this age of spin, keeping facts straight instead of jumping to heartfelt conclusions is more vital than ever. We are all potentially citizen scientists so testing a conspiracy is within everyone’s grasp.

Continue reading “Magnets Versus Laundry Detergent”