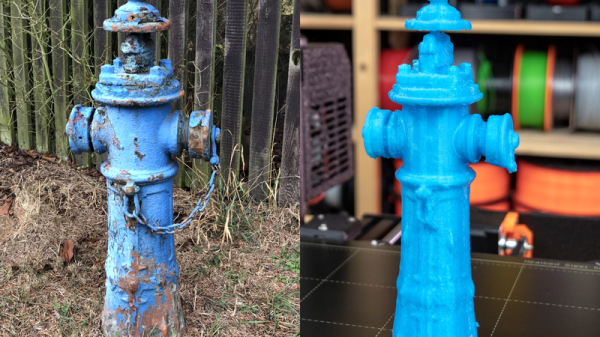
SPIDriver Shows You What’s Going On

When you’re debugging two bits of electronics talking SPI to each other, there’s a lot that can go sideways. Starting from the ground up, the signals can be wrong: data not synced with clocks right, or phase inverted. On top of that, the actual data sent needs to make sense to the receiving device. Are you sending the right commands?

When nothing’s working, you’re fighting simultaneously on these two fronts and you might need different tools to debug each. An oscilloscope works great at the physical layer, while something like a Bus Pirate or fancier logic analyzer works better at the data layer because it can do parsing for you. [James Bowman]’s SPIDriver looks to us like a Bus Pirate with a screen — giving you a fighting chance on both fronts.

SPIDriver also has a couple more tricks up its sleeve: a voltage and current monitor for the device under test, so you don’t even have to break out your multimeter when you’re experiencing random resets. We asked [James] if these additions had a sad history behind them. He included this XKCD.

Everything about SPIDriver is open, so you can check out the hardware design, browse the code, and modify any and all of it to your taste. And speaking of open, [James] is also the man behind the Gameduino and an amazing FPGA Forth soft-CPU.

It’s fully crowd-funded, but it closes in a couple of days so if you want one, get on it soon.

And if you want to learn more about SPI debugging, we’ve written up a crash-course. With the gear and the know-how, you at least stand a fighting chance.

Fatalities Vs False Positives: The Lessons From The Tesla And Uber Crashes

In one bad week in March, two people were indirectly killed by automated driving systems. A Tesla vehicle drove into a barrier, killing its driver, and an Uber vehicle hit and killed a pedestrian crossing the street. The National Transportation Safety Board’s preliminary reports on both accidents came out recently, and these bring us as close as we’re going to get to a definitive view of what actually happened. What can we learn from these two crashes?

There is one outstanding factor that makes these two crashes look different on the surface: Tesla’s algorithm misidentified a lane split and actively accelerated into the barrier, while the Uber system eventually correctly identified the cyclist crossing the street and probably had time to stop, but it was disabled. You might say that if the Tesla driver died from trusting the system too much, the Uber fatality arose from trusting the system too little.

But you’d be wrong. The forward-facing radar in the Tesla should have prevented the accident by seeing the barrier and slamming on the brakes, but the Tesla algorithm places more weight on the cameras than the radar. Why? For exactly the same reason that the Uber emergency-braking system was turned off: there are “too many” false positives and the result is that far too often the cars brake needlessly under normal driving circumstances.

The crux of the self-driving at the moment is precisely figuring out when to slam on the brakes and when not. Brake too often, and the passengers are annoyed or the car gets rear-ended. Brake too infrequently, and the consequences can be worse. Indeed, this is the central problem of autonomous vehicle safety, and neither Tesla nor Uber have it figured out yet.

Continue reading “Fatalities Vs False Positives: The Lessons From The Tesla And Uber Crashes”

Frozen Rat Kidney Shipping Container

The biggest allure of 3D printing, to us at least, is the ability to make hyper-personalized objects that would otherwise fall through the cracks of our mass-market economy. Take, for instance, the Frozen Rat Kidney Shipping Container, or maybe some of the less bizarro applications in the US National Institute of Health’s 3D Print Exchange.

The Exchange is dominated, at least in terms of sheer numbers, by 3D models of proteins and other biochemical structures. But there are two sections that will appeal to the hacker in you: prosthetics and lab equipment. Indeed, we were sent there after finding a nice model of a tray-agitator that we wanted to use for PCB etching. We haven’t printed one yet, but check out this flexible micropositioner.

While it’s nowhere near as comprehensive a resource as some other 3D printing model sites, the focus on 3D printing for science labs should really help those who have that particular itch to find exactly the right scratcher. Or a tailor-made flexible container for slicing frozen rat kidneys. Whatever you’re into. We don’t judge.

Man with skull image: [jaqtikkun]

DIY Coil Winding Machine Counts The Hacky Way

“Wait, was that 423 or 424?” When you’re stuck winding a transformer or coil that has more than a few hundred turns, you’re going to want to spend some time on a winding jig. This video, embedded below, displays a simple but sufficient machine — with a few twists.

The first elaboration is the addition of a shuttle that moves back and forth in sync with the main spindle to lay the windings down nice and smooth. Here, it’s tremendously simple — a piece of threaded rod and a set of interchangeable wheels that are driven by a big o-ring belt. We love the low-tech solution of simply adding a twist into the belt to swap directions. We would have way overthought the mechanism.

But then the hack is the digital counter made out of an old calculator. We’ve seen this before, of course, but here’s a great real-world application.

Thanks [Jānis] for the tip!

Continue reading “DIY Coil Winding Machine Counts The Hacky Way”

Silicon Bugs In The FTDI FT232R, And A Tidy RF VCO Project

[Scott Harden] wrote in to tell us of some success he’s having using the FT232 chip to speak SPI directly from his laptop to a AD98850 digital signal generator. At least that was his destination. But as so often in life, more than half the fun was getting there, finding some still-unsolved silicon bugs, and (after simply swapping chips for one that works) potting it with hot glue, putting it in a nice box, and putting it up on the shelf.

In principle, the FTDI FT232 series of chips has a bit-bang mode that allows you to control the individual pins from a fairly simple API on your target computer, using their drivers and without installing anything on basically any platform. We wrote this feature up way back in 2009, and [Scott] was asking himself why he doesn’t see more hacks taking advantage of bit-bang mode.

“Square” waves

Then he answered his own question the hard way, by spending hours “debugging” his code until he stumbled on the FTDI errata note (PDF), where they admit that bit-bang mode doesn’t get timings right at all on the FT232R and FT232RL parts. FTDI has made claims that they fixed the bug in subsequent chip revisions, but the community has not been able to confirm it. If you want to use bit-bang mode, which is plenty cool, steer clear of the FT232R chips — the ones found in the ever-popular FTDI cables and many adapter dongles.

The good news here is twofold. First, now you know. Second, bit-bang mode is tremendously useful and it works with other chips from the vendor. Particularly, the FT232H and FT230X chips work just fine, among others. And [Scott] got his command-line controlled digital VCO up and running. All’s well that ends well?

We’ll wrap up with questions for the comment section. Do other manufacturers’ cheap USB-serial chips have an easily accessible bit-bang mode? Are any of you using USB bit-bang anyway? If so, what for?

Reverse-Emulating NES: Nintendception!

This is a stellar hack, folks. [Tom7] pulled off both full-motion video and running a Super Nintendo game on a regular old Nintendo with one very cute trick. And he gives his presentation of how he did it on the Nintendo itself — Nintendo Power(point)! The “whats” and the “hows” are explained over the course of two videos, also embedded below.

In the first, he shows it all off and gives you the overview. It’s as simple as this: Nintendo systems store 8×8 pixel blocks of graphics for games on their ROM cartridges, and the running program pulls these up and displays them. If you’re not constrained to have these blocks stored in ROM, say if you replaced the cartridge with a Raspberry Pi, you could send your own graphics to be displayed.

He demos a video of a familiar red-haired English soul-pop singer by doing just that — every time through the display loop, the “constant” image block is recalculated by the Raspberry Pi to make a video. And then he ups the ante, emulating an SNES on the Pi, playing a game that could never have been played on an NES in emulation, and sending the graphics block by block back to the Nintendo. Sweet!

The second video talks about how he pulled this off in detail. We especially liked his approach to an epic hack: spend at least a day trying to prove that it’s impossible, and when you’ve eliminated all of the serious show-stoppers, you know that there’s a good chance that it’ll work. Then, get to work. We also learned that there were capacitors that looked identical to resistors used in mid-80s Japan.

These are long videos, and the first one ends with some wild speculation about how a similar human-brain augmentation could take a similar approach, replacing our “memories” with computed data on the fly. (Wait, what?!? But a cool idea, nonetheless.) There’s also another theme running through the first video about humor, but frankly we didn’t get the joke. Or maybe we just don’t know what’s funny. Comments?

None of that matters. A SNES game was played in an NES by pushing modified graphics from a “ROM” cartridge in real-time. And that’s awesome!

If you want more Nintendo-in-Nintendo goodness, check out this NES ROM that’s also a zip file that contains its own source code. If you compile the source, you get the zip file, which if you unzip gives you the source to compile. Right?

Continue reading “Reverse-Emulating NES: Nintendception!”

Friday Hack Chat: Logic Noise

If you like your synthesizers glitchy, squawky, or simply quick-and-dirty, you won’t want to miss this week’s Hack Chat with Hackaday’s own [Elliot Williams], because he’ll be brain-dumping everything he knows about making music with 4000-series CMOS logic chips. Break out your breadboards!

Continue reading “Friday Hack Chat: Logic Noise”