Entropy And The Arduino: When Clock Jitter Is Useful

What do you do, when you need a random number in your programming? The chances are that you reach for your environment’s function to do the job, usually something like rand() or similar. This returns the required number, and you go happily on your way.

A shift register configured as a pseudo-random number generator.
A shift register configured as a pseudo-random
number generator. [by KCAuXy4p CC0 1.0]
Except of course the reality isn’t quite that simple, and as many of you will know it all comes down to the level of randomness that you require. The simplest way to generate a random number in software is through a pseudo-random number generator, or PRNG. If you prefer to think in hardware terms, the most elementary PRNG is a shift register with a feedback loop from two of its cells through an XOR gate. While it provides a steady stream of bits it suffers from the fatal flaw that the stream is an endlessly repeating sequence rather than truly random. A PRNG is random enough to provide a level of chance in a computer game, but that predictability would make it entirely unsuitable to be used in cryptographic security for a financial transaction.

There is a handy way to deal with the PRNG predictability problem, and it lies in ensuring that its random number generation starts at a random point. Imagine the  shift register in the previous paragraph being initialised with a random number rather than a string of zeros. This random point is referred to as the seed, and if a PRNG algorithm can be started with a seed derived from a truly unpredictable source, then its output becomes no longer predictable.

Selecting Unpredictable Seeds

Computer systems that use a PRNG will therefore often have some form of seed() function alongside their rand() function. Sometimes this will take a number as an argument allowing the user to provide their own random number, at other times they will take a random number from some source of their own. The Sinclair 8-bit home computers for example took their seed from a count of the number of TV frames since switch-on.

The not-very-random result of a thousand analogRead() calls.

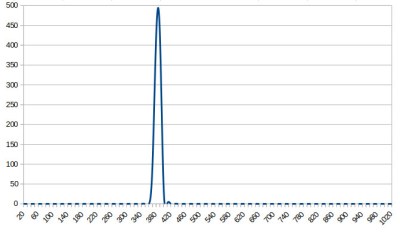
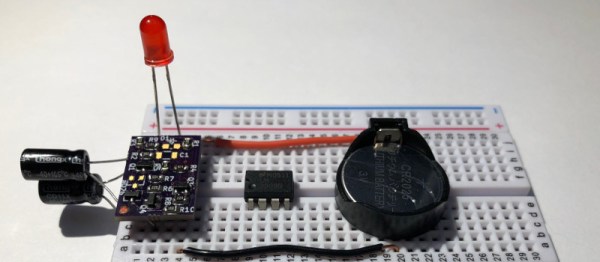
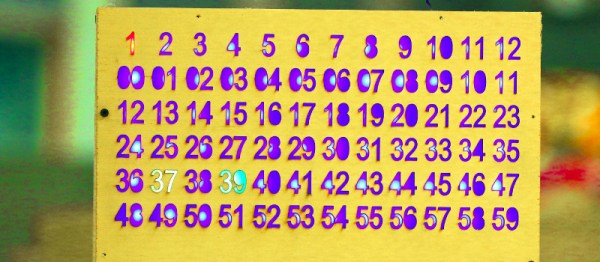
The Arduino Uno has a random() function that returns a random number from a PRNG, and as you might expect it also has a randomSeed() function to ensure that the PRNG is seeded with something that will underpin its randomness. All well and good, you might think, but sadly the Atmel processor on which it depends has no hardware entropy source from which to derive that seed. The user is left to search for a random number of their own, and sadly as we were alerted by a Twitter conversation between @scanlime and @cybergibbons, this is the point at which matters start to go awry. The documentation for randomSeed() suggests reading the random noise on an unused pin via analogRead(), and using that figure does not return anything like the required level of entropy. A very quick test using the Arduino Graph example yields a stream of readings from a pin, and aggregating several thousand of them into a spreadsheet shows an extremely narrow distribution. Clearly a better source is called for.

Noisy Hardware or a Jittery Clock

As a slightly old-school electronic engineer, my thoughts turn straight to a piece of hardware. Source a nice and noisy germanium diode, give it a couple of op-amps to amplify and filter the noise before feeding it to that Arduino pin. Maybe you were thinking about radioactive decay and Geiger counters at that point, or even bouncing balls. Unfortunately though, even if they scratch the urge to make an interesting piece of engineering, these pieces of hardware run the risk of becoming overcomplex and perhaps a bit messy.

The significantly more random result of a thousand Arduino Entropy Library calls.

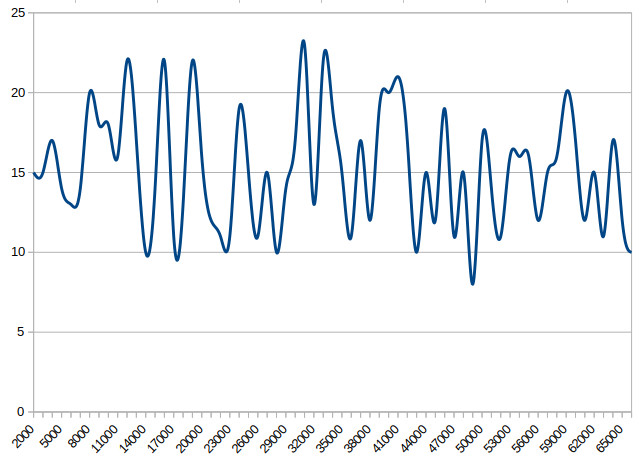
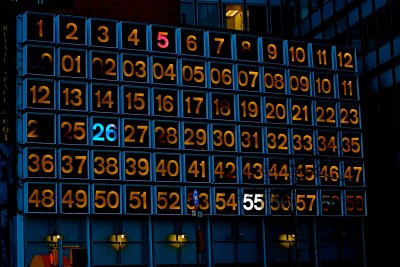
The best of the suggestions in the Twitter thread brings us to the Arduino Entropy Library, which uses jitter in the microcontroller clock to generate truly random numbers that can be used as seeds. Lifting code from the library’s random number example gave us a continuous stream of numbers, and taking a thousand of them for the same spreadsheet treatment shows a much more even distribution. The library performs as it should, though it should be noted that it’s not a particularly fast way to generate a random number.

So should you ever need a truly random number in your Arduino sketch rather than one that appears random enough for some purposes, you now know that you can safely disregard the documentation for a random seed and use the entropy library instead. Of course this comes at the expense of adding an extra library to the overhead of your sketch, but if space is at a premium you still have the option of some form of hardware noise generator. Meanwhile perhaps it is time for the Arduino folks to re-appraise their documentation.

The subject of entropy and generating random numbers is one that has appeared on these pages many times. [Voja Antonic] made a in-depth study using uninitialized RAM as an entropy source for microcontrollers. If you have an insatiable appetite for understanding Linux entropy, we point you at [Elliot Williams]’ comprehensive examination of the subject.

[Arduino image: DustyDingo Public domain]

Retro Rear-Projection Numeric Display Gets A Teardown

We recently featured an entertaining project here, a digital clock with a variety of different retro display technologies forming its numerals. Among those was an extremely unusual device, a rear-projection display with an array of bulbs each able to shine through a different letter or numeral slide. There was such interest in this device that its owner [Suedbunker] subjected one to a teardown for all to see.

The displays came from an organ which he suggests may have been manufactured around 1900. We suspect that may be a rather early estimate due to its use of a printed circuit board, but it is no less a fascinating device for it. A rectangular enclosure secured by twist-tabs opens to reveal a matrix of small filament bulbs on a PCB and supported by a stack of resin boards, in front of which was placed a slide with a letter or number for each one. Before that lies a sheet of glass, and then a molded plastic lens assembly which provides an individual lens for each of the 12 bulbs. When a bulb is illuminated with these in place, the letter or number is projected on the screen at the front of the unit.

It has the advantage of simplicity, no need for a high voltage, and high-quality characters and flexibility in displaying alternatives through different slides, though at the expense of quite a bulky package. The bulbs are quite energy-sapping, so for his clock he replaced them with LEDs. We like it as one of the more practical retro numeric displays, but its size means we probably won’t see a comeback.

You can see our write-up of the clock using the projection display here.

3D Printed Wave Lamp Forecasts The Weather

While browsing Thingiverse, [Dushyant Ahuja] found a rather pleasing wave lamp, and since a mere lamp on its own would not quite be enough, he added a means by which his lamp could provide weather alerts by means of changing its color.

It’s fair to say that the wave lamp is not a print for the faint-hearted, and it took him 30 hours to complete. However, it has the interesting feature of not requiring a support or raft. There is also a base for the lamp designed to take a strip of addressable LEDs, and he modified its design to mount a small PCB containing an ESP8266 module and a level shifter chip. The code for the ESP relies on the OpenWeatherMap API, and changes the LED color based on the rainfall forecast.

Casting our minds back a decade, this lamp is reminiscent of the long-departed Nabaztag product, best described as an internet-connected plastic anthropomorphic rabbit that could keep you updated with information such as weather or stock market trends through lighting up and the movement of its ears. It was an overpriced idea tied into a proprietary online back end that was probably well before its time back in 2004. Perhaps repackaged for 2017 with a commodity microcontroller board Nabaztag has finally found its application.

There is a short video showing the color change and an LED animation, which we’ve put below the break.

Continue reading “3D Printed Wave Lamp Forecasts The Weather”

The PlyPad: CNC Machine Yourself A Tiny House

The Maslow CNC project is a CNC mill for sheet woodwork that is designed to be as inexpensive as possible and to be assembled by the end user. They’ve dropped us a line to tell us about a recent project they’ve undertaken as part of a collaboration to produce the PlyPad, a tiny house for Kenton Women’s Village, a project to tackle homelessness among women in part of the City of Portland.

Their write-up is a fascinating look at the issues surrounding the design and construction of a small dwelling using CNC rather than traditional methods. As an example their original design featured an attractive sawtooth roofline with multiple clerestory windows, but sadly a satisfactory solution could not be found to the problem of keeping it waterproof and they were forced to adopt a more conventional look.

The walls of the building are a ply-foam bonded sandwich, and the house is constructed in 4 foot sections to match the width of a sheet of ply. There are several section designs with built-in furniture, for example containing a bed, or storage space.

This house was designed to be part of a community with central washing and sanitary facilities, so it does not incorporate the bathroom you might expect. However it is not impossible to imagine how sections could be designed containing these, and could be added to a full suite of construction choices. We are reminded of its similarity to the WikiHouse project.

We covered the Maslow project back in 2016, it is especially pleasing to see that it has been something of a success.

There Once Was An IC Dedicated To Blinking An LED

Today you can buy flashing LEDs; a simple two-lead component that requires only a power supply to produce even flashes of light. They look for all the world like any other LED, though embedded in the plastic dome is an integrated circuit to do all that flashing work.

There was a time though when a flashing LED was something of a big deal, so much so that National Semiconductor produced a dedicated chip for the task. The LM3909 boasted the ability to flash an LED for over a year using a single C battery. That part is now long out of production, so [Dillon] has implemented the LM3909 circuit using discrete components on a small PCB designed to take pins and fit the footprint of the original.

Why on earth might a reborn LM3909 be of interest to him, you ask? Well, he wasn’t able to make a 555 flash the LED from a coin cell, and a friend mentioned this chip which piqued his interest. The internal schematic is in the data sheet (found in the files section of his project), so he was able to implement it relatively easily using common parts. It still requires an external capacitor just like the original, but there is space on-board should you wish to put it there.

He’s produced a video we’ve placed below the break showing the device in action, proving it to be a drop-in replacement for an original. Recreations of classic chips using discretes are nothing new, we recently brought you a reborn PSU regulator chip made in 2014. An while you’re playing around with coin cell batteries, may we direct your attention to the Coin Cell Challenge.

Continue reading “There Once Was An IC Dedicated To Blinking An LED”

Mine Bitcoin With An ESP8266

With all the hype surrounding cryptocurrencies and the current high not quite so high but still pretty eye-watering price of Bitcoin, there are some things which might once have been pure folly that could now be deemed worthy of pursuit. There is an excavation mission being considered to unearth a hard drive containing an early Bitcoin wallet in a Welsh landfill, for instance. But a more approachable task for you may be the possibility of mining using minimal hardware.

Take [Merlot Machina]’s project for example, implementing a Bitcoin miner on an ESP8266. Part of this is the timeless pursuit of answering the joke question: “Will it mine Bitcoin”, and the other part is looking at this like a lottery ticket. Is it a worthwhile punt at a prize for a minimal investment?

He gives us a rundown of some of the statistics involved, and comes away with the conclusion that it is something like a not-very-good lottery ticket. The ESP performs 1200 hashes per second while the entire Bitcoin community manages about 1.2 exahashes per second. This he calculates gives him a 1 in 1016 chance of mining a block every ten minutes, which for the tiny cost of an ESP and its relatively frugal power budget is a chance he sees as worth taking.

So far he has implemented the hashing algorithm and verified it against a known hash on an already-mined block. At this point though he’s hit a roadblock in the need to run Bitcoin core on a server to keep the ESP supplied with new block headers, so the ESP miner remains a proof of concept. The write-up is still an interesting read though, and given that many readers will have a few spare ESP boards it’s possible that one of you may take it to the next level and Win It Big. If that’s you, you’ll be able to sit on your private island sipping a cool drink, and laugh at the commenters who said it would never happen. Meanwhile here at Hackaday we’ll stick to tried-and-trusted revenue generation strategies, such as bringing you the latest hardware hacks.

This might seem a peculiarly slow miner, but it’s not the slowest we’ve seen by any means. The ever-prolific [Ken Shirriff] has tried it on an IBM 1401 mainframe and a Xerox Alto, and you can of course do it the old-fashioned way.

Have Your Own 200 Water Street Digital Clock

On the front of a building in New York City, above a branch of the ubiquitous Starbucks coffee chain, there is a clock. It is no ordinary clock, the 200 Water Street clock is an art installation created by the artist [Rudolph de Harak], and consists of 72 lighted numbers which are illuminated in sequence to show hours, minutes, and seconds. It is a landmark of sufficient fame that [Jason Ben Nathan] and [Eldar Slobodyan], Cornell University students of [Bruce Land], decided to make their own tribute to it as their course project.

Water Street clock at night
Water Street clock at night [via NYC ♥ NYC]
It’s a fairly straightforward build, thanks to the use of Adafruit Dotstar multicolour LED strips which are populated with APA102 pixels. Behind the scenes is a PIC32 microcontroller, and the time information comes from an off-the-shelf 60kHz WWVB time signal receiver. There is also a temperature sensor, for a handy second function.

The front panel is a piece of ply with the required numbers nicely laser-cut. All the schematics and code are available, should you fancy your hand at building your own version of the clock.

If you are curious about the real-life clock here’s an image. But you get a much more interesting perspective if you stand in front of it. If you just can’t go there, get an approximation through the wonders of Google Street View.