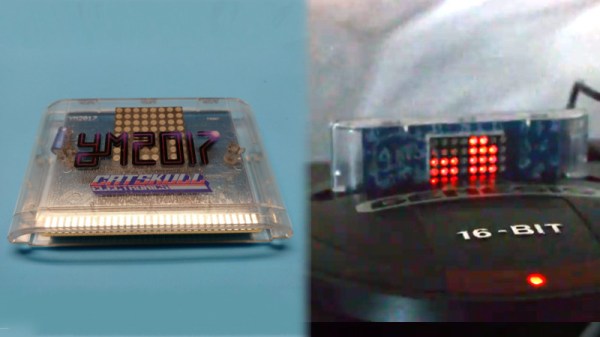
The Sega Genesis, or Mega Drive if you’re not from North America, isn’t exactly this summer’s hottest new console, but it still has a huge following 29 years after launch. Fans range from retro Sonic enthusiasts to hardcore chiptune composers, and this year, Catskull Electronics is releasing a Genesis compilation album on a cartridge with a rather special feature.
The cartridge sports an 8×8 LED matrix, which acts as a visualiser for the audio coming out of the console. They’re controlled with a combination of data and address lines with some buffers and 74-series glue logic to make it all work together. Special attention was paid to make sure the LED matrix doesn’t just respond to all activity on the bus, though it would perhaps be cool to see some blinkenlights on a 90s console one day.
Each row of LEDs is attached to an address line, and each column to a data line. It’s a fairly basic multiplexing setup which sees each LED only actually lit for a fraction of a second, but sweeping the display at speed creates a lasting display. The image data is stored as an 8×8 sprite in the system RAM, and updated with the sound level of each channel from the Genesis’s audio subsystem.
The team are looking to release the ROM code in future to inspire copycat designs, which has the potential to spawn even more Genesis cart releases in future. We look forward to seeing what else the community comes up with. And if you’re a die-hard Genesis fan, there are other ways to listen to those classic tunes too.
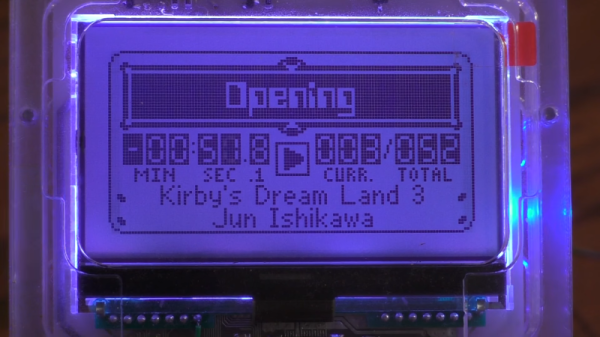
Chiptunes are the fantastic, bleeping musical renditions of the soundchips of retro consoles past. Performers of the art overwhelmingly favour the various flavours of Game Boy, though there are those who work with such varied machines as the Commodore 64, Sega Genesis, and the Nintendo Entertainment System. A little more off the beaten track in the chiptune scene is the Super Nintendo, but [kevtris] has struck out and built a chiptune player for SNES-based music.
The heavy lifting is handled by an FPGA, which emulates the SNES’s S-SMP sound processor, and handles loading the music from the SPC-format files. Being chiptunes, these files store both the instrument data as well as the note data for the music. Audio output is clean and crisp, as heard in the test video.
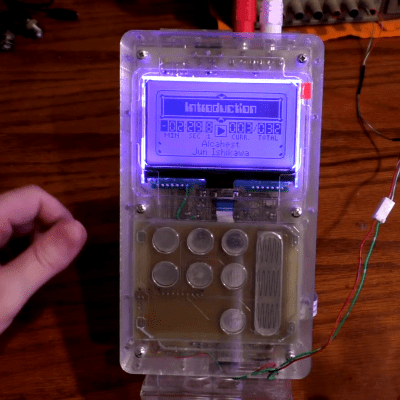
The laser cut case lends the device a great aesthetic.
Case design is where this project really shines. Laser cut clear acrylic is combined with a bright LCD character display and some LEDs which create an effect not unlike a glowing magical block from your 90s platformer of choice. It’s combined with some slick capacitive buttons that avoid the need to drill holes for bulky traditional buttons. [kevtris] goes through the case design, showing how it all fits together with a combination of screws and standoffs. Being built out of a series of essentially 2D slices, the case is stacked up one layer at a time.
What really stands out about this project is the fit and finish. There’s plenty of microcontroller and FPGA projects out there that can hum out a tune, but the attention to detail paid to the case design and the neatly laid out PCB really add polish to a project like this. For a different take, why not check out this chiptune player built around a Raspberry Pi?
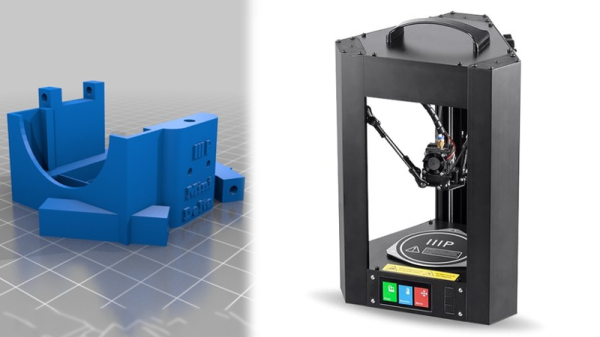
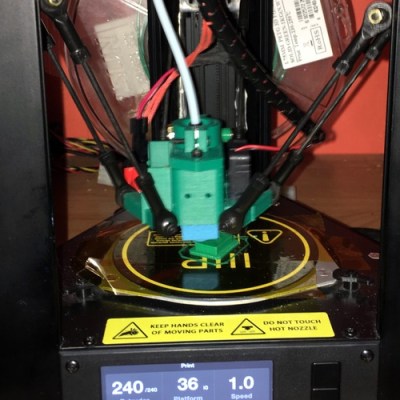
3D printers are now cheaper than ever and Monoprice is at the absolute forefront of that trend. However, some of their printers struggle with flexible filaments, which is no fun if you’ve discovered you have a taste for the material properties of Ninjaflex and its ilk. Fear not, however — the community once again has a solution, in the form of a hot end adapter for the Monoprice Mini Delta.
The Mini Delta is a fantastic low-cost entry into 3D printing but its hot end has a break in the Bowden between the extruder and nozzle. This can lead to flexible filaments not being properly guided through the hot end and a general failure to print. This adapter allows the fitting of the popular E3D V6 hot end, and is similar to modifications out there for other Monoprice printers.
Overall, 3D printing has long benefited from the efforts of the community to bring both incremental improvements and major leaps forward to the technology. We look forward to seeing more hacks on the Monoprice range!
As ever, I am fighting a marginally winning battle against my 1991 Mazda MX-5, and this is the story of how I came to install a wideband oxygen sensor in my Japanese thoroughbred. It came about as part of my ongoing project to build myself a viable racecar, and to figure out why my 1990s Japanese economy car engine runs more like a late 1970s Malaise-era boat anchor.
I’ve always considered myself unlucky. My taste for early 90s metal has meant I’ve never known the loving embrace of OBD-2 diagnostics, and I’ve had to make to do with whatever hokey system was implemented by manufacturers who were just starting to produce reliable fuel injection systems.
Narrowband oxygen sensor voltage output. The output is heavily dependent on sensor temperature and highly non-linear, making these sensors unsuitable for delivering a true AFR reading.
This generally involves putting in a wire jumper somewhere, attaching an LED, and watching it flash out the trouble codes. My Mazda was no exception, and after putting up with a car that was running rich enough to leave soot all over the rear bumper, I had to run the diagnostic.
It turned up three codes – one for the cam angle sensor, and two for the oxygen sensor. Now, a cam angle sensor (CAS) fault will normally prevent the car running at all, so it’s safe to assume that was an intermittent fault to keep an eye on.
The oxygen sensor, however, was clearly in need of attention. Its job is to allow the engine control unit (ECU) to monitor the fuel mixture in the exhaust, and make sure it’s not too rich or too lean. As my car was very obviously running too rich, and the diagnostic codes indicated an oxygen sensor failure, a repair was in order.
I priced up replacement sensors, and a new oxygen sensor could be had for under $100. However, it wasn’t exactly what I wanted, as not all oxygen sensors are created equal. Cars in the 80s and 90s typically shipped from the OEM fitted with what’s called a narrowband oxygen sensor. These almost always consist of a zirconia dioxide cell that outputs a voltage depending on the difference in oxygen concentration between the exhaust gas and the free air. These sensors generally sit at 0.45 V when the fuel mixture is stoichiometric, but rapidly change to 0.1 V in a lean condition and 0.9 V in a rich condition. The response is highly non-linear, and changes greatly with respect to temperature, and thus is only good for telling the ECU if it’s rich or lean, but not by how much. ECUs with narrowband sensors tend to hunt a lot when running in closed loop O2 control – you’ll see an engine at idle hunt either side of the magical 14.7 stoichiometric air fuel ratio, never able to quite dial in on the correct number.
As I intend to switch to an aftermarket ECU in the future, I’ll need to tune the car. This involves making sure the air/fuel ratios (AFRs) are correct, and for that I need to be able to properly measure them. Just knowing whether you’re rich or lean isn’t enough, as often it’s desirable to run the engine intentionally rich or lean at certain engine loads. To get a true AFR reading requires fitting a wideband oxygen sensor. These are a little more complicated.
The design process for any product is necessarily an iterative one. Often, a prototype is modelled or built, and changes are made to overcome problems and improve the design. This can be a tedious process, and it’s one that MIT’s CSAIL has sought to speed up with InstantCAD.
The basic idea is integrating analysis tools as a plugin within already existing CAD software. A design can be created, and then parametrically modified, while the analysis updates on screen in a near-live fashion. Imagine modelling a spanner, and then dragging sliders to change things like length and width while watching the stress concentrations change in real time. The tool appears to primarily be using some sort of finite element analysis, though the paper also shows examples of analyzing fluid flows as well.
The software is impressive, however there are caveats. Like any computer analysis, serious verification work must be undertaken to ensure its validity. We suspect that there may be issues with more complex geometries that lead to inaccurate simulation. It’s not the sort of tool you’d use for anything that puts life and limb at risk, but we can see it having great uses for designing basic objects when you want to quickly gain an idea of what sort of effect certain parameter changes will have.
The other main disappointment is that while this tool looks great, it doesn’t appear to be publicly available in any form. Whether this is due to universities and complicated IP requirements or the potential for future commercialization is anyone’s guess. Regardless, you can read the conference paper here or check out the video below. Or you could read up on the applications of finite element analysis to 3D printer slicers, too.
Anyone who regularly presents to an audience these days has known the pain of getting one’s laptop to work reliably with projection hardware. It’s all the more fraught with pain when you’re hopping around from venue to venue, trying desperately to get everything functioning on a tight schedule. [Seb] found that the magic keystrokes they used to deal with these issues no longer worked on the Macbook Pro Touchbar, and so a workaround was constructed in hardware.
The build itself is simple – an Adafruit Trinket serves as the brains, with a meaty 12mm tactile button used for input. The Trinket emulates a USB keyboard and sends the Cmd-F1 keypress to the computer when the button is pressed. The button’s even mounted in a tidy deadbugged fashion.
While it’s not at all complicated from a build standpoint, the key to this project is that it’s a great example of using the tools available to solve real-life problems. When you’re in a rush with 300 people waiting for your talk to start, the last thing you need to be worrying about is a configuration issue. [Seb] now has a big red button to mash to get out of trouble and get on with the job at hand. It does recall this much earlier hack for emulating a USB keyboard with an Arduino Uno or Mega. It’s a useful skill to have!
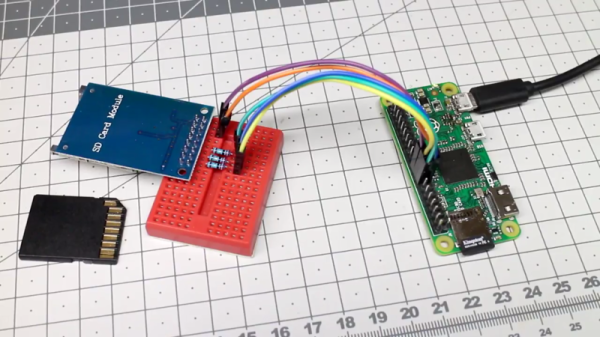
The Raspberry Pi Zero is a beautiful piece of hardware, fitting an entire Linux computer into a package the size of a pack of gum (don’t chew it, though). However, this size comes with limited IO options, which can be a complication for some projects. In this case, [Hugatry] wanted extra storage, and devised a smart method to add a second SD card to the Pi Zero.
The problem with the Pi Zero is that with only a single USB port, it’s difficult to add any other storage to the device without making things bulkier with hubs or other work arounds. Additionally, the main SD card can’t be removed while the Pi is running, so it makes sense to add an easy-to-use removable storage option to the Pi Zero.
It’s quite a simple hack – all that’s required to pull it off is a few resistors, an SD card connector, and some jumper wires. With everything hooked up, a small configuration change enables the operating system to recognise the new card.
Overall it’s great to see hacks that add further functionality to an already great platform. If you find it’s not powerful enough, you can always try overclocking one.