AI On Raspberry Pi With The Intel Neural Compute Stick

I’ve always been fascinated by AI and machine learning. Google TensorFlow offers tutorials and has been on my ‘to-learn’ list since it was first released, although I always seem to neglect it in favor of the shiniest new embedded platform.

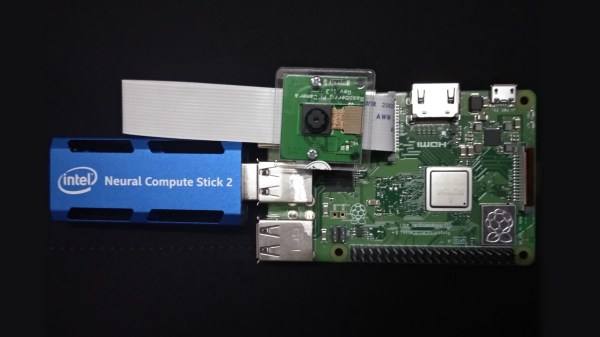
Last July, I took note when Intel released the Neural Compute Stick. It looked like an oversized USB stick, and acted as an accelerator for local AI applications, especially machine vision. I thought it was a pretty neat idea: it allowed me to test out AI applications on embedded systems at a power cost of about 1W. It requires pre-trained models, but there are enough of them available now to do some interesting things.

You can add a few of them in a hub for parallel tasks. Image credit Intel Corporation.

I wasn’t convinced I would get great performance out of it, and forgot about it until last November when they released an improved version. Unambiguously named the ‘Neural Compute Stick 2’ (NCS2), it was reasonably priced and promised a 6-8x performance increase over the last model, so I decided to give it a try to see how well it worked.


I took a few days off work around Christmas to set up Intel’s OpenVino Toolkit on my laptop. The installation script provided by Intel wasn’t particularly user-friendly, but it worked well enough and included several example applications I could use to test performance. I found that face detection was possible with my webcam in near real-time (something like 19 FPS), and pose detection at about 3 FPS. So in accordance with the holiday spirit, it knows when I am sleeping, and knows when I’m awake.

That was promising, but the NCS2 was marketed as allowing AI processing on edge computing devices. I set about installing it on the Raspberry Pi 3 Model B+ and compiling the application samples to see if it worked better than previous methods. This turned out to be more difficult than I expected, and the main goal of this article is to share the process I followed and save some of you a little frustration.

Continue reading “AI On Raspberry Pi With The Intel Neural Compute Stick”

Compiling NodeMCU For The ESP32 With Support For Public-Private Key Encryption

When I began programming microcontrollers in 2003, I had picked up the Atmel STK-500 and learned assembler for their ATtiny and ATmega lines. At the time I thought it was great – the emulator and development boards were good, and I could add a microcontroller permanently to a project for a dollar. Then the ESP8266 came out.

I was pretty blown away by its features, switched platforms, except for timing-sensitive applications, and it’s been my chip of choice for a few years. A short while ago, a friend gave me an ESP32, the much faster, dual core version of the ESP8266. As I rarely used much of the computing power on the ESP8266, none of the features looked like game changers, and it remained a ‘desk ornament’ for a while.

About seven weeks ago, support for the libSodium Elliptic Curve Cryptography library was added. Cryptography is not the strongest feature of IoT devices, and some of the methods I’ve used on the ESP8266 were less than ideal. Being able to more easily perform public-private key encryption would be enough for me to consider switching hardware for some projects.

However, my preferred automated build tool for NodeMCU wasn’t available on the ESP32 yet. Compiling the firmware was required – this turned out to be a surprisingly user-friendly experience, so I thought I’d share it with you. If I had known it would be so quick, this chip wouldn’t have sat on my desk unused quite so long!  Continue reading “Compiling NodeMCU For The ESP32 With Support For Public-Private Key Encryption”

The Linux Throwie: A Non-Spacefaring Satellite

Throwies occupy a special place in hardware culture — a coin cell battery, LED, and a magnet that can be thrown into an inaccessible place and stick there as a little beacon of colored light. Many of us will fondly remember this as a first project. Alas, time marches inevitably on, and launching cheerful lights no longer teaches me new skills. With a nod to those simpler times, I’ve been working on the unusual idea of building a fully functional server that can be left in remote places and remain functional, like a throwie (please don’t actually throw it). It’s a little kooky, yet should still deliver a few years of occasional remote access if you leave it somewhere with sunlight.

A short while ago, I described the power stages for this solar-powered, cloud accessible Linux server. It only activates on demand, so a small solar cell and modest battery are sufficient to keep the whole show running.

Where we left off, I had a solar cell that could charge a battery, and provide regulated 12 V and 5 V output. For it to be a functional device, there are three high level problems to solve:

  1. It must be possible to set up the device without direct physical access
  2. You must be able to remotely turn it on and off as needed.
  3. It needs to be accessible from the Internet.

The funny thing is, this hardware reminds me of a satellite. Of course it’s not meant to go into space, but I do plan to put it somewhere not easy to get to again, it runs off of solar power, and there’s a special subsystem (ESP8266) to tend the power, check for remote activation, and turn the main computer (Raspberry Pi 3) on and off as necessary. This sounds a lot like space race tech, right?

As I have a bit more code than usual to share with you today, I’ll discuss the most interesting parts, and provide links to the full firmware files at the end of the article.

Continue reading “The Linux Throwie: A Non-Spacefaring Satellite”

The Linux Throwie: Powering A Linux Server With A 0.3W Solar Panel

Have you ever had one of those moments, when you’re rummaging through your spare parts heap, and have a rather bizarre project idea that you can’t quite get out of your head? You know, the ones that have no clear use, but simply demand to be born, of glass and steel and silicon?

This time, the stubborn idea in question was sort of like a solar-rechargeable LED throwie, but instead of a blinking light, it has a fully cloud-accessible embedded Linux server in the form of a Raspberry Pi 3 Model B+. Your choice of embedded Linux board should work — I just happen to have a lot of these due to a shipping error.

There were two main challenges here: First, it would have to combine the smallest practical combination of solar panel, power supply, and Li-ion cell that could run the Raspberry Pi. Second, we’ll need to remotely activate and access the Pi regardless of where it is, as well as be able to connect it to WiFi without direct physical access. In this article we’ll be dealing with the first set of problems — stay tuned for the rest.

Continue reading “The Linux Throwie: Powering A Linux Server With A 0.3W Solar Panel”

Selling Everything, Moving To Asia, And Setting Up A Company

Today I don’t have a hack for you. I have a story, one that I hope will prove useful to a few of you who are considering a move to Asia to chase opportunities here.

Seven years ago, I was a pretty stereotypical starving hacker. I had five jobs: A full-time dead-end job in biotech, and four part-time or contract gigs that were either electronic hardware design or programming. I worked perhaps 50 hours a week, and was barely past the poverty line – I was starting to wonder why I spent so much time in school. I saw the economic growth in Asia as an attractive but risky opportunity.

Check out that image above…France? No, this is Shenzhen and let’s face it: many exciting things are made there (even the copies). After a short visit to the region, I decided to take that risk but not in Shenzhen. I sold everything I owned and moved from Canada to Vietnam and started a company. Over the last seven years things have worked out well, although I certainly wish I had known more about the process before I got on a plane. This article is about the general path I took to get where I am. Obviously I don’t know the legal framework of every country in Asia, but speaking in generalities I hope that I can cover some interesting points for the curious and adventurous.

Continue reading “Selling Everything, Moving To Asia, And Setting Up A Company”

Track Everything, Everywhere With An IoT Barcode Scanner

I’ve always considered barcodes to be one of those invisible innovations that profoundly changed the world. What we might recognize as modern barcodes were originally designed as a labor-saving device in the rail and retail industries, but were quickly adopted by factories for automation, hospitals to help prevent medication errors, and a wide variety of other industries to track the movements of goods.

Medication errors in hospitals are serious and scary: enter the humble barcode to save lives. Source: The State and Trends of Barcode, RFID, Biometric and Pharmacy Automation Technologies in US Hospitals

The technology is accessible, since all you really need is a printer to make barcodes. If you’re already printing packaging for a product, it only costs you ink, or perhaps a small sticker. Barcodes are so ubiquitous that we’ve ceased noticing them; as an experiment I took a moment to count all of them on my (cluttered) desk – I found 43 and probably didn’t find them all.

Despite that, I’ve only used them in exactly one project: a consultant and friend of mine asked me to build a reference database out of his fairly extensive library. I had a tablet with a camera in 2011, and used it to scan the ISBN barcodes to a list. That list was used to get the information needed to automatically enter the reference to a simple database, all I had to do was quickly verify that it was correct.

While this saved me a lot of time, I learned that using tablet or smartphone cameras to scan barcodes was actually very cumbersome when you have a lot of them to process. And so I looked into what it takes to hack together a robust barcode system without breaking the bank.

Continue reading “Track Everything, Everywhere With An IoT Barcode Scanner”

Move Aside Mercury: Measuring Temperature Accurately With An RTD

Temperature is one of the most frequently measured physical quantities, and features prominently in many of our projects, from weather stations to 3D printers. Most commonly we’ll see thermistors, thermocouples, infrared sensors, or a dedicated IC used to measure temperature. It’s even possible to use only an ordinary diode, leading to some interesting techniques.

Often we only need to know the temperature within a degree Celsius or two, and any of these tools are fine. Until fairly recently, when we needed to know the temperature precisely, reliably, and over a wide range we used mercury thermometers. The devices themselves were marvels of instrumentation, but mercury is a hazardous substance, and since 2011 NIST will no longer calibrate mercury thermometers.

A typical Pt100 RTD probe

Luckily, resistance temperature detectors (RTDs) are an excellent alternative. These usually consist of very thin wires of pure platinum, and are identified by their resistance at 0 °C. For example, a Pt100 RTD has a resistance of 100 Ω at 0 °C.

An accuracy of +/- 0.15 °C at 0 °C is typical, but accuracies down to +/- 0.03 °C are available. The functional temperature range is typically quite high, with -70 °C to 200 °C being common, with some specialized probes working well over 900 °C.

It’s not uncommon for the lead wires on these probes to be a meter or more in length, and this can be a significant source of error. To account for this, you will see that RTD probes are sold in two, three, and four wire configurations. Two-wire configurations do not account for lead wire resistance, three-wire probes account for lead resistance but assume all lead wires have the same resistance, and four-wire configurations are most effective at eliminating this error.

In this article we’ll be using a 3-wire probe as it’s a good balance between cost, space, and accuracy. I found this detailed treatment of the differences between probe types useful in making this decision.

Continue reading “Move Aside Mercury: Measuring Temperature Accurately With An RTD”