Pokédex Case Keeps Your Phone Powered Up So You Can Catch ‘Em All

The launch of Pokemon Go has unleashed the franchise upon the world once again but this time it’s encouraging users to get active and socialize in the great outdoors. To show off their dedication to the cause, [Npoole] 3D printed a Pokédex external battery and case to combat the game’s already legendary drain on their Galaxy S4’s resources.

Pokedex Open Back
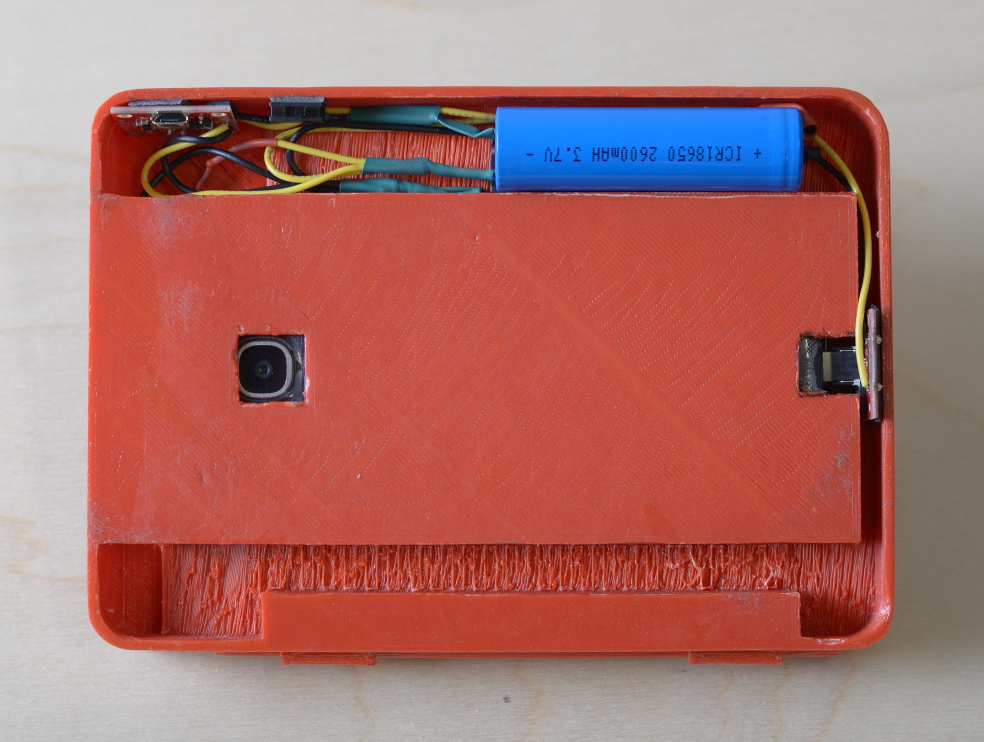
Mimicking the first-generation Kanto design, [Npoole] 3D printed it in red ABS and added a small circuit with a red, yellow and green LED to complete the effect. Inside, a 18650 lithium cell provides the much-needed backup power via a micro B plug and is boosted to 5V with a LiPo charger/booster board. Despite a switch on the circuit, the battery slowly drains so that’s something to be corrected in a future version.

As you can see, there is still some room left over in the external bat–I mean–Pokédex, and [Npoole]  intends to add another battery and a cooling fan to further improve the design. The result is a little bulky, but for new and diehard fans alike, a working Pokédex definitely worth it.

While that’s printing, if you’re looking to hack your way to the perfect Poké-ball throw, try out this lo-tech addition to your Pokémon trainer kit.

[via Sparkfun]

Mechanized One-Man Sawmill

The title of ‘maker’ is conventionally applied to the young-adult age group. In the case of 84 year-old Ralph Affleck, a lifelong sawmiller, ‘maker’ perhaps undersells the accomplishment of building a fully functioning sawmill that can be operated by a single individual.

Starting in the trade at the age of 16 under his father’s tutelage, fifty years of working in sawmills saw him still loving what he did as retirement loomed. So, with pen, paper, and a simple school ruler he designed the entire shop from scratch. Decades of expertise working with wood allowed him to design the machines to account for warping and abnormalities in the timber resulting in incredibly accurate cuts.

With no other examples to guide his design — aside from perhaps old style steam-powered sawmills, and newer portable ones that he feels are inadequate for the job — much of the shop is built from scratch with scavenged parts. And, that list is impressive: four hydraulic cylinders from a Canberra bomber, levers from an old locomotive, differentials and gearboxes from a MAC and 1912 Republic trucks, a Leyland engine that operated for 13 years without the need for maintenance, and an assortment of old military and air force vehicle parts. This is complimented by his log skidder — also custom — that would look at home in a post-apocalyptic wasteland. Built from two tractors, it combines three gearboxes for 12 forward and 8 reverse gears(what!?), and can hit 42mph in reverse!

Continue reading “Mechanized One-Man Sawmill”

A Grounded Option For The Jet-Setting Homebody

Over the course of 10 years, [Bruce Campbell] has built himself a sleek pad out of a Boeing 727-200 in the middle of the picturesque Oregon countryside.

As you’d expect, there are a number of hurdles to setting up a freaking airplane as one’s home in the woods. Foremost among them, [Campbell] paid $100,000 for the aircraft, and a further $100,000 for transportation and installation costs to get it out to his tract of land — that’s a stiff upfront when compared to a down payment on a house and a mortgage. However, [Campbell] asserts that airplanes approaching retirement come up for sale with reasonable frequency, so it’s possible to find something at a lower price considering the cost of dismantling an airframe often compares to the value of the recovered materials.

Once acquired and transported, [Campbell] connected the utilities through the airplane’s existing systems, as well going about modifying the interior to suit his needs — the transparent floor panels are a nice touch! He has a primitive but functional shower, the two lavatories continue to function as intended, sleeping, dining and living quarters, and a deck in the form of the plane’s wing.

Continue reading “A Grounded Option For The Jet-Setting Homebody”

Lightweight Game Console Packs A Punch

Any maker worth their bits will look for new ways to challenge themselves. [Robert Fotino], a computer science student at the University of California, is doing just that: designing and building his own lightweight hobbyist game console that he has appropriately named Consolite.

[Fotino] wrote his own compiler in C++ that converts from C-like languages to a custom-designed assembler that he has dubbed Consolite Assembly. To test his code, he also wrote an emulator before loading it onto the Mimas V2 FPGA board. Presently, Consolite  uses 64KiB of main memory and 48 KiB of video memory; a future version will have 32 bit support to make better use of the Mimas’ 64 MiB of on board ram, but the current 16-bit version is a functional proof of concept.

consolite-status-leds-and-hardware-switches_thumbnailAn SD card functions as persistent storage for up to 256 programs, which can be accessed using the hardware switches on the Mimas, with plans to add user access in the form of saving game progress, storage outside of main memory, etc. — also in a future update that will include audio support.

As it stands, [Fotino] has written his own versions of Breakout, Tetris, and Tron to show off his project.

Not wanting for diligence, [Fotino] has provided thorough documentation of nearly every step along the way in his blog posts and on GitHub if you are looking for guidelines for any similar projects you might have on the back burner — like an even tinier game console.

[via r/FPGA]

Door Iris Porthole Is The Perfect Fix For Detroit Hackerspace

In order to resolve the problem of congestion at the entrance to their hackerspace, the minds at i3Detroit installed a motion-activated mechanical iris in their door’s porthole.

Grabbing the design online (which they are now hosting on their site here), the parts were laser cut out of wood, gold leaf was added for effect, and it was relatively easy to assemble. PIR sensors detect movement on both sides of the door and an FET resistor connected to an orange LED add some old-school science fiction flair. The iris is actuated by a 12V car window motor — which works just fine on the 5V power that it’s supplied with — and an Arduino filling in as a controller. Start and stop positioning required some limit switches that seem to do the trick.

Continue reading “Door Iris Porthole Is The Perfect Fix For Detroit Hackerspace”

Staying In And Playing Skyrim Has Rarely Been This Healthy

Looking to add some activity to your day but don’t want to go through a lot of effort? [D10D3] has the perfect solution that enables you to take a leisurely bike ride through Skyrim. A standing bicycle combines with an HTC Vive (using the add-on driver VorpX which allows non-vr enabled games to be played with a VR headset) and a Makey Makey board to make slack-xercise — that’s a word now — part of your daily gaming regimen.

The Makey Makey is the backbone of the rig; it allows the user to set up their own inputs with electrical contacts that correspond to keyboard and mouse inputs, thereby allowing one to play a video game in some potentially unorthodox ways — in this case, riding a bicycle.

Setting up a couple buttons for controlling the Dragonborn proved to be a simple process. Buttons controlling some of the main inputs were plugged into a breadboard circuit which was then connected to the Makey Makey along with the ground wires using jumpers. As a neat addition, some aluminium foil served as excellent contacts for the handlebars to act as the look left and right inputs. That proved to be a disorienting addition considering the Vive’s head tracking also moves the camera. Continue reading “Staying In And Playing Skyrim Has Rarely Been This Healthy”

Digital Opponent In An Analog Package

Unsatisfied with the present options for chess computers and preferring the feel of a real board and pieces, [Max Dobres] decided that his best option would be to build his own.

Light and dark wood veneer on 8mm MDF board created a board that was thin enough for adding LEDs to display moves and for the 10mm x 1mm neodymium magnets in the pieces to trip the reed switches under each space. The LEDs were wired in a matrix and connected to an Arduino Uno by a MAX7219 LED driver, while the reed switches were connected via a Centipede card. [Dobres] notes that you’ll want to test that the reed switches are positioned correctly — otherwise they might not detect the pieces!

Continue reading “Digital Opponent In An Analog Package”