Modded GBA SP Does Its Best Switch Impression

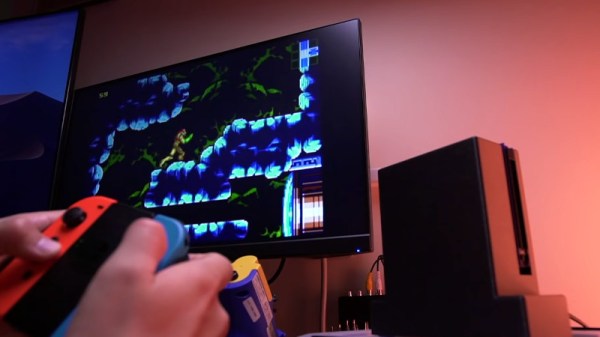
The whole idea behind the Nintendo Switch is that the system isn’t just a handheld, but can be converted into a more traditional home game console when placed into its dock. The wireless controllers even pop off the sides so you can kick back on the couch and enjoy your big-screen gaming from a distance. Judging by how many units Nintendo has sold of their latest system, it’s clearly a winning combination.

Which is probably why [Tito] of Macho Nacho and his friend [Kyle Brinkerhoff] decided to recreate some of the Switch’s core features using one of Nintendo’s older handhelds, the Game Boy Advance SP. There was already a video-out mod kit on the market for the GBA SP that would let them play games on the TV, but the team still had to figure out how to make a dock for the 18 year old handheld, plus get it working with the official Switch Joy-Cons.

Wiring the custom PCB into the GBA SP

Lucky, this crew is no stranger to developing impressive GBA SP add-ons. Last month they took the wraps off of an expanded 3D printed rear panel for the system that housed a number of upgrades, such as an expanded battery pack and support for Bluetooth audio.

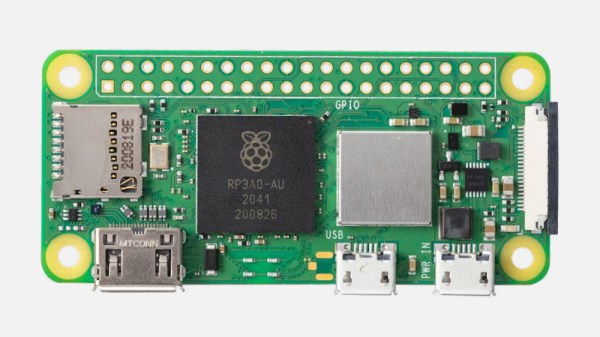
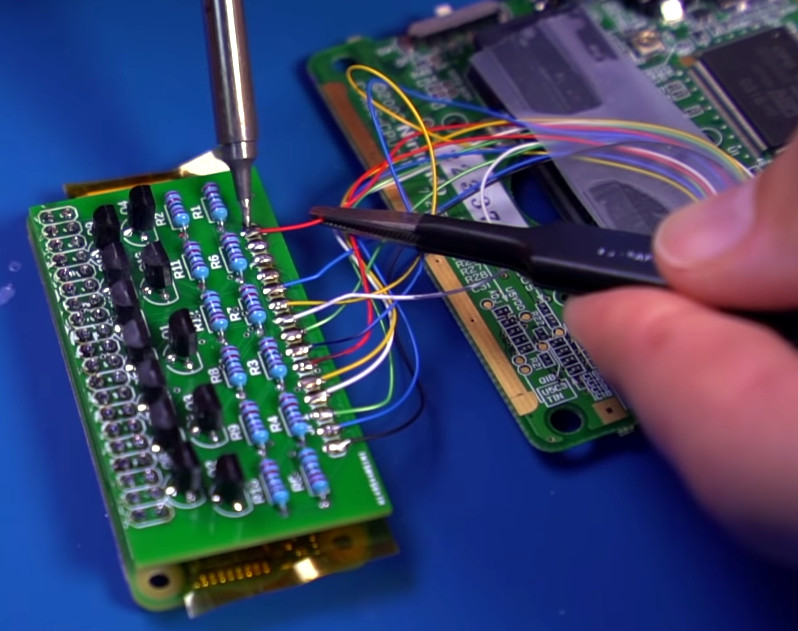
This mod uses a similarly expanded “trunk” for the GBA, but this time it’s to hold the rails the Joy-Cons mount to, as well as the electronics required to get the modern controllers talking to the Game Boy. Namely, a Raspberry Pi Zero and a custom PCB designed by [Kyle] that uses a dozen transistors to pull the system’s control inputs low when the Pi’s GPIO pins go high.

[Tito] doesn’t seem to mention it in the video below, but we’re assuming the dock component of this project is just a 3D printed box with a connector sticking up for the GBA SP’s link cable port, since that’s where the TV-out modification outputs its video. Incidentally that means you don’t really need the dock itself, but it certainly looks cool.

At the end of the video [Tito] goes over a few of the rough edges of the current build, including the rather lengthy pairing process to get the Joy-Cons talking to the Raspberry Pi. But ultimately, he says that not only does the system feel good in his hands, but playing those classic games on the big screen has been a nice change of pace.

Continue reading “Modded GBA SP Does Its Best Switch Impression”

Smoothing Out Foam Parts With Lots Of Gesso

Whether you’re building a product mock-up or a lightweight enclosure, carving your parts out of hard foam is a fast way to get the job done. Unfortunately, the end result can have a bit of a rough finish; a problem if you’re looking to attract investors or get some nice shots so you can send your handiwork into Hackaday.

If you ever find yourself in a situation where you need to make a carved piece of foam look like it isn’t a carved piece of foam, this tip from prolific maker [Eric Strebel] could really come in handy. Rather than using some spray-on primer or epoxy coating, things that can be difficult to work with when you’re confined to a small home workspace, he recommends sealing it up with several coats of gesso.

The gesso fills in the tiny voids in the foam’s surface.

For the less artistically inclined in the audience, gesso is essentially a paint that’s been combined with chalk or gypsum to make it thicker. Gesso is generally used to prepare an absorbent surface (such as wood or canvas) before applying paint. In this case, [Eric] is using it to build up the surface of the foam and seal up all the open pores.

The downside is that the gesso requires several coats to really build up. [Eric] puts six coats on in this demonstration before he starts to thin it out a bit with water. At that point, each successive coat is sanded with increasingly higher grits. After nine coats, he does his finish sanding with 600 grit paper, and the results look fantastic.

To add some color [Eric] dyed the piece and then used a toothbrush to flick on some black and white paint, creating a very convincing granite-like finish. Unfortunately, his attempt to brush on a water-based sealer caused this finish to run, and he had to take it all off. In the end, he had to resort to using spray paint to finish the piece, but at least it was a simple rattle can.

This isn’t the first time [Eric] has experimented with alternative priming techniques. He’s a big fan of two-component primer in a can, which lets you lay down a professional finish without the expense and complication of using a spray gun.

Continue reading “Smoothing Out Foam Parts With Lots Of Gesso”

RC Minecraft Boat Patrols The Pool For Treasure

Looking to recreate those relaxing Minecraft fishing sessions in real life, [electrosync] recently set out to 3D print himself a blocky remote controlled boat, complete with a similarly cubic occupant to ride in it. Each element of the build, from the oars to the bobber on the end of the fishing line, has been designed to look as faithful to the source material as possible. In fact, the whole thing is so accurate to the game that it’s almost surreal to see it rowing around the pool.

That said, some of the resemblance is only skin deep. For example the rowing action, though it appears to be properly synchronized to the boat’s movement through the water, is completely for show. A standard propeller and rudder arrangement under the boat provide propulsion and directional control, and [electrosync] notes its actually powerful enough to push the boat very near to its scale top speed from the game, despite the exceptionally poor hydrodynamics of what’s essentially just a rectangle.

A look under the deck.

Speaking of which, [electrosync] even went through the trouble of printing the hull in wood-fill PLA and coating it in polyester resin to make sure it was watertight. Granted he could have just made the boat out of wood in the first place, saving himself the nearly 60 hours it took to print the hull parts, but that would have been cheating.

Beyond the servos and motors that move the boat and the oars, [electrosync] had to give his 3D printed fisherman a considerable amount of dexterity. Servos embedded into the 3D printed parts allow “Steve” to rotate at the hips and raise and lower his arm. With a fishing pole slipped into a hole printed into the hand, he’s able to cast out his magnetic bobber and see whats biting.

We’ve actually seen quite a number of projects that allow virtual objects inside Minecraft to interact with the real world, but comparatively few efforts to recreate objects from the game’s blocky universe, so the change of pace is nice.

Continue reading “RC Minecraft Boat Patrols The Pool For Treasure”

Four More Talks Added To The 2021 Remoticon Lineup

We’ve already unveiled multiple keynote speakers and a slate of fascinating presenters that will be showing off everything from reverse engineering vintage calculators to taking those first tentative steps on your CAD journey for this year’s Remoticon. You’d be forgiven for thinking that’s everything you’ll see at the conference, but there’s still plenty to announce before the two-day virtual event kicks off on November 19th. Normally we’d be promising to make sure you get your money’s worth, but since tickets are completely free, we’re shooting a bit higher than that.

We were blown away by the number of fantastic talk proposals we received during this year’s extended call. Let’s take a look at the next four presenters who will be joining us for the 2021 Hackaday Remoticon on November 19th through the 20th.

Continue reading “Four More Talks Added To The 2021 Remoticon Lineup”

New Raspberry Pi Zero 2 Upgrades To Quad-Core Processor

Over the years, we’ve seen a steady stream of updates for the Raspberry Pi Foundation’s flagship single-board computer (SBC), with each new release representing a significant boost in processing power and capability. But the slim Raspberry Pi Zero, released all the way back in 2015, hasn’t been quite so fortunate. Beyond the “W” revision that added WiFi and Bluetooth in 2017, the specs of the diminutive board have remained unchanged since its release.

That is, until now. With the introduction of the $15 USD Raspberry Pi Zero 2 W, the ultra-compact Linux board gets a much-needed performance bump thanks to the new RP3A0 system-in-package, which combines a Broadcom BCM2710A1 die with 512 MB of LPDDR2 SDRAM and a quad-core 64-bit ARM Cortex-A53 CPU clocked at 1 GHz. In practical terms, the Raspberry Pi Foundation says the new Zero 2 is five times as fast as its predecessor with multi-threaded workloads, and offers a healthy 40% improvement in single-threaded performance. That puts it about on par with the Raspberry Pi 3, though with only half the RAM.

Otherwise, the new Zero 2 isn’t much different from the original. It’s the same size and shape, meaning existing cases or mounts should work fine. You’ll also find the micro SD slot, CSI camera connector, dual micro USB ports, and mini HDMI port in the same places they were in 2015.

Frankly we’re a little surprised they didn’t switch over to USB-C (at least for the power port) and micro HDMI to bring it in line with the Pi 4, but of course, they presumably didn’t want to break compatibility with existing Zero projects. At least we won’t have to wait for a second edition to add wireless, as the Zero 2 W offers 2.4 GHz 802.11 b/g/n WiFi and Bluetooth 4.2 out of the box.

We’ll have samples of the new Zero 2 W in hand shortly, so keep an eye out for a detailed overview of this highly anticipated new member of the Pi family. In the meantime, let us know what you think about the new hardware in the comments. Is it a worthy successor to the original $5 Pi Zero?

VCF East 2021: Preserving Heathkit’s 8-Bit Computers

To say the Heathkit name is well known among Hackaday readers would be something of an understatement. Their legendary kits launched an untold number of electronics hobbies, and ultimately, plenty of careers. From relatively simple radio receivers to oscilloscopes and televisions, the company offered kits for every skill level from the post-war era all the way up to the 1990s.

So it’s hardly a surprise that in 1977, seeing the success of early home computers like the Altair 8800 and IMSAI 8080, Heathkit decided to join the fray with a computer kit of their own. But by that point the home computing market had started to shift from a hobbyist’s pursuit to something the whole family could enjoy. Compared to the Apple II and TRS-80, both of which also launched in 1977, Heathkit’s machine seemed like the product of a bygone era.

While it might not have gained the notoriety of the microcomputers it was designed to compete with, the Heathkit H8 is certainly not forgotten. Tucked away in a corner at the 2021 Vintage Computer Festival East was an impressive exhibit dedicated to the Society of Eight-Bit Heath Computerists (SEBHC) called Heathkit: Keeping the Legacy Alive. Presented by Glenn Roberts, this collection of original and modern hardware demonstrated the incredible lengths to which this group of passionate Heathkit owners have gone to not just preserve the memory of these often overlooked computers, but to continue to improve upon the kit’s unique design.

Continue reading “VCF East 2021: Preserving Heathkit’s 8-Bit Computers”

Modified Car Alternator Powers Speedy DIY E-Bike

Your garden variety automotive alternator is ripe for repurposing as is, but with a little modification, it can actually be used as a surprisingly powerful brushless motor. Looking to demonstrate the capabilities of one of these rebuilt alternators, [DIY King] bolted one to the back of a old bicycle and got some impressive, and frankly a bit terrifying, results.

We should say up front that the required modifications to the alternator are quite extensive, so before you get too excited about building your own budget e-bike, you should check out the previous guide [DIY King] put together. The short version is that you’ll need to machine a new rotor and fill it with the neodymium magnets salvaged from hoverboard motors.

A custom built alternator rotor is the key to the project.

Once you’ve got your modified alternator, the rest is relatively easy. The trickiest part of this build looks like it was cutting off the bike’s rear wheel mount and replacing it with a plate that holds the alternator and a pair of reduction gears pulled from a 125cc motorbike. Beyond that, it’s largely electronics.

Naturally, you’ll also need a pretty beefy speed controller. In this case [DIY King] is using a 200 amp water-cooled model intended for large RC boats, though interestingly enough, it doesn’t seem he’s actually running any water through the thing. He’s also put together a custom 1,500 watt-hour battery pack that lives in a MDF box mounted under the seat.

To test out his handiwork, [DIY King] took to the streets and was able to get the bike up to 70 km/h (43 MPH) before his courage ran out. He thinks the motor should be able to push it up to 85 km/h, but he says the bike started wobbling around too much for him to really open it up. In terms of range, he calculated that while cruising around at a more palatable 30 km/h (18 MPH), he should be able to get 100 kilometers (62 miles) off of a single charge.

If you like repurposed motors and suicidal bike speeds, you’ll love this build that uses a washing machine motor to push a rider to a claimed 110 km/h. If you’re not worried about speed or range, then this supercapacitor e-bike is certainly worth a look as well.

Continue reading “Modified Car Alternator Powers Speedy DIY E-Bike”