As most anyone in this community knows, there’s an excellent chance that any consumer product on the market that’s advertised as “smart” these days probably has some form of Linux running under the hood. We’re also keenly aware that getting companies to hold up their end of the bargain when it comes to using Linux and other GPL licensed software in their products, namely releasing their modified source, isn’t always as cut and dried as it should be.
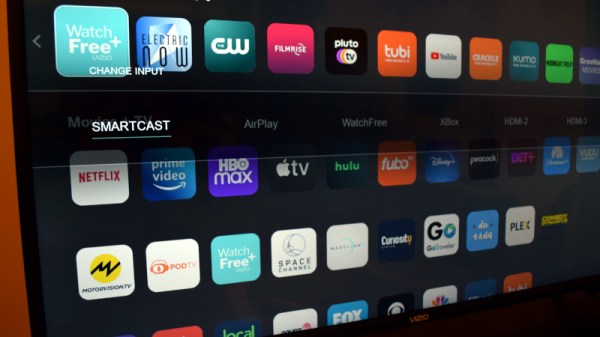
Occasionally these non-compliant companies will get somebody so aggravated that they actually try to do something about it, which is where smart TV manufacturer Vizio currently finds itself. The Software Freedom Conservancy (SFC) recently announced they’re taking the Irvine, California based company to court over their repeated failures to meet the requirements of the GPL while developing their Linux-powered SmartCast TV firmware. In addition to the Linux kernel, the SFC also claims Vizio is using modified versions of various other GPL and LGPL protected works, such as U-Boot, bash, gawk, tar, glibc, and ffmpeg.
 According to the SFC press release, the group isn’t looking for any monetary damages. They simply want Vizio to do what’s required of them as per the GPL and release the SmartCast source code, which they hope will allow for the development of an OpenWrt-like replacement firmware for older Vizio smart TVs. This is particularly important as older models will often stop receiving updates, and in many cases, will no longer be able to access all of the services they were advertised as being able to support. Clearly the SFC wants this case to be looked at as part of the larger Right to Repair debate, and given the terrible firmware we’ve seen some of these smart TVs ship with, we’re inclined to agree.
Now of course, we’ve seen cases like this pop up in the past. But what makes this one unique is that the SFC isn’t representing one of the developers who’s software has been found to be part of Vizio’s SmartCast, they’re actually the plaintiff. By taking the position of a consumer who has purchased a Vizio product that included GPL software, the SFC is considered a third-party beneficiary, and they are merely asking the court to be given what’s due to them under the terms of the license.
As firm believers in the open source movement, we have zero tolerance for license violators. Vizio isn’t some wide-eyed teen, randomly copying code they found from GitHub without understanding the implications. This is a multi-billion dollar company that absolutely should know better, and we’ll be happy to see them twist in the wind a bit before they’re ultimately forced to play by the rules.