Custom 3D Printed Vitamins Are Just A Few Clicks Away

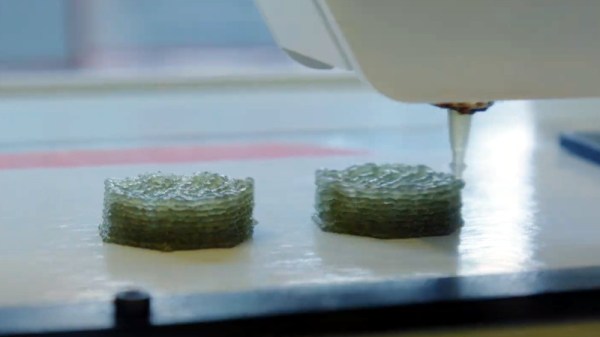
It’s recently come to our attention that a company by the name of Nourished has carved out a niche for themselves by offering made-to-order gummy vitamins produced with their own custom designed 3D printers. Customers can either select from an array of pre-configured “stacks”, or dial in their own seven layers of gelatinous goodness for a completely bespoke supplement.

Now we can’t vouch for whether or not taking a custom supplement like this is any better than just popping a traditional multi-vitamin, but we’ll admit the hardware Nourished has developed is pretty interesting. As briefly seen in the video after the break, large syringes are filled with the seven different vitamin suspensions, and then loaded into what appears to be a heated chamber for extrusion. This is not unlike other food-grade 3D printers we’ve seen, such as the Cocoa Press.

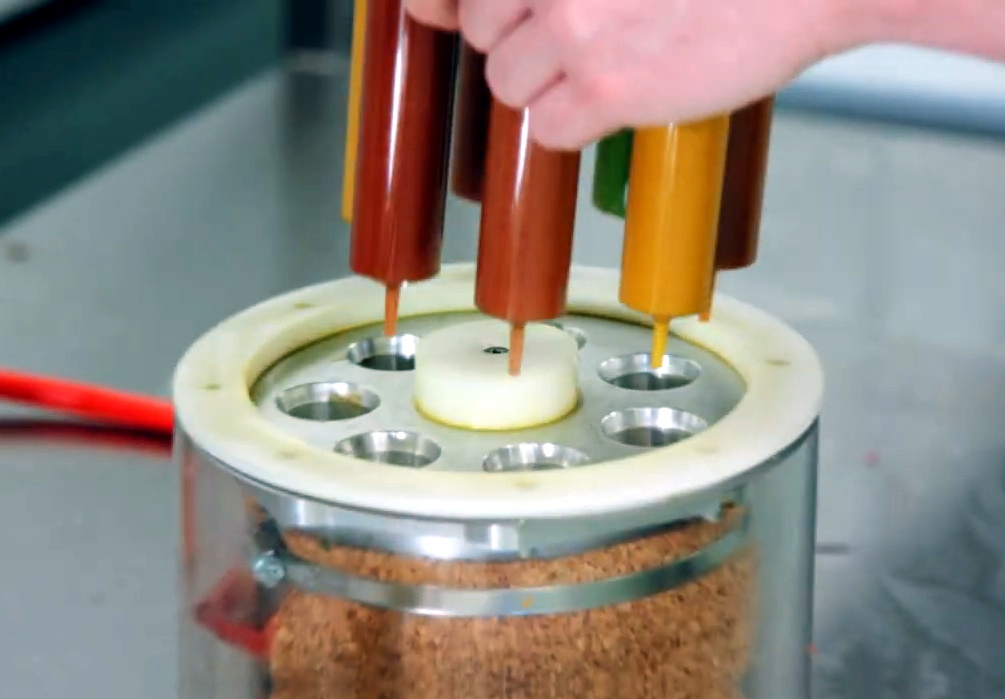
It looks like all of the syringes are being depressed simultaneously with a plate and a pair of beefy lead screws, so it seems the order in which the layers are placed down must be different for each nozzle. A blog post on the company’s site from early last year shows a wildly different machine being used to produce the vitamins, so either their core technology is changing rapidly, or perhaps the printer being used depends on whether they’re running off the customized stacks versus the standard formulations.

Interestingly, this is very similar to a concept floated by the U.S. Army’s Combat Feeding Directorate (CFD) back in 2014. They reasoned that a 3D printer could be used to produce meal bars that were customized for each soldier’s personal nutritional needs. Being largely impractical for the battlefield, the program didn’t get very far. But thanks to consumers who are willing to pay the premium that Nourished is charging for this service, it seems the idea has turned into a lucrative business model.

Continue reading “Custom 3D Printed Vitamins Are Just A Few Clicks Away”

PS2 Gets Integrated HDMI

It might be difficult to imagine in our modern HDMI Utopia, but there was a time when game consoles required proprietary cables to connect up to your TV. We’re not just talking about early machines like the NES either, turn of the millennium consoles like the PlayStation 2, Gamecube, and the original Xbox all had weirdo A/V ports on the back that were useless without the proper adapter.

But thanks to the efforts of [Taylor Burley], you can now upgrade your Slim PS2 with integrated HDMI capability. It’s not even a terribly difficult modification, as these things go. Sure there’s a lot of soldering involved to run from the console’s A/V connector to the commercially-made HDMI dongle he’s hidden inside the case, but at least it’s straightforward work.

Tapping into the console’s A/V connector.

As [Taylor] shows in the video after the break, all you have to do is remove the proprietary connector from the HDMI adapter dongle, and wire it directly into the console’s A/V port with a bit of ribbon cable. There are only 8 pins in the connector that you need to worry about, and the spacing is generous enough that there’s no problem getting in there with your iron and some standard jumper wires. You’ve also got to pull 5 V from the board to power the adapter, but that’s easy enough thanks to the system’s nearby USB ports.

There’s a perfect spot to mount the adapter board next to the console’s Ethernet connector, and once that’s tacked down with a bit of adhesive, the only thing left to do is cut a hole in the back of the enclosure for the HDMI port and snip away a bit of the metal RF shield. Presumably the same modification could be done on the original “fat” PS2, though you’ll be on your own for finding a suitable place to mount the board.

While modern game consoles can easily emulate their earlier peers, providing enhanced graphical fidelity and introducing modern conveniences like wireless controllers in the process, there’s still something to be said for playing classic games on the original hardware. Even if these projects are fueled by little more than youthful nostalgia, it’s a safe bet we’ll continue to see folks keeping these older machines running far into the future.

Continue reading “PS2 Gets Integrated HDMI”

Building Replica Amigas To Preserve Digital Artwork

A few years back, the Andy Warhol Museum ran into an unusual problem. They wanted to display digital pieces the pop artist created on his Amiga 1000 back in the 1980s, but putting the vintage computers on the floor and letting the public poke around on them wasn’t really an option. So the team at [Iontank] were tasked with creating an interactive display that looked like a real Amiga, but used all modern technology under the hood.

The technical details on the electronics side are unfortunately a bit light, as the page on the [Iontank] site simply says all of the internals were replaced with “solid-state hardware” and an Amiga emulator. To us that sounds like a Raspberry Pi is now filling in for the Amiga’s original motherboard, but that’s just a guess. The page does note that they went through the trouble of making sure the original mouse and keyboard still worked, so it stands to reason a couple microcontrollers are also along for the ride doing translation duty.

Milling the curved display lens.

While we don’t know much about the computers, [Iontank] do provide some interesting insight into developing the faux CRTs sitting atop the non-Amigas. There were some promising rear-projection experiments conducted early on, but in the end, they decided to use a standard LCD behind a milled acrylic lens. This not only made for a perfect fit inside the original monitor enclosures, but gave the screen that convex depth that’s missing on modern flat panels.

The end result looks like the best of both worlds, combining the sharp bright image of an LCD with just a hint of retro distortion. With a scanline generator in the mix, this technique would be a great way to simulate the look of a CRT display in an arcade cabinet, though admittedly being able to mill down an acrylic lens of the appropriate size would be a tough job for most home gamers.

[Thanks to Derek for the tip.]

This Stackable Pi Portable Is Ready To Rumble

The proliferation of desktop 3D printing and powerful single-board computers like the Raspberry Pi has given rise to an absolute explosion of small bespoke computing devices. Whether or not you think these cobbled together devices are close enough to Gibson’s original vision to call them cyberdecks, it’s a remarkable shift from the norm that brings us closer to the “High Tech, Low Life”  philosophy so prevalent in cyberpunk literature and films.

[Jay Doscher] has been on the front lines of this movement for some time now, producing several very popular designs. His latest creation leans hard into the more utilitarian aspects of the cyberpunk ethos, inspired more by the grit of The Expanse than the lusciously upholstered interiors of Star Trek’s Enterprise-D. The culmination of lessons learned over the last several years, the new Kuiper Deck is cheaper and easier to build than his previous designs, thanks at least in part to the fact that you no longer need to go out and get an expensive Pelican case.

Like his previous designs, the Kuiper Deck makes extensive use of 3D printed components. But this time around, [Jay] is using an array of smaller pieces that are bolted together on an acrylic front panel. This not only means the project is compatible with a wider array of machines, such as the Prusa Mini, but it’s also easier to print as larger parts have an annoying tendency to warp. The downside is that you’ll need some way to get the acrylic panel cut to shape, though you can buy one through him if you don’t have any way to get it made locally.

In place of the Pelican case his previous designs used as an enclosure, [Jay] has found a heavy-duty stackable plastic tote available from McMaster Carr for $12 USD. It’s not particularly nice looking, nor is it waterproof. But that’s also sort of the point. If you’re just trying to put together a small computer that you can toss around the shop and not have to worry about breaking, the Pelican case was always a bit overkill.

The electronics bill of materials is similarly sparse, comprising mainly of the Raspberry Pi 4, a cooling fan, and a 10 inch LCD from Pimoroni. Everything gets screwed to the rear of the panel and connected with pre-made cables, making assembly very simple. That said, there’s still plenty of room inside the case for custom hardware should you want to put something custom together such as a mobile software defined radio rig.

[Jay] created the original Raspberry Pi Field Unit in 2015, but it wasn’t until he unveiled the revised Raspberry Pi Recovery Kit in 2019 that the idea of sticking a Raspberry Pi into a Pelican case became something of hacker meme. It sounds like the Kuiper Deck is going to be his final word on the subject for now, but it’s a safe bet we’ll be seeing folks putting together similar builds for years to come.

Europa Decision Delivers Crushing Blow To NASA’s Space Launch System (SLS)

These days, NASA deciding to launch one of their future missions on a commercial rocket is hardly a surprise. After all, the agency is now willing to fly their astronauts on boosters and spacecraft built and operated by SpaceX. Increased competition has made getting to space cheaper and easier than ever before, so it’s only logical that NASA would reap the benefits of a market they helped create.

So the recent announcement that NASA’s Europa Clipper mission will officially fly on a commercial launch vehicle might seem like more of the same. But this isn’t just any mission. It’s a flagship interplanetary probe designed to study and map Jupiter’s moon Europa in unprecedented detail, and will serve as a pathfinder for a future mission that will actually touch down on the moon’s frigid surface. Due to the extreme distance from Earth and the intense radiation of the Jovian system, it’s considered one of the most ambitious missions NASA has ever attempted.

With no margin for error and a total cost of more than $4 billion, the fact that NASA trusts a commercially operated booster to carry this exceptionally valuable payload is significant in itself. But perhaps even more importantly, up until now, Europa Clipper was mandated by Congress to fly on NASA’s Space Launch System (SLS). This was at least partly due to the incredible power of the SLS, which would have put the Clipper on the fastest route towards Jupiter. But more pragmatically, it was also seen as a way to ensure that work on the Shuttle-derived super heavy-lift rocket would continue at a swift enough pace to be ready for the mission’s 2024 launch window.

But with that deadline fast approaching, and engineers feeling the pressure to put the final touches on the spacecraft before it gets mated to the launch vehicle, NASA appealed to Congress for the flexibility to fly Europa Clipper on a commercial rocket. The agency’s official line is that they can’t spare an SLS launch for the Europa mission while simultaneously supporting the Artemis Moon program, but by allowing the Clipper to fly on another rocket in the 2021 Consolidated Appropriations Act, Congress effectively removed one of the only justifications that still existed for the troubled Space Launch System.

Continue reading “Europa Decision Delivers Crushing Blow To NASA’s Space Launch System (SLS)”

PCB Mods Silence Voltage Warnings On The Pi 4

If you’ve ever pushed the needle a bit on your Raspberry Pi, there’s a good chance you’ve been visited by the dreaded lightning bolt icon. When it pops up on the corner of the screen, it’s a warning that the input voltage is dipping into the danger zone. If you see this symbol often, the usual recommendation is to get a higher capacity power supply. But experienced Pi wranglers will know that the board can still be skittish.

Sick of seeing this icon during his MAME sessions, [Majenko] decided to attack the problem directly by taking a close look at the power supply circuitry of the Pi 4. While the official schematics for everyone’s favorite single-board computer are unfortunately incomplete, he was still able to identify a few components that struck him as a bit odd. While we wouldn’t necessarily recommend you rush out and make these same modifications to your own board, the early results are certainly promising.

The first potential culprit [Majenko] found was a 10 ohm resistor on the 5 V line. He figured this part alone would have a greater impact on the system voltage than a dodgy USB cable would. The components aren’t labeled on the Pi’s PCB, but with a little poking of the multimeter he was able to track down the 0402 component and replace it with a tiny piece of wire. He powered up the Pi and ran a few games to test the fix, and while he definitely got fewer low-voltage warnings, there was still the occasional brownout.

Do we really need this part?

Going back to the schematic, he noticed there was a 10 uF capacitor on the same line as the resistor. What if he bumped that up a bit? The USB specifications say that’s the maximum capacitive load for a downstream device, but he reasoned that’s really only a problem for people trying to power the Pi from their computer’s USB port.

Tacking a 470 uF electrolytic capacitor to the existing SMD part might look a little funny, but after the installation, [Majenko] reports there hasn’t been a single low-voltage warning. He wonders if the addition of the larger capacitor might make removing the resistor unnecessary, but since he doesn’t want to mess with a good thing, that determination will be left as an exercise for the reader.

It’s no secret that the Raspberry Pi 4 has been plagued with power issues since release, but a newer board revision released last year helped smooth things out a bit. While most people wouldn’t go this far just to address the occasional edge case, it’s good to know folks are out there experimenting with potential fixes and improvements.

Restored Dreamcast Is A SEGA Fan’s Dream Come True

[Bren Sutton] has been a long time fan of SEGA’s Dreamcast, eagerly snapping one up right around its October 1999 European release. But after years of neglect and a somewhat questionable paint job a decade or so back, he decided it was time to spruce his old friend up. He could have just cleaned the machine and been done with it, but he took the opportunity to revamp the console’s internals with both practical and cosmetic trickery.

The first step was getting the system looking a bit fresher. Removing the silver metallic paint he applied in his youth with a rattle can wasn’t going so well, so he ended up buying a broken donor console on eBay so he’d have a new shell to work with. The donor was yellowed with age, but a coating of peroxide cream and a few hours under a cheap UV light got it whitened up nicely. Now that he had a fresh new case, [Bren] turned his attention to the internal components.

Those who might be plugged into the active Dreamcast homebrew scene may already know that several upgrade modules exist for SEGA’s last home game console. One of the most popular replaces the optical drive with an SD card filled with your favorite game ISOs. You can also get a modern high efficiency power supply, as well as a board that replaces the original soldered-on clock battery with a slot that fits a CR2032. [Bren] threw them all in, ensuring several more years of gaming bliss.

But he wasn’t done yet. He also wanted to add some visual flair to his new and improved console. After some consideration, he gingerly cut the logo out of the Dreamcast’s lid, and installed an Adafruit CLUE board underneath it. With a few carefully crafted GIFs installed onto the CircuitPython-powered board, the console now has a gorgeous fully animated logo that you can see in the video after the break.

[Bren] could have really taken his console to the next level by doubling its available RAM to an eye-watering 32 MB, but considering the limited software support for that particularly bodacious modification, we’ll let it slide. Continue reading “Restored Dreamcast Is A SEGA Fan’s Dream Come True”