Exploring Custom Firmware On Xiaomi Thermometers

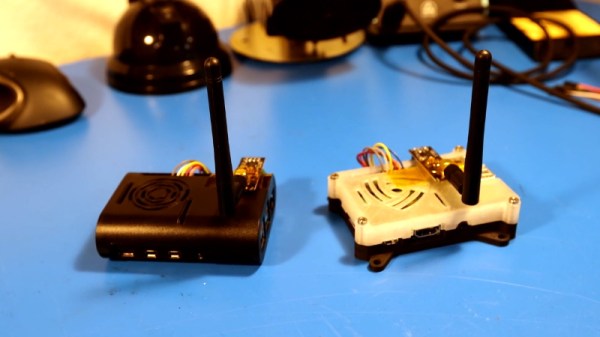
If we’ve learned anything over the years, it’s that hackers love to know what the temperature is. Seriously. A stroll through the archives here at Hackaday uncovers an overwhelming number of bespoke gadgets for recording, displaying, and transmitting the current conditions. From outdoor weather stations to an ESP8266 with a DHT11 soldered on, there’s no shortage of prior art should you want to start collecting your own environmental data.

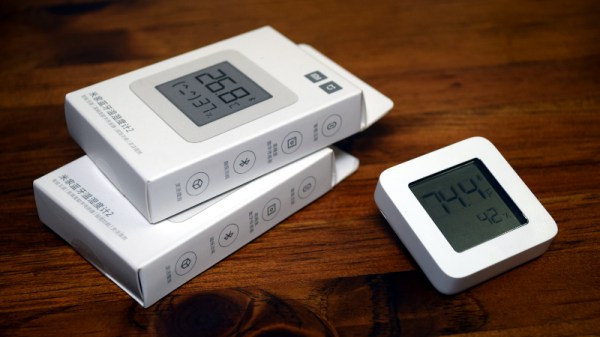
Now obviously we’re big fans of DIY it here, that’s sort of the point of the whole website. But there’s no denying that it can be hard to compete with the economies of scale, especially when dealing with imported goods. Even the most experienced hardware hacker would have trouble building something like the Xiaomi LYWSD03MMC. For as little as $4 USD each, you’ve got a slick energy efficient sensor with an integrated LCD that broadcasts the current temperature and humidity over Bluetooth Low Energy.

You could probably build your own…but why?

It’s pretty much the ideal platform for setting up a whole-house environmental monitoring system except for one detail: it’s designed to work as part of Xiaomi’s home automation system, and not necessarily the hacked-together setups that folks like us have going on at home. But that was before Aaron Christophel got on the case.

We first brought news of his ambitious project to create an open source firmware for these low-cost sensors last month, and unsurprisingly it generated quite a bit of interest. After all, folks taking existing pieces of hardware, making them better, and sharing how they did it with the world is a core tenet of this community.

Believing that such a well crafted projected deserved a second look, and frankly because I wanted to start monitoring the conditions in my own home on the cheap, I decided to order a pack of Xiaomi thermometers and dive in.

Continue reading “Exploring Custom Firmware On Xiaomi Thermometers”

An Epic Quest For A Motorized Volume Knob

[Haris Andrianakis] likes his Logitech Z623 sound system. He likes it a lot. Which is why he was willing to hack in his own remote volume control rather than just get a new pair of speakers. But he certainly didn’t make things easy on himself. Rather than trying to tap into the electronics, he decided to take the long way around and motorize the volume knob.

The belt drive looked great, but didn’t work.

The idea seemed simple enough. Just drill a hole through the PCB behind the knob’s potentiometer, attach some kind of extension to the axle, and turn it with a small servo. Modifying the PCB and potentiometer went well enough, but the trouble came when [Haris] actually tried to turn the thing.

Attaching the servo directly to the axle worked, but it made turning the knob by hand extremely difficult. His next idea was to add a small belt into the mix so there would be some slip in the system. But after designing a 3D printed servo mount and turning custom pulleys on the lathe, it ended up having too much slip, and the knob didn’t always move when the servo turned.

He then swapped out the servo for a small stepper motor. The motor was easy enough to spin when powered down, but didn’t have quite enough torque to turn the knob. He tried with a larger stepper motor that he salvaged from an old printer, but since he could only run it at half the recommended 24 VDC, it too had a tendency to skip steps.

After experimenting with some 3D printed reduction gears, [Haris] finally stumbled upon the 28BYJ-48. This small stepper with an integrated gearbox proved to be the perfect solution, as it had enough muscle to turn the knob while at the same time not restricting its movement when powered down. The rest of the project was relatively easy; with a DRV8825, an ESP8266, and an IR receiver, he’s able to spin the stepper with his TV’s remote. A simple web page running on the ESP8266 even allows him to control volume over the network with his smartphone. Based on similar projects we’ve seen, he could probably add support for HDMI CEC as well.

[Haris] says you shouldn’t follow his example, but we’re not so sure. He kept going when others would have given up, and the engineering and thought that went into each attempt is certainly commendable. Even if he hadn’t ultimately gotten this project working, we’d still say it was a valiant hack worthy of praise.

ARM And X86 Team Up In No Compromise Cyberdeck

Over the last couple of years the cyberdeck community has absolutely exploded. Among those who design and build these truly personal computers there are no hard rules, save perhaps making sure the final result looks as unconventional as possible. But one thing that’s remained fairly consistent is the fact that these machines are almost exclusively powered by the Raspberry Pi. Unfortunately, that means they often leave something to be desired in terms of raw performance.

But [MSG] had a different idea. His cyberdeck still has the customary Raspberry Pi inside, but it also has an i7 Intel NUC that can be fired up at the touch of a button. He says it’s the best of both worlds: an energy efficient ARM Linux platform for mobile experimentation, and a powerful x86 Windows box for playing games working from home. It’s the hacker equivalent of business in the front, party in the back.

With a KVM connected to the custom Planck 40% mechanical keyboard and seven inch LCD, [MSG] can switch between both systems on the fly. Assuming he’s got the juice anyway; while the Raspberry Pi 4 and LCD is able to run on a pair of 18650 batteries, the cyberdeck needs to be plugged in if he wants to use the power-hungry NUC. If he ditched the Pi he could potentially load up the case with enough batteries to get the Intel box spun up, but that would be getting a little too close to a conventional laptop.

The whole plurality theme doesn’t stop at the computing devices, either. In addition to the primary LCD, there’s also a 2.13 inch e-paper display and a retro-style LED matrix courtesy of a Pimoroni Micro Dot pHAT. With a little Python magic behind the scenes, [MSG] is able to display things like the system temperature, time, and battery percentage even when the LCD is powered down.

In a post on the aptly-named Cyberdeck Cafe, [MSG] talks about how seeing the VirtuScope built by [bootdsc] inspired him to start working towards his own personal deck, and where he hopes to take the idea from here. The unique USB expansion bay behind the screen holds particular promise, and it sounds like a few add-on modules are already in the works. But of course, it wouldn’t be a true cyberdeck if it wasn’t constantly being improved and redesigned. Come to think of it, that makes at least two rules to live by in this community.

Transforming Work Light Is More Than Meets The Eye

While it does use the same M12 batteries, this impeccably engineered work light isn’t an official Milwaukee product. It’s the latest creation from [Chris Chimienti], who’s spent enough time in the garage and under the hood to know a thing or two about what makes a good work light. The modular design not only allows you to add or subtract LED panels as needed, but each section is able to rotate independently so it points exactly where you need it.

Magnets embedded in the 3D printed parts mean the light modules not only firmly attach to one another, but can be stuck to whatever you’re working on. Or you could just stack all the lights up vertically and use the rocket-inspired “landing legs” of the base module keep it vertical. Even if the light gets knocked around, the tension provided by rubber bands attached to each fold-out leg means it will resist falling over. In the video after the break [Chris] says the little nosecone on top is just for fun and you don’t have to print it, but we don’t see how you can possibly resist.

The same PCB is used on both ends of the light modules.

Of course, 3D printed parts and magnets don’t self-illuminate. The LED panels and switches are salvaged from cheap lights that [Chris] found locally for a few bucks, and a common voltage regulator board is used to step the 12 volts coming from the Milwaukee battery down to something the LEDs can use. He’s designed a very slick reversible PCB that’s used on either end of each light module to transfer power between them courtesy of semi-circular traces on one side and and matching pogo pins on the other.

As we saw in his recent Dremel 3D20 rebuild, [Chris] isn’t afraid to go all in during the design phase. The amount of CAD work that went into this project is astounding, and serves as fantastic example of the benefits to be had by designing the whole assembly at once rather than doing it piecemeal. It might take longer early on, but the final results really speak for themselves.

Continue reading “Transforming Work Light Is More Than Meets The Eye”

Nerfnet Tunnels TCP/IP Over NRF24L01 Radios

There’s an excellent chance you’ve already worked with the nRF24L01. These little modules are an easy and cheap way to shuffle data across a 2.4 GHz radio link at a respectable rate, making them great for remote control projects. But after seeing that others had experimenting with using these radios to transmit digital audio, [Andrew Rossignol] got to wondering if some software trickery could push the envelope even further.

The result is nerfnet, a Linux program that allows you to tunnel TCP/IP over a pair of nRF24L01 modules. The link appears as a virtual interface, meaning everything happens transparently as far as other programs are concerned. Anything that uses TCP/IP to communicate on Linux can take advantage of this low-cost link, albeit at speeds that most of us haven’t had to deal with in decades.

Though it’s not quite as bad as you might think. Latency is around 50 ms, and after some tweaks, [Andrew] has been able to squeeze almost 300 Kbps out of the link. That’s more than enough for terminal work, and some light audio and video streaming isn’t out of the question.

In terms of range, he was able to maintain a fairly reliable connection at a distance of up to 60 meters (200 feet) outdoors. It might not sound like much, but again, you’ve got to take the cost of these radios into account. If you’re looking to SSH into a Raspberry Pi weather station you’ve got in the backyard, a pair of these could get the job done for just a couple of bucks.

The blog post [Andrew] has put together explains the software in fantastic detail if you’re interested in the nuts and bolts of it all. But if you just want to play around with the idea, you just need to connect some nRF24L01 modules to a pair of Raspberry Pis with short SPI wires to cut down any interference, and follow the instructions. Ideally the radios would have external antennas, but it’s not strictly required.

We’ve seen these modules pushed into service as impromptu Bluetooth Low Energy transmitters in the past, but nothing quite like this. While the latency and bandwidth offered by this technique might seem antiquated to modern eyes, it could be the perfect dedicated communication channel for your sensors, smart devices, or home automation projects.

Continue reading “Nerfnet Tunnels TCP/IP Over NRF24L01 Radios”

PinePhone Gets 3D Printed Mechanical Keyboard

Do you remember when smartphones had real physical keyboards? Working the command line on some remote machine over SSH was a breeze, and you could even knock out a few lines of code if you were so inclined. But these days you’ve either got to lug around an external keyboard, or suffer through pecking out a few words per minute on a piece of glass. Doesn’t sound much like progress to us.

By the looks of it, [James Williams] doesn’t think so either. He’s designed a physical keyboard add-on that snaps onto the back of the PinePhone to deliver a proper, albeit condensed, typing experience. This is no repurposed BlackBerry board either; he’s created a custom mechanical keyboard that manages to fold into an incredibly small size thanks to resin printed keycaps and Kailh low profile switches. Other than the hand-drawn legends, it’s probably not a stretch to say this is a better keyboard than what many people have on their actual computers.

In addition to the 3D printed frame and Kailh switches, there’s also an Arduino Pro Micro onboard to communicate with the phone. Rather than use USB, the keyboard is wired to the I2C accessory port on the rear of the PinePhone. It sounds like [James] needs a little more time to polish his QMK build before its ready to release, so you might want to wait a bit before you start printing off your own copy of the parts.

Those following along with the development of the PinePhone know there’s supposedly an official keyboard accessory in the works, but who wants to wait when we’re so close to mobile Linux nirvana? Besides, we doubt it will be nearly as pleasant to type on as the board [James] has put together.

NSF Releases Video Of Arecibo’s Final Moments

Today the National Science Foundation released a pair of videos that document the collapse of the Arecibo Observatory with incredible detail. A wide shot, apparently taken from the Visitors Center, shows the 900 ton instrument platform breaking free and swinging on the remaining support cables until it smashes into the edge of the dish. The second clip, recorded by an airborne drone, is focused directly on the cables as they failed. Both can be seen in the video embedded below.

Together, they produce an invaluable visual record of what finally brought the iconic radio telescope down. As was predicted by engineers earlier in the month, the failure of another support cable on tower 4 triggered a chain reaction that brought the entire platform crashing down onto the 305 meter reflector. Footage from a drone observing the top of tower 4 shows that the entire sequence, from the first visual wire break to the remaining cables being torn from their mounts, only took five seconds. While some initially doubted the NSF’s determination that it was too dangerous to repair Arecibo, this footage seems to prove just how tenuous the structural integrity of the Observatory really was.

A drone captured the critical cable failure.

These videos will hopefully help investigators who still need to determine why the cables failed in the first place. The cable in August didn’t snap, it simply pulled lose from its mount. It was suspected that the cable may have been incorrectly installed, but as it was only a backup, the situation was not seen as critical. But when the second cable failed in November it was found to have snapped at just 60% of its minimum breaking strength.

This immediately called into question the condition of the remaining cables, and ultimately lead to the decision by the NSF to proceed with a controlled demolition of the Observatory that would preserve as much of the scientific equipment as possible. Unfortunately, the remaining cables didn’t last long enough to put that plan into action.

Continue reading “NSF Releases Video Of Arecibo’s Final Moments”