Custom Coil Lets Mouse Charge Without Wires

It’s 2021, shouldn’t all of our devices be able to pull the power they need from the ether? [Sasa Karanovic] certainly thinks so, which is why he recently took it upon himself to add wireless charging capabilities to his desktop computer peripherals. The Qi transmitter and receiver modules are relatively cheap and easy to come by, the trick is in getting them installed.

The keyboard gets non-invasive Qi charging.

For the keyboard, [Sasa] took the path of least resistance. The receiver coil lives inside a little 3D printed box attached to the back, and power is routed through a hacked up right-angle USB cable. It’s a simple addition that doesn’t make any permanent changes to the keyboard; perfect for those who don’t want to risk toasting their gear.

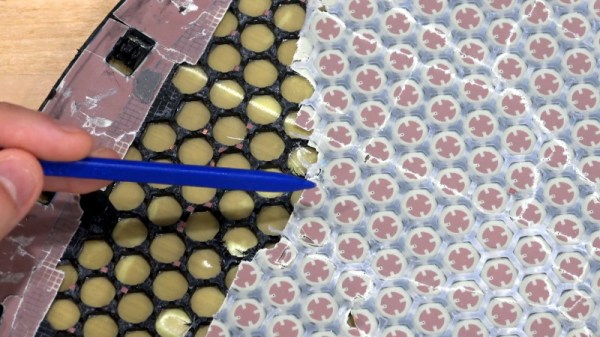
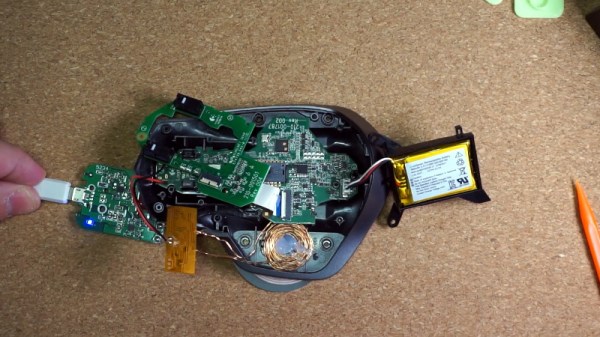
But that wasn’t really an option for the mouse. Obviously the Qi hardware would have to go on the inside, but at a glance it was clear there wasn’t enough room to mount the stock coil. So [Sasa] pulled the original coil apart and rewound it around a small 3D printed jig. This resulting coil was perfectly sized to fit inside the flat area on the left side of the mouse with no apparent degradation in charging ability. Wiring the module up to an unpopulated pad on the PCB allowed him to easily inject the 5 V output into the device’s existing charging circuitry.

We’ve seen plenty of aftermarket Qi charging coils take up permanent residence in various gadgets, but rewinding the coil is a neat trick that we’ve only seen pulled off a couple times in the past. Something to file away mentally should you ever want to wirelessly power up one of your projects.

Continue reading “Custom Coil Lets Mouse Charge Without Wires”

3D Printed Pi Laptop Honors The Iconic GRiD Compass

If you’re familiar with vintage portable computers, you know about the GRiD Compass. Even if you’re not into computers of yesteryear, there’s a good chance you’ve seen a Compass or two without realizing it. From battling xenomorphs in Aliens to making the trip to orbit aboard the Space Shuttle, the trendsetting clamshell computer seemed to be everywhere in the 1980s. While far too expensive for the average consumer to afford back then, its no-compromise design and sleek looks helped lay the groundwork for today’s ubiquitous laptops.

Getting your hands on a working GRiD Compass in 2021 isn’t a whole lot easier than it was in 1982, so [Mike] decided to do the next best thing and build his own. His GRIZ Sextant certainly isn’t a replica, but the family resemblance is strong enough to get the point across. The Raspberry Pi powered machine has a greatly reduced “trunk” section in the back as you might expect, but the overall layout is very similar. The Commodore 64 inspired color scheme is probably the biggest departure from the source material, but it’s hard to argue with the results.

It’s clear at a glance that a lot of thought was put into the external aesthetics of the Sextant, but a peek under the hood shows the internal details are equally impressive. [Mike] tells us he has a background in product design, and it shows. Rather than approaching this project as a one-off creation, he’s clearly taken great pains to ensure the design is as reproducible as possible.

All of the individual components of the 3D printed frame and enclosure have been carefully designed so they’ll fit within the build volume of the average desktop machine. Electronic components are screwed, not glued, to the internal framework; making future repairs and maintenance much easier. When combined with the ample internal volume available, this modular approach should make adding custom hardware a relatively painless process as well.

So when will you be able to build a GRIZ Sextant of your own? Hopefully, very soon. [Mike] says he still needs to work some kinks out of the power supply and finalize how the speakers will get mounted into the case. Once those last tweaks are locked in, he plans to release all the STL files and a complete Bill of Materials. For those who want to get a sneak peek before they start warming up the extruder, he’s also started documenting the assembly of the Sextant on his YouTube channel. Continue reading “3D Printed Pi Laptop Honors The Iconic GRiD Compass”

Starlink Satellite Dish X-Rayed To Unlock RF Magic Inside

When [Kenneth Keiter] took apart his Starlink dish back in November, he did his best to explain the high-level functionality of the incredibly complex device in a video posted to his YouTube channel. It was a fascinating look at the equipment, but by his own admission, he wasn’t the right person to try and explain the nuances of how the phased array actually functioned. But he knew who could do the technology justice, which is why he shipped the dismembered dish over to [Shahriar Shahramian] of The Signal Path.

Don’t be surprised if you can’t quite wrap your head around his detailed analysis after your first viewing. You’ll probably have a few lingering questions after the second re-watch as well. But that’s OK, as [Shahriar] still has a few of his own. Even after cutting out a section of the dish and putting it under an X-ray, it’s still not completely clear how the SpaceX engineers managed to cram everything into such a tidy package. Though there seems to be no question that the $500 price for the early-access hardware is an absolute steal, all things considered.

The layered antenna works on multiple frequencies.

Most of the video is spent examining the stacked honeycomb construction of the phased antenna array, which as expected, holds a number of RF secrets if you know what to look for. Put simply, there’s no such thing as an insignificant detail to the trained eye. From the carefully sized injection molded spacer sheet that keeps the upper array a specific distance from the RF4-like radome, to the almost microscopic holes that have been bored through each floating patch to maintain equalized air pressure through the stack up, [Shahriar] picks up on fascinating details which might otherwise seem like arbitrary design decisions.

But a visual inspection will only get you so far. Eventually [Shahriar] has to cut out a slice of the PCB so he can fit it into the X-ray machine, but don’t feel too bad, the dish was long dead before he got his hands on it. While he hasn’t yet completed his full analysis, an initial examination indicates that each large IC and the eight chips surrounding it make up a 16 channel beam forming module. Each channel is further split into two RX and TX pairs, which provides the necessary right and left hand polarization. That said, he admits there’s some room for interpretation and that further work would be necessary before any hard conclusions could be made.

Between this RF analysis and the initial overview provided by [Kenneth], we’ve already learned a lot more about this device than many might have expected considering how rare and expensive the hardware is. While we admit it’s not immediately clear what kind of hijinks hardware hackers could get into once this device is fully understood, we’re certainly eager to find out.

Continue reading “Starlink Satellite Dish X-Rayed To Unlock RF Magic Inside”

Retro Terminals Bring Some Style To Your Desktop

It wasn’t so long ago that a desktop computer was just a beige box with another, heavier, beige box sitting next to it or maybe perched on top. They’re a bit more visually exciting these days, with even mass produced PCs now shipping with RGB lighting and clear side panels. But even so, few could really look at a modern desktop computer and call it objectively beautiful.

But [Oriol Ferrer Mesià] wonders if we couldn’t improve on things a bit. Over the last few months, he’s been experimenting with small 3D printed enclosures that reimagine the traditional desktop computer aesthetic. With their distinctively retro-futuristic style, they look like the kind of gadgets science magazines in the 1960s thought would be dotting kitchens, living rooms, and space stations by the year 2000. But unlike those fanciful creations, each one of these beauties is a fully functional computer.

A few of the designs are relatively conservative, and not entirely unlike some of the old “dumb terminals” of the 1970s. With a Raspberry Pi 4 and a tablet-sized screen, these diminutive terminals would be perfectly usable for light desktop work or some retro gaming.

But we particularly like the ultra-widescreen design that [Oriol] has come up with. With a fairly unusual 4:1 aspect ratio LCD, the printed enclosure for this one was so large that it had to be done in two pieces on his Ender 3. To keep the 8″ 1920 x 480 panel well fed, this design uses a Jetson Nano 2GB which has considerably more graphical punch than other Linux SBCs of similar size and price.

As part of the recent cyberdeck craze, we’ve seen plenty of people recreating the look and feel of vintage portable computers with 3D printed cases and modern components. Desktop creations have been far less common, but with gorgeous designs like these to serve as inspiration, that may change.

Cyberpunk Mazda MX-5 Packs Onboard Cyberdeck

Back in April of 2019, inspired by iconic films such as Blade Runner and Akira, [Chris Watson] embarked on a journey to create his very own cyberpunk roadster from a 1991 Mazda MX-5. After pouring an incredible amount of blood, sweat, and fiberglass into the project, he now has a vehicle that wouldn’t look out of place cruising the streets of Neo Tokyo. Even if you’re not usually into car mods, his impeccably photographed build log is an absolutely fascinating journey.

But as impressive as the car itself might be, what really caught our attention was the computer sitting on the dash. From early on, [Chris] wanted the vehicle to have a companion cyberdeck that would be used to control various onboard systems. At this point it’s just for show, but he says ultimately it will be integrated with the electric motor he plans to install in place of the MX-5’s original power plant. We can’t wait to see it.

Of course, the lack of a practical application has hardly stopped us from admiring any of the other cyberdecks we’ve covered thus far. This one started out life as a laptop with a broken screen, which [Chris] beheaded and connected it to 15″ external display mounted in the top of a heavy-duty case. With a new SSD and a fresh copy of Linux Mint to verify all the hardware was still functional, he put together an MDF bezel for the display that includes some faux antennae and covered aircraft style switches.

When this futuristic roadster is making an appearance at a car show or contest, [Chris] makes sure to load up some suitably high-tech looking imagery on the display. It even shows some flashing technobabble error messages pulled from The Fast & The Furious.

Traditionally we haven’t covered many custom car projects, though to be fair, we traditionally haven’t seen many that looked like this either. But between ever more technologically advanced vehicles and the insightful car modding column helmed by our very own [Lewin Day], we expect tricked out rides may become an increasingly common sight on these pages.

Careful Drilling Keeps Stadia From Listening In

Google’s fledgling Stadia service leverages the Chrome ecosystem to deliver streamed PC games on mobile devices, web browsers, and TVs. While not strictly required, the company even offers a dedicated Stadia controller that connects directly to the streaming servers over its own WiFi connection to reduce overall system latency. Of course, being a Google product, the controller has a tiny microphone that’s always listening in for interacting with the voice assistant.

[Heikki Juva] didn’t like the privacy implications of this, but unfortunately, there appears to be no way to turn off this “feature” in software. He decided the most expedient solution would be to simply remove the microphone from the controller, but it turns out there was a problem. By researching previous teardowns, he found out that it’s nearly impossible to take the controller apart without damaging it.

Getting close to the target.

So [Heikki] came up with a bold idea. Knowing roughly the position of the microphone, he would simply drill through the controller’s case to expose and ultimately remove the device. The operation was complicated by the fact that, from the teardown video he saw, he knew he’d also have to drill through the PCB to get to the microphone mounted to the opposite side. The only bright spot was that the microphone was on its own separate PCB, so physically destroying it probably wouldn’t take the whole controller out with it.

Now we don’t have to explain why drilling into a gadget powered by an internal lithium-ion battery is dangerous, and we’re not necessarily vouching for the technique [Heikki] used here. But when presented with a sealed unit like this, we admit there weren’t a lot of good options. The fact that the user should have to go to such ridiculous lengths to disable the microphone in a game controller is a perfect example of why we should try to avoid these adversarially designed devices, but that’s a discussion for another time.

In the end, with a steady and and increasingly larger bits, [Heikki] was able to put a 7 mm hole in the back of the Stadia controller that allowed him to extract the microphone in one piece. Removing the microphone seems to have had no adverse effect on the device as, surprisingly enough, it turns out that a game controller doesn’t actually need to listen to the player. Who knew?

As our devices get smarter, hidden microphones and cameras are unfortunately becoming more common. Thankfully a few manufacturers out there are taking the hint and including hardware kill switches for these intrusive features, but until that becomes the norm, hackers will have to come up with their own solutions.

Update 1/10/21: This article originally indicated that the microphone is always listening. While there is no hardware switch to disable the mic, there is a button which must be pressed to trigger the voice assistant functions. We have used strike through above to indicate the change to what was originally published.

Continue reading “Careful Drilling Keeps Stadia From Listening In”

Industrial Stack Light Keeps An Eye On Prusa Mini

When most people want to keep tabs on what their 3D printer is up to while they’re out and about, they’ll install OctoPrint on a Pi and be done with it. But what if you’re just on the other side of the room? Inspired by the stack lights used on factory floors, [Jeff Glass] decided to add a similar system to his Prusa Mini so he could see what it’s up to at a glance.

It turns out you can get these lights pretty cheaply online from the usual retailers, and as [Jeff] explains in the video after the break, driving them is about as easy as it gets. Rather than being some kind of addressable device, they generally have a single common 12 or 24 volt DC wire and ground lines for each color. With a USB controlled relay board, kicking on the appropriate light is simple from your operating system of choice.

What ended up being a bit harder was finding out what the Prusa Mini was up to. The printer offers up a simple status web page, but it has a few oddball quirks that make it difficult to scrape; such as presenting a little pop-up message that you have to manually close each time you load the page. But after spending some time with the powerful Selenium library for Python, he was able to create a script that worked its way through the UI and pulled the relevant status messages. Obviously the resulting code is Prusa specific, but the general concept would work on other printers assuming you can find a reliable way to pull the device’s current status.

After coming up with a wall mounted enclosure for the electronics that doubles as a mount for the light itself, [Jeff] can now see if his printer needs attention from clear across the room. An especially nice feature when the printer is all buttoned up inside of its enclosure.

Continue reading “Industrial Stack Light Keeps An Eye On Prusa Mini”