Sharpie Mount Brings Some Color To Your 3D Prints

The average cost of a desktop 3D printer has dropped like a stone over the last few years. They went from a piece of equipment you had to wait your turn to use at the hackerspace to something you can pick up on Prime Day, which has definitely been a good thing for our community. But to get the price down, these printers are almost exclusively running single extruder setups with no provision for multi-material printing other than swapping the filament manually.

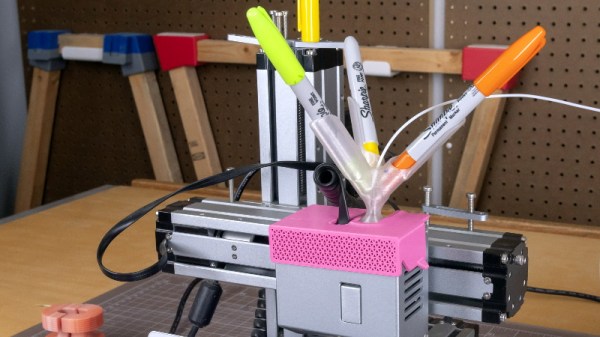
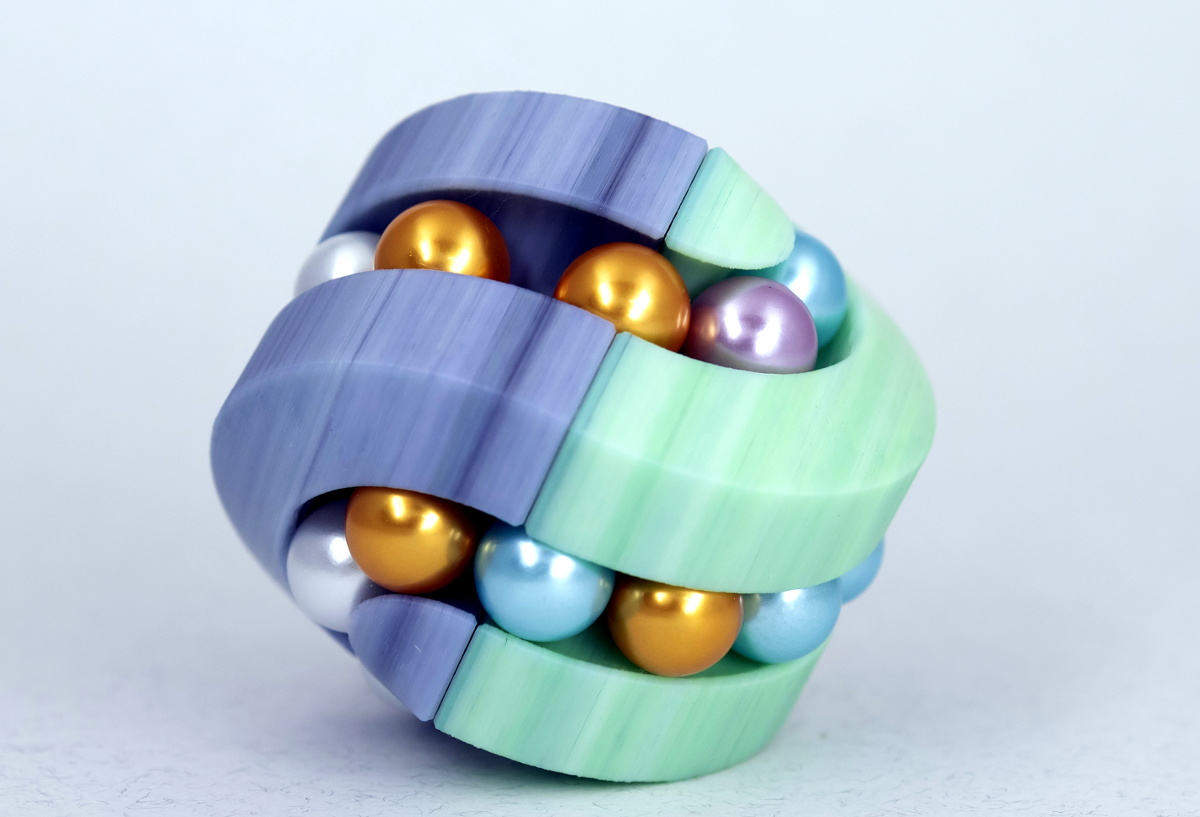
From a practical standpoint, that’s not much of a problem. But wanting to add a little visual flair to his prints, [Devin Montes] came up with a simple 3D printed mount that holds the tip of up to three Sharpie permanent markers against the filament as it enters the top of the extruder. When used with white or translucent filaments, these markers can give the final print an interesting splash of color. Obviously it’s not true multi-color 3D printing, but it can certainly make for some attractive decorative objects.

The mount is designed for the Snapmaker 3-in-1 3D printer, which is relatively well suited to such a contraption as it has a direct drive extruder and there’s plenty of clearance for the markers to stick up. The concept could certainly be adapted to other printers, but it might be a little trickier in the case of a Bowden extruder or an i3 clone that has frame components running over the top. It sounds like [Devin] is working on a generic version of the marker holder that can work on other printers, so it should be interesting to see how he addresses these issues.

Technically this isn’t a new concept, as makers were pulling off similar tricks back in the earliest days of desktop 3D printing. But this is an especially well-implemented version of the idea, and if [Devin] can really come up with a mount that will work on a wider array of hardware, we could certainly see it becoming a popular way to make printed projects a bit more exciting.

Bodge Wire Saves A Vintage Mac SE/30 From The Heap

Anyone who pokes around old electronics knows that age is not kind to capacitors. If you’ve got a gadget with a few decades on the clock, there’s an excellent chance that some of its capacitors are either on the verge of failure or have already given up the ghost. Preemptively swapping them out is common in retrocomputing circles, but what do you do if your precious computer has already fallen victim to a troublesome electrolytic?

That’s the situation that [Ronan Gaillard] recently found himself in when he booted up his Mac SE/30 and was greeted with a zebra-like pattern on the screen. The collected wisdom of the Internet told him that some bad caps were almost certainly to blame, though a visual inspection failed to turn up anything too suspicious. Knowing the clock was ticking either way, he replaced all the capacitors on the Mac’s board and gave the whole thing a good cleaning.

Unfortunately, nothing changed. This caught [Ronan] a bit by surprise, and he took another trip down the rabbit hole to try and find more information. Armed with schematics for the machine, he started manually checking the continuity of all the traces between the ROM and CPU. But again, he came up empty handed. He continued the process for the RAM and Glue Chip, and eventually discovered that trace A24 wasn’t connected. Following the course it took across the board, he realized it ran right under the C11 axial capacitor he’d replaced earlier.

Suddenly, it all made sense. The capacitor must have leaked, corroded the trace underneath in a nearly imperceptible way, and cut off a vital link between the computer’s components. To confirm his suspicions, [Ronan] used a bodge wire to connect both ends of A24, which brought the 30+ year old computer roaring back to life. Well, not so much a roar since it turns out the floppy drive was also shot…but that’s a fix for another day.

It seems like every hardware hacker has a bad capacitor story. From vintage portable typewriters to the lowly home router, these little devils and the damage they can do should always be one of the first things you check if a piece of hardware is acting up.

Adding Remote Control To The Elegoo Mars Pro

Recent price drops put entry level masked stereolithography (MSLA) resin 3D printers at around $200 USD, making them a very compelling tool for makers and hackers. But as you might expect, getting the price this low often involves cutting several corners. One of the ways manufacturers have made their machines so cheap is by simplifying the electronics and paring down the feature set to the absolute minimum.

So it was hardly a surprise for [Luiz Ribeiro] to find that his new Elegoo Mars Pro didn’t offer WiFi connectivity or a remote control interface. You’re supposed to just stick a USB flash drive into the printer and select the object you want to print from its menu system. But that doesn’t mean he couldn’t hack the capability in himself.

Monitoring a print with Mariner.

If this were a traditional 3D printer, he might have installed OctoPrint and been done with it. But resin printers are a very different beast. In the end, [Luiz] had to develop his own remote control software that worked around the unique limitations of the printer’s electronics. His software runs on a Raspberry Pi Zero and uses Linux’s “USB Gadget” system to make it appear as a flash drive when plugged into the USB port on the Elegoo Mars Pro.

This allows sending object files to the printer over the network, but there was a missing piece to the puzzle. [Luiz] still needed to manually go over to the printer and select which file he wanted to load from the menu. Until he realized there was an exposed serial port on control board that allowed him to pass commands to the printer. Between the serial connection and faux USB Mass Storage device, his mariner software has full control over the Mars Pro and is able to trigger and monitor print jobs remotely.

It might not offer quite the flexibility of adding OctoPrint to your FDM 3D printer, but it’s certainly a start.

ESP8266 Does RC Without The Transmitter

While the cost of a hobby-grade remote control transmitter has dropped significantly over the last decade or so, even the basic models are still relatively expensive. It’s not such a big deal if you only need to get one for personal use, but for a school to outfit a classroom’s worth of students their own radios, they’d need to have a serious STEM budget.

Which is why [Miharix], himself an educator with a decade of experience, developed a project that leverages the ESP8266 to create affordable RC vehicles that can be controlled with a smartphone’s web browser. There’s a bit of irony at play since the smartphones are more expensive than the RC transmitters would have been; but with more and more school-age kids having their own mobile devices, it takes the cost burden off of the educators. Depending on the age of the students, the teacher would only need to keep a couple of burner phones on hand for student that doesn’t have a device of their own.

A custom PCB makes connections easier for students.

In its fully realized form, the project uses an open hardware board that allows standard RC hobby servos to be connected to the GPIO pins of a ESP-12E module. But if you don’t want to go through the trouble of building the custom hardware, you could put something similar together with an ESP development board. From there it’s just a matter of installing the firmware, which starts up a server providing a touch-based controller interface that’s perfect for a smartphone’s screen.

Since the ESP8266 pops up as an Access Point that client devices can connect to, you don’t even need to have an existing network in place. Or Internet access, for that matter. [Miharix] says that in tests, the range between a common smartphone and the ESP8266 is approximately 85 meters (260 feet), which should be more than enough to get the job done.

In the videos after the break you can see this system being used with an RC car and boat, though the only limit to what you could control with this project is your own imagination.

Continue reading “ESP8266 Does RC Without The Transmitter”

PyGame Celebrates 20 Years By Releasing PyGame 2.0

Python is an absolutely fantastic language for tossing bits of data around and gluing different software components together. But eventually you may find yourself looking to make a program with an output a bit more advanced than the print() statement. Once you’ve crossed into the land of graphical Python programming, you’ll quickly find that the PyGame library is often recommended as a great way to start pushing pixels even if you’re not strictly making a game.

Today, the project is celebrating an incredible milestone: 20 years of helping Python developers turn their ideas into reality. Started by [Pete Shinners] in 2000 as a way to interface with Simple DirectMedia Layer (SDL), the project was quickly picked up by the community and morphed into a portable 2D/3D graphics library that lets developers deploy their code on everything from Android phones to desktop computers.

Things haven’t always gone smoothly for the open source library, and for awhile development had stalled out. But the current team has been making great progress, and decided today’s anniversary was the perfect time to officially roll out PyGame 2.0. With more than 3,300 changes committed since the team started working on their 2.0 branch in July of 2018, it’s a bit tough to summarize what’s new. Suffice to say, the library is more capable than ever and is ready to tackle everything from simple 2D art up to 4K GPU-accelerated applications.

Rip and tear in PyGame 2.0

If you haven’t given PyGame a try in awhile, don’t worry. The team has put special effort into making the library as backwards compatible as possible, so if you’ve got an old project kicking around that you haven’t touched in a decade, it should still run against the latest and greatest version. If you’ve never used it before, the team says they’ll soon be releasing new tutorials that show you how to get the most out of this new release.

Whether you’re putting together your own implementation of Conway’s “Game of Life” or creating the graphical front-end for your own Linux distribution, PyGame is a powerful tool to have in your collection. Our sincere congratulations to all PyGame developers, past and present, for making it to this auspicious occasion. We can’t wait to see what the next decade will bring.

[Thanks to deshipu for the tip.]

Making A 3D Printed DSLR Camera Mount Even Better

We’d love to say that all of our projects worked perfectly on the first try, but the average Hackaday reader is a bit too experienced to buy a fib like that. The reality is, DIY projects rarely get everything right out of the gate. It takes some time to identify issues and work out all the kinks. But of course, that’s half the fun.

For a perfect example of this process, check out the latest update on the 3D printed DSLR camera mount that [isaac879] has been working on. When we last checked in with this project over the summer the mount was already impressive, but with the latest improvements and the addition of a whole new axis of movement, this homebrew camera motion system is an extremely compelling project for anyone who wants to take their project videos to the next level.

The new Hall effect sensor mounts are a very nice touch.

Back in June, the mount [isaac879] showed off was only capable of pan and tilt. But as you can see in the video after the break, he’s since mounted that to a track made of 20×40 aluminum extrusion and added another stepper motor. This allows the pan/tilt mount to move itself back and forth on the track to get those slick panning shots that all the cool kids use in their videos nowadays.

But even if you’re not interested in the slider aspect, the core pan/tilt mount has also received a number of refinements over the last few months. Perhaps the most obvious is the switch over to thinner and lighter stepper motors. Reducing mass is always an improvement with a moving system like this, and in the case of the pan motor, the shorter can prevents a potential collision with the camera itself. Obviously the smaller motors are weaker, but [isaac879] considers that a feature; the mini motors will just start skipping steps if things get bound up instead of potentially damaging your expensive camera.

He’s switched to flange bearings to help hold the frame together, improved wire routing, added a mounting point for the electronics, reprinted the pinion gears in a flexible filament to help absorb some vibrations, and switched over to TMC2208 stepper drivers. The new drivers may actually be one of the biggest usability upgrades, as they allow the entire mount to move faster and more accurately. Critically, [isaac879] also reports the new drivers have solved a troublesome vibration issue he was seeing when the camera was moving slowly.

Obviously you can throw together a simple pan and tilt mount with a couple of servos and some zip ties if you only need to use it once or twice, but a project of this caliber would rightfully become a permanent fixture in your workspace. Perfect if you’re looking to up your project photography game.

Continue reading “Making A 3D Printed DSLR Camera Mount Even Better”

Replace Your IR Remote With A Web Browser

While more and more consumer products are rushing to include WiFi and Bluetooth connectivity, the simplicity and reliability of infrared has kept it in the game in the game far longer than many might have thought. Despite being thinner and sleeker, the IR remote control that comes with your brand new smart TV isn’t fundamentally different than what we were using in the 1980s.

But that doesn’t mean IR devices can’t enjoy some modern conveniences. Sick of misplacing his remote, [Sasa Karanovic] decided to come up with a way he could emulate it to control his TV over the network. Now with nothing more exotic than a web browser on his phone or computer, he can tap away at a visual representation of a remote to control the TV from anywhere in the house. As you might expect, this project could readily be adapted to control whatever IR gadget you might have in mind.

Assembling a simple IR transmitter dongle.

Admittedly, this isn’t exactly breaking any new ground. We’ve seen plenty of people come up with similar IR gateways in the past with varying levels of complexity. But what we really like about this project is that not only has [Sasa] shared the source code that turns an ESP32 into a network-controlled IR transmitter, but he’s put together a concise video that demonstrates how easy it is so spin up your own version. The 3D printed enclosure that looks like a traditional IR remote was a nice touch too.

The hardware for this project is little more than an ESP32 development board and an LED, but if you’re looking for something a bit more built for purpose, we recently saw a very slick open hardware IR gateway that might fit your needs.

Continue reading “Replace Your IR Remote With A Web Browser”