A Farewell To Hackaday’s Favorite Falcon 9 Booster

With the notable exception of the Space Shuttle, rockets and spacecraft have always been considered disposable. It’s a slow and expensive way to travel, akin to building a new airliner for every flight, but it was the easiest option. These vehicles have always represented the pinnacle of engineering and material science of their time, and just surviving the trip to space once was an incredible accomplishment. To have another go around would have been asking too much of the technology. Even looking back on the Space Shuttle program, there’s plenty of debate about whether or not the reusable design really paid off in the end.

So SpaceX’s ability to land, refurbish, and refly the first stage of their Falcon 9 booster is no small accomplishment. After demonstrating the idea was possible in 2017, the company made numerous changes to the latest iteration of the rocket with reusability in mind. Known as Block 5, this version of the Falcon 9 is designed to be more survivable and require minimal servicing between flights. The company says its cheaper and faster to reuse the Block 5 than it would be to build a new one for each flight, allowing the company to approach spaceflight more like commercial aviation.

Falcon 9 launch and landing streaks
Falcon 9 launch and landing streaks. (Source: SpaceX)

With a fleet of Block 5 boosters now in rotation, SpaceX has given them serial numbers not unlike an airplane’s tail number. It might not be the kind of thing the general public would normally be aware of, but these serial numbers have allowed a dedicated community of space aficionados to keep track of the missions each booster has flown.

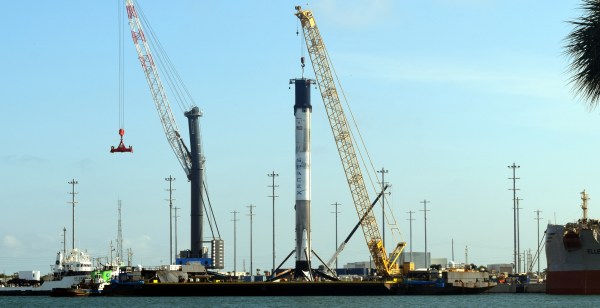
Unfortunately the story of one of these rockets, officially referred to as “Cores” in SpaceX parlance, was recently cut short. Core B1056, returning from the Starlink 4 mission on February 17th, failed to land on the autonomous spaceport drone ship (ASDS) Of Course I Still Love You and splashed down in the ocean. It’s still unclear what condition the booster was in after its soft landing in the water, but when the recovery ships returned to port empty handed, there was no question as to the fate of B1056.

From a purely business standpoint, the failure of any of SpaceX’s boosters means lost time and revenue. But in some ways B1056 had established itself as the vanguard of the fleet, managing to either set or break a number of records in its relatively short life. The destruction of the most thoroughly flight proven Block 5 booster is a stark reminder that there’s very little about spaceflight that could be called routine.

Continue reading “A Farewell To Hackaday’s Favorite Falcon 9 Booster”

Stomp Switches Let You Skip Tracks Hands-Free

You’ve (probably) got four limbs, so why are you only using half of them when you’re working on the computer? Just because your toes don’t have the dexterity to type (again, probably) doesn’t mean your feet should get to just sit there doing nothing all day. In a recent project, [MacCraiger] shows you just how easy it can be to put some functionality under foot by building a pair of media control stomp switches.

Crimp pin connectors grant +50 professionalism.

If the devices pictured above look a lot like guitar effects, that’s because they share a lot of parts. [MacCraiger] used the same sort of switch and aluminum case that you might see on a pedal board, as he figured they’d be better suited to a lifetime of being stepped on than something he 3D printed.

Up on the desk, and this time in a printed case, is the Arduino Leonardo that they connect to. The wiring for this project is very straightforward, with the switches connected directly to the GPIO pins. From there, the Arduino firmware emulates a USB Human Interface Device and fires off the appropriate media control keystrokes to skip to the next track or pause playback depending on which switch has been engaged.

This hardware isn’t exactly breaking any new ground here, but we did like how [MacCraiger] used standard 3.5 mm audio cable and the associated jacks to connect everything up. It’s obviously on-theme for what’s essentially a music project, but more importantly, gives the whole thing a very professional look. Definitely a tip to mentally file away for the future.

For the more accomplished toe-tapper, our very own [Kristina Panos] recently recently took us through the construction of her macro slinging footstool. Between these two examples of bespoke peripherals, you should have everything you need to create your own custom input devices. We suppose you could even make one that’s hand operated if you’re into that sort of thing.

Continue reading “Stomp Switches Let You Skip Tracks Hands-Free”

Multiple 3D Printers, And One Pi To Rule Them All

If you’ve got a desktop 3D printer, there’s an excellent chance you’ve heard of OctoPrint. This web front-end, usually running on a Raspberry Pi, allows you to monitor and control the printer over the network from any device that has a browser. But what if you’ve got two printers? Or 20? The logistics of each printer getting its own Pi can get uncomfortable in a hurry, which is why [Jay Doscher] has been working on a way to simplify things.

Leveraging the boosted processing power of the Raspberry Pi 4 and some good old fashioned Linux trickery, [Jay] is now controlling multiple printers from a single device. The trick is to run multiple instances of the OctoPrint backend and assign them to virtual network interfaces so they don’t interfere with each other. This takes some custom systemd unit files to get up and running on Raspbian, which he’s been kind enough to include them in the write-up.

But getting multiple copies of OctoPrint running on the Pi is only half the battle. There still needs to be a way to sort out which printer is which. Under normal circumstances, the printers would be assigned random virtual serial ports when the Pi booted. To prevent any confusion, [Jay] explains how you can use custom udev rules to make sure that each printer gets its own unique device node. Even if you aren’t trying to wrangle multiple 3D printers, this is a useful trick should you find yourself struggling to keep track of your USB gadgets.

If you’re wondering why [Jay] needs to have so many 3D printers going at the same time, we hear they’ve been keeping rather busy running off parts for commissioned copies of his popular projects. Something to consider the next time you’re wondering if there’s a way to make a happy buck out of this little hobby of ours, folks.

3D Printable Nameplates From Your Web Browser

It’s an unwritten rule that all proper pieces of shop equipment need a nameplate. Otherwise, how are you going to know what name to use when you curse it under your breath? In the old days these would have been made out of something fancy such as brass, but for the modern hacker that doesn’t stand on tradition, you can now easily outfit all your gear with custom 3D printed nameplates using this online tool.

Granted, it wouldn’t be very difficult to throw one of these together in whatever CAD package you happen to have access to. But with the tool [Tobias Weber] has developed, you don’t have to. Simply pick the font, the shape of the border, and fill in a few variables to fine tune things such as padding and base thickness.

Finally, enter your text and marvel at the real-time 3D preview that’s rendered thanks to the magic of modern web technologies. In seconds, you’ll have an STL file that’s ready for the warm liquid goo phase.

The huge collection of fonts are a particularly nice touch, ranging from delicate scripts to military style stencils. Depending on your CAD software, getting arbitrary fonts imported and extruded into a three dimensional shape can be tricky for new players. If we do have one complaint though, it’s that there doesn’t seem to be a clear indicator of how big the nameplate is going to be when exported. First time around, it spit out an STL that would have been 300 mm long if we hadn’t scaled it down in the slicer.

This project is very reminiscent of another web-based tool we featured recently. That one allowed you to make 3D printed QR codes which would whatever entomb in plastic whatever data your cold hacker heart desired.

Continue reading “3D Printable Nameplates From Your Web Browser”

Steel Pegboard Makes For A Tidy Charging Station

Do you have a bunch of electronic devices that all have different styles of chargers and batteries? Of course you do, so does everyone else. While there’s been some headway made towards standardizing on USB (and more recently, USB-C) for charging, there are still plenty of gadgets out there that march to the beat of their own DC adapter. For all those devices, [Tom Barnes] has a tip for making a cheap and easy centralized charging station.

The idea is to get a power strip, ideally one that has a switch on it, and use zip ties to attach it to a piece of pegboard. [Tom] used a nice black steel board which is obviously very strong and shouldn’t be bothered by any potentially high temperatures, but you could get away with the hardware store MDF variety if you had to.

All your chargers, mounted around the periphery of the board with Velcro hook and loop fasteners, have their individual power cords run through to the back of the board where they are nearly routed and zip tied. This is where using the steel pegboard really helped, as it has a lip around the edge that makes a void for all the wires to be run through when hung on the wall. If your particular flavor of pegboard doesn’t have that space behind it, you’d either have to settle for running the wires across the front or build out your own space in the back using a wooden frame.

Even in our high-tech world, no shop is truly complete without pegboard. Whether you’re using it to vertically mount your development boards, or pushing it around on wheels to keep your tools close at hand, there’s no shortage of ways to use this versatile material.

DIY Power Station Puts Ryobi Batteries To Work

Anyone with a few cordless tools has probably amassed quite a collection of batteries for them. If you’re a professional contractor, having a fleet of batteries you can swap out during the day’s work is a necessity. But if you’re just doing the occasional DIY project, those batteries are probably going to sit unused more often than not.

Looking to find alternative uses for his growing collection of Ryobi batteries, [Chris Nafis] has come up with a portable power station design that lets him put all that stored energy to use. With support for multiple charging standards and even an integrated work light, this device would be perfect to have around for power outages or to take with you on a camping trip.

Ryobi standardized on an 18 V battery a while back, so [Chris] is using a 10 A DC-DC buck converter to step that down to a more generally useful 12 V. From there he’s got a standard “cigarette lighter” automotive power connector which offers compatibility with a wide range of mobile devices such as small inverters or mobile radios. There’s also dual 2.4 USB “A” ports and a Quick Charge 3.0 compatible USB-C port for charging your mobile gadgets.

As an aside, this project is an excellent example of how powerful 3D printing can be when building your own hardware. Trying to make an interface for a Ryobi battery, without sacrificing a tool as a donor anyway, would be maddeningly difficult with traditional at-home manufacturing methods. But with a pair of calipers and a bit of time in your CAD package of choice, it’s possible to design and build an exact match that works like the real thing.

Which incidentally should make adapting the design to other battery types relatively easy, though editing STLs does pose its own set of unique challenges. A future improvement to this project could be making the battery interface a separate piece that can be swapped out instead of having to reprint the entire thing.

Continue reading “DIY Power Station Puts Ryobi Batteries To Work”

Counter-Strike Gets The RGB LED Treatment

Inspired by the over-the-top stage lighting and pyrotechnics used during e-sport events, [Hans Peter] set out to develop a scaled-down version (minus the flames) for his personal Counter-Strike: Global Offensive sessions. It might seem like pulling something like this off would involve hacking the game engine, but as it turns out, Valve was kind enough to implement a game state API that made it relatively easy.

According to the documentation, the CS:GO client can be configured to send out state information to a HTTP server at regular intervals. It even provided example code for implementing a simple state server in Node.js, which [Hans] adapted for this project by adding some conditional statements that analyze the status of the current game.

These functions fire off serial commands to the attached Arduino, which in turn controls the WS2812B LEDs. The Arduino code takes the information provided by the HTTP server and breaks that down into various lighting routines for different conditions such as wins and losses. But things really kick into gear when a bomb is active.

[Hans] wanted to synchronize the flashing LEDs with the beeping sound the bomb makes in the game, but the API doesn’t provide granular enough data. So he recorded the audio of the bomb arming sequence, used Audacity to precisely time the beeps, and implemented the sequence in his Arduino code. In the video after the break you can see that the synchronization isn’t perfect, but it’s certainly close enough to get the point across in the heat of battle.

With the special place that Counter-Strike occupies in the hearts of hackers and gamers alike, it’s little surprise people are still finding unique ways to experience the game.

Continue reading “Counter-Strike Gets The RGB LED Treatment”