Gaze Deeply Into These Infinity Mirror Coasters

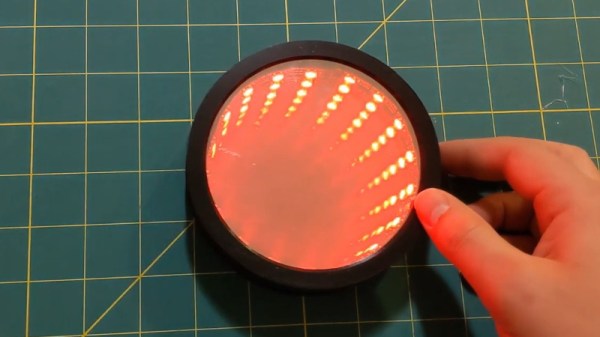
Infinity mirrors have been gaining in popularity recently, thanks in no small part to the availability of low-cost RGB LED strips to line them with. Generally such pieces are limited to wall art, or the occasional table build, which is what makes these infinity mirror drink coasters from [MnMakerMan] so unique.

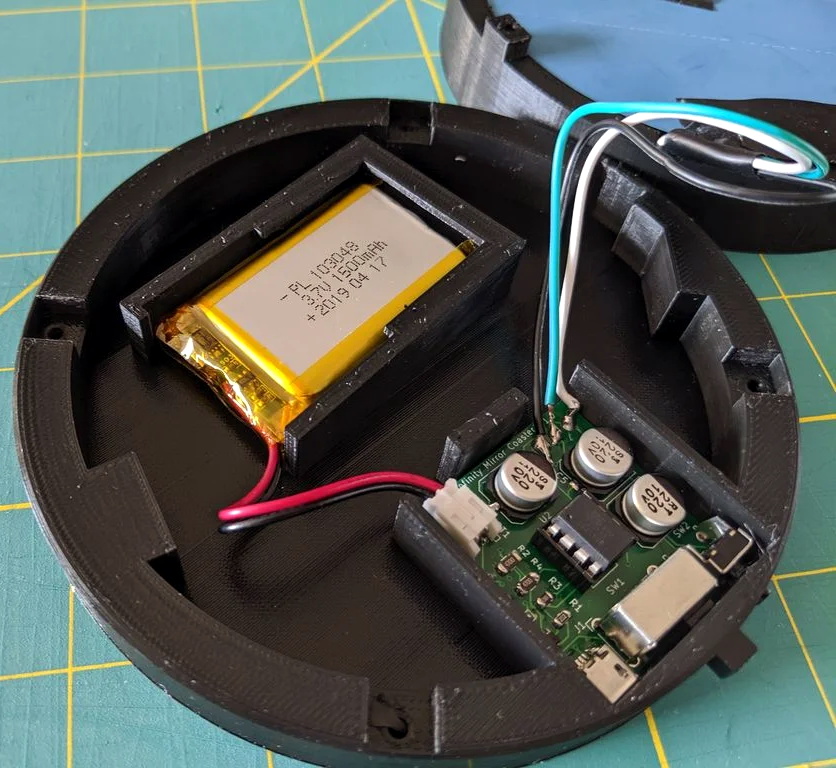
Built from an ATtiny85 and a WS2812B LED strip nestled into a 3D printed enclosure, these coasters are relatively cheap and easy to assemble should you want to run a few off before the holiday party season. [MnMakerMan] mentions the LEDs can consume a decent amount of energy, so he’s included a module to allow recharging of the internal 3.7 V 1500 mAh battery over USB.

Of course, a couple of PLA pieces and a custom PCB doesn’t make an infinity mirror. To achieve the desired effect, he’s created a stack consisting of a 4″ glass mirror, a 1/8″ thick plexiglass disc, and one-way mirror tint film. The WS2812B strip mounted along the circumference lights up the void between the two surfaces, and produces a respectable sense of depth that can be seen in the video after the break.

This isn’t the first high-tech piece of surface protection we’ve seen around these parts, as some very nice wirelessly charged supercapacitor coasters were entered into the 2019 Hackaday Prize. Of course, if you’re of the opinion that coasters should remain as cheap as possible, we’ve seen a number of automated attempts to add some flair to the classic paperboard discs.

Continue reading “Gaze Deeply Into These Infinity Mirror Coasters”

Print From The ESP8266, Courtesy Of Google

The ESP8266 has become the hacker’s microcontroller of choice because it’s exceptionally easy to get the chip connected to the network and talking to other devices. The fact that it’s also absurdly cheap is just a bonus. Since nearly every piece of electronics you buy today is “smart” enough to include some form of Internet control, that means there’s no shortage of gadgets these MCUs can potentially poke and prod.

In their latest tip, [TecnoProfesor] shows how you can interface the ESP8266 with Google’s Cloud Print, a service that enables simple remote printing over the web without having to worry about having the proper device drivers. Remote printing from the ESP8266 might seem like little more than a gag at first glance, but if you’re the kind of person who likes to have hard copies of data, adding the capability to generate a daily printed report to your weather station could be a nice weekend project.

[TecnoProfesor] provides explanations and source code for printing documents of various sizes from both the ESP8266’s internal flash storage and an SPI-attached SD card. Towards the end of the write-up, there’s even some explanation of how the setPrintDocument() function of the Cloud Print API can be used in more advanced scenarios, such as printing web pages or documents stored in Google Drive.

When we see microcontrollers connected to printers, they’re usually of the small thermal kind. Being able to access “real” printers with such a simple technique offers some interesting possibilities, though like most technology, there’s potential for it to be misused.

[Thanks to Andrew for the tip.]

Old Cisco WAN Card Turned FPGA Playground

Many of us think of FPGAs as some new cutting edge technology, but the fact of the matter is that they’ve been around for quite some time. They’ve just traditionally been used in hardware that’s too expensive for us lowly hackers. A case in point is the Cisco HWIC-3G-CDMA WAN card. A decade ago these would have been part of a router valued in the tens of thousands of dollars, but today they can be had for less than $10 USD on eBay. At that price, [Tom Verbeure] thought it would be worth finding out if they could be repurposed as generic FPGA experimentation devices.

So as not to keep you in suspense, the short answer is a resounding yes. In the end, all [Tom] had to do was figure out what voltages the HWIC-3G-CDMA was expecting on the edge connector, and solder a 2×5 connector onto the helpfully labeled JTAG header. Once powered up and connected to the computer, Intel’s Quartus Programmer software immediately picked up the board’s Cyclone II EP2C35F484C8 chip. The blinking LEDs seen in the video after the break serve as proof that these bargain bin gadgets are ripe for hacking.

Unfortunately, there’s a catch. After studying the rest of the components on the board, [Tom] eventually came to the conclusion that the HWIC-3G-CDMA has no means of actually storing the FPGA’s bitstream. Presumably it was provided by the router itself during startup. If you just want to keep the board tethered to your computer for experimenting, that’s not really a big deal. But if you want to use it in some kind of project, you’ll need to include a microcontroller capable of pushing the roughly 1 MB bitstream into the FPGA to kick things off.

It might not be as easy to get up and running as the 2019 Hackaday Superconference badge, but it’s certainly a lot easier to get your hands on.

Continue reading “Old Cisco WAN Card Turned FPGA Playground”

Teardown: VTech PreComputer 1000

Back in the days before kids could be placated with a $50 Android burner phone, many a youngster was gifted a so-called “educational computer” to keep them occupied. Invariably looking like a fever dream version of the real computer their parents didn’t want to let them use, these gadgets offered monochromatic exploits that would make Zork look like Fortnite. Due equally to their inherent hardware limitations and the premise of being an educational toy, the “games” on these computers often took the form of completing mathematical equations or answering history questions.

The VTech PreComputer 1000 is a perfect specimen of this particular style of educational toy. Released in 1988, it was advertised as a way for pre-teens to become more comfortable with operating a real computer; since at that point, it had become abundantly clear that the coming decade would see a beige box on every professional’s desk. Its full-size QWERTY keyboard was specifically mentioned in the product’s accompanying literature as a way to get young hands accustomed to the ways of touch typing.

Words of wisdom from the PreComputer 1000’s manual.

By the mid-1990s these devices would have progressed far enough to include passable text-to-speech capabilities and primitive graphics, but the junior professional who found him or herself seated in front of the PreComputer 1000 was treated to a far more spartan experience. It’s perhaps just as well that this particular educational computer was listed as a training tool, because even in 1988, surely a session with this toy must have felt very much like work.

But that’s not to say the PreComputer 1000 is without its own unique charms. In an effort to help cement its role as a “trainer” for more conventional computers, VTech saw fit to equip the PreComputer with its own BASIC interpreter. They even included generous written documentation that walked young programmers through the various commands and functions. Even today, there’s something oddly appealing about a mobile device with a full keyboard that can run BASIC programs for better than 24 hours on batteries (even if they’re alkaline “C” cells).

Let’s take a look inside this more than 30 year old mobile device, and see how the designers managed to create a reasonable facsimile of actual computing on a kid-friendly budget.

Continue reading “Teardown: VTech PreComputer 1000”

Behind The Scenes Of The 2019 Superconference Badge

If you count yourself among the several hundred of our closest friends that have joined us at Supplyframe HQ for the 2019 Hackaday Superconference, then by now you’ll have your hands on one of this year’s incredible FPGA badges. It should come as no surprise that an incredible amount of time and effort went into developing and manufacturing this exceptionally unique piece of hardware; the slick gadget in your hands today took nearly an entire year to develop, and work continued on it until very literally the last possible moment.

Badge designer Jeroen Domburg (aka Sprite_TM), Hackaday staff, and a team of dedicated volunteers were still putting the final touches on these ambitious devices less than 24 hours before they were distributed to the first wave of Superconference attendees. Naturally, that’s not exactly how things were supposed to go. But when you’ve got a group of people that want to push the envelope and build something truly incredible, convincing them to actually stop working can be a challenge in itself.

In fact, development of the badge is still ongoing. Fixes and improvements are being made to the software even as you read this, and if you haven’t already, you should upgrade your badge to make sure you’ve got the latest and greatest from our international team of wizards. We all know that conference badges have an unfortunate habit of languishing on the shelf and collecting dust, but the 2019 Superconference badge was built to challenge you for longer than just one weekend. Consider yourself warned: for every Supercon badge that gets tossed in a drawer come Monday, Sprite_TM will shed a single tear.

After the break, come along as we turn back the clock and take a look at the last minute dash to get 500+ badges programmed and ready to go before the doors opened for the 2019 Hackaday Superconference.

Continue reading “Behind The Scenes Of The 2019 Superconference Badge”

2019 Superconference Is Streaming Live Right Now!

Perhaps Pasadena is a bit too far from home, or maybe you waited a few milliseconds longer than you should have and missed the tickets when they went on sale. Whatever the reason, the fact is that the vast majority of Hackaday readers won’t be able to join us at the 2019 Superconference. But thanks to the magic of the Internet, you’ll still be able to see the incredible talks we’ve got lined up.

Starting at 10 AM Pacific on both Saturday and Sunday, the live stream will allow you to virtually attend the ultimate hardware conference in glorious high definition. Many of the talks this year have a specific focus on FPGAs (and we’ve got an incredible badge to match), but you’ll also see presentations on subjects such as hacking quantum key distribution systems, the creation of free-form circuit sculptures, debugging PCBs with augmented reality, and using Peltier coolers for fermentation. Saturday evening we’ll reveal the winner of the Hackaday Prize live on stage, and come Sunday you can unwind with a look at the best and brightest badge hacks from the weekend.

We won’t lie to you, there’s more going on at Supercon than we can possibly fit into a live video stream. At an event where nearly every flat surface will be playing host to somebody fiddling with a piece of interesting hardware, there’s only so much you can do vicariously. If anyone knows how you can take part in the SMD Soldering Challenge over the Internet, we’re all ears. Whether you’ll be with us in corporeal form or otherwise, don’t forget to join the official 2019 Hackaday Superconference Chat and use the #supercon hashtag on your social media time sink of choice.

Upgrade Board Turns Typewriter Into A Teletype

It may come as little surprise to find that Hackaday does not often play host to typewriter projects. While these iconic machines have their own particular charm, they generally don’t allow for much in the way of hardware modification. But then the IBM Wheelwriter 1000 isn’t exactly a traditional typewriter, which made its recent conversion to a fully functional computer terminal possible.

A product of the Computer History Museum’s [IBM 1620 Jr. Team], this modification takes the form of a serial interface board that can be built at home and installed into the Wheelwriter. The board allows the vintage electronic typewriter to speak RS-232 and USB, so it can be connected to whatever vintage (or not so vintage) computer you can imagine. The documentation for the project gives a rough cost of $150, though that does assume you’ve already got a Wheelwriter 1000 kicking around.

The GitHub repository includes everything you need to create your own board, and there’s even a highly detailed installation guide that goes over the case modifications necessary to get the new hardware installed. It also explains that you’ll want to get a new keycap set for your Wheelwriter if you perform this modification, as the original board doesn’t have all of the ASCII characters.

So why adapt an old electric typewriter to function as a teletype? As explained by the [IBM 1620 Jr. Team], there are projects out there looking to recreate authentic 1960s-era computing experiences that need a (relatively) affordable paper terminal. The originals are too rare to use in modern recreations, but with their adapter board, these slightly less archaic input devices can be used in their place.

Once you’ve built your new teletype, or in the somewhat unlikely event you already have one at the ready, we’ve seen a couple of projects that you might be interested in to put it to use.