Adaptive Layer Height On The Monoprice Select Mini

If you’ve used a desktop 3D printer, you’re likely familiar with the concept of layer heights. Put simply: thicker layers will print faster, and thinner layers will produce better detail. Selecting your layer height is making a choice between detail and speed, which usually works well enough. For example, prints which are structural and don’t have much surface detail can be done in higher layer heights to maximize speed with no real downside. Conversely, if you’ve got a model with a lot of detail you’ll have to just deal with the increased print time of thinner layers.

At least, that’s how it’s been up till now. Modern slicer software is starting to test the waters of adaptive layer heights, which change the layer height during the print. So the software will raise or lower the layer height depending on the level of detail required for the current area being printed. [Dylan Radcliffe] wanted to experiment with this feature on his Monoprice Select Mini, but it took some tweaking and the dreaded mathematics to get Cura’s adaptive layer height working on the entry-level printer. He’s documented his settings for anyone who wants to check out this next-generation 3D printing technology without forking out the cash for a top of the line machine.

While Cura is a popular slicer, the fact of the matter is that it’s developed by Ultimaker primarily for their own line of high-end printers. It will control machines from other manufacturers, but it makes no promises that all the features in the software will actually work as expected on lesser printers. In the case of the Monoprice Mini, the issue is the rather unusual Z hardware. The printer uses a 7.5° 48-step motor coupled to 0.7 mm thread pitch M4 rod. This is a pretty suspect arrangement that was no doubt selected to keep costs down, and results in an unusual 0.04375 mm step increment. For the best possible print quality, layer heights should be a multiple of this number. That’s where the math comes in.

After enabling adaptive layers in Cura’s experimental settings, you need to define the value which Cura will add or subtract to the base layer height. In theory you could enter 0.04375 mm here, but while that’s the minimum on paper, the machine itself is unlikely to be able to pull off such a small variation. [Dylan] recommends doubling that to 0.0875 for the “variation step size” parameter, and setting the base layer height to 0.175 mm (4 x 0.04375 mm).

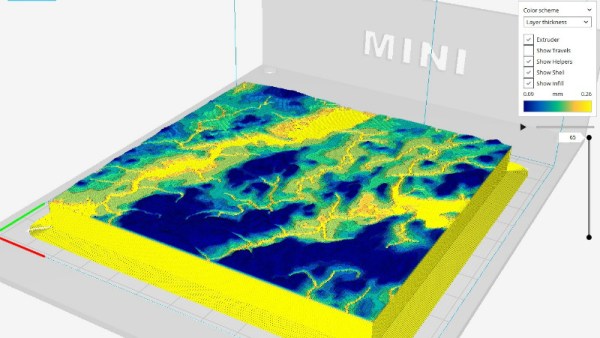
[Dylan] reports these settings reduced the print time on his topographical map pieces from 12 hours to 7 hours, while still maintaining high detail on the top surface. Of course print time reduction is going to be highly dependent on the model being printed, so your mileage may vary.

If Cura isn’t your style, our very own [Brian Benchoff] gave us a tour of “variable layer height”, the Slic3r version of this technique. Perfect for that Prusa i3 MK3 you finally spent the cash on.

Mini LEGO Technic Tank Patrols Your Desk Under ESP32 Control

We probably don’t have to tell the readers of Hackaday that LEGO isn’t just for kids; we’ve seen plenty of projects that live in an enclosure made of the multi-color bricks, and let’s not even get started on the Mindstorms builds we’ve seen over the years. But while LEGO (and especially the Technic product line) is fine for prototyping and putting together quick projects, the stock electronic components aren’t exactly top of the line. Which is why [Jason Kirsons] has been working on bridging the gap between LEGO and “real” parts.

His LEGO Technic tank is a perfect example of this principle. While the tank design itself is standard LEGO fare, he’s gone all in on the electronics. With an Adafruit Feather ESP32, custom motor controller board, and NEMA 8 steppers with 3D printed Technic adapters, this little tank has a lot more going on under the hood than you might expect. While this project is more a proof of concept than anything, the methods [Jason] demonstrates might be something to consider the next time you’re building with Billund’s best.

[Jason] chose the Feather ESP32 because of its small size, but you could get away with a generic board if you’re not trying to compress everything down into such a small footprint. Of course, if you go with another board you won’t be able to use the PCB he’s designed which attaches to the Feather and holds four Pololu DRV8835 motor drivers.

Easily the most broadly applicable element of this project is the work [Jason] has done designing adapter plates that let you use NEMA 8 motors with LEGO Technic parts. He’s put the adapters up on Thingiverse, for anyone looking for a drop-in solution to give their Technic creations a bit more oomph (technical term).

LEGO has a long history with hackers and makers. We’ve covered some absolutely incredible projects built with the famous construction set, and we don’t see any sign of it slowing down in the future.

Continue reading “Mini LEGO Technic Tank Patrols Your Desk Under ESP32 Control”

Corporate Badgelife: Oracle’s Code Card

We tend to think of elaborate electronic conference badges as something limited to the hacker scene, but it looks like the badgelife movement is starting to hit the big time. Now even the “big boys” are getting into the act, and pretty soon you won’t be able to go to a stuffy professional conference without seeing a sea of RGB LEDs firing off. We’ll let the good readers of Hackaday determine if this means it’s officially post-cool or not.

[Noel Portugal] writes in to tell us about how he created the “Code Card” during his tenure with the Oracle Groundbreakers Team. Featuring an ESP8266 and an e-ink screen, the Code Card serves not only as swanky way of identifying yourself, but as a real-world demonstration of physical devices pulling content from Oracle’s Cloud. Gotta keep those corporate overlords happy.

The Code Card is a fairly simple piece of hardware as far as badges go these days, but then the goal was never to be flashy. It does feature dual four-pin Grove System connectors on the backside though, so you can plug in additional sensors and gadgets for the customary badge hacking sessions.

To maximize runtime on the rechargeable coin cell battery, the Code Card only turns on the ESP after the user has pressed one of the buttons on the front. Once the ESP has finished performing whatever task the user requested, its powered back off completely rather than put into standby. Combined with the e-ink screen, power consumption while the device isn’t actively updating the display or pulling down new content is negligible.

[Noel] really went all-out on the software side, going as far as developing a web application which let conference attendees configure their Code Cards from their smartphones. Different functions could be assigned to short and long presses on the badge’s two buttons, and users could even select icons for the various functions from a list of images included in the firmware. A feature where attendees could upload their own images didn’t make the cut, but that surely won’t stop people from hacking around in the published Arduino source code and figuring out how to do it manually.

If you think the Code Card looks a bit familiar, it’s perhaps because it was designed in conjunction with Squarofumi, creators of the Badgy. So even if you aren’t hitting up any of Oracle’s upcoming conferences, you’re not completely out of luck if you want an e-ink badge to play with.

Kepler Closes Eyes After A Decade Of Discovery

Since its launch in March 2009, the Kepler Space Telescope has provided us with an incredible amount of data about exoplanets within our galaxy, proving these worlds are more varied and numerous than we could ever have imagined. Before its launch we simply didn’t know how common planets such as ours were, but today we know the Milky Way contains billions of them. Some of these worlds are so hot they have seas of molten rock, others experience two sunsets a day as they orbit a pair of stars. Perhaps most importantly, thousands of the planets found by Kepler are much like our own: potentially playing host to life as we know it.

Kepler lived a fruitful life by any metric, but it hasn’t been an easy one. Too far into deep space for us to repair it as we did Hubble, hardware failures aboard the observatory nearly brought the program to a halt in 2013. When NASA announced the spacecraft was beyond hope of repair, most assumed the mission would end. Even by that point, Kepler was an unqualified success and had provided us with enough data to keep astronomers busy for years. But an ingenious fix was devised, allowing it to continue collecting data even in its reduced capacity.

Leaning into the solar wind, Kepler was able to use the pressure of sunlight striking its solar panels to steady itself. Kepler’s “eyesight” was never quite the same after the failure of its reaction wheels, and it consumed more propellant than originally intended to maintain this careful balancing act, but the science continued. The mission that had already answered many of our questions about our place in the galaxy would push ahead in spite of a failure which should have left it dead in space.

As Kepler rapidly burned through its supply of propellant, it became clear the mission was on borrowed time. It was a necessary evil, as the alternative was leaving the craft tumbling through space, but mission planners understood that the fix they implemented had put an expiration date on Kepler. Revised calculations could provide an estimate as to when the vehicle would finally run its tanks dry and lose attitude control, but not a definitive date.

For the last several months NASA has known the day was approaching, but they decided to keep collecting data until the vehicle’s thrusters sputtered and failed. So today’s announcement that Kepler has at long last lost the ability to orient itself came as no surprise. Kepler has observed its last alien sunset, but the search for planets, and indeed life, in our corner of the galaxy doesn’t end today.

Continue reading “Kepler Closes Eyes After A Decade Of Discovery”

Relativity Space’s Quest To 3D Print Entire Rockets

While the jury is still out on 3D printing for the consumer market, there’s little question that it’s becoming a major part of next generation manufacturing. While we often think of 3D printing as a way to create highly customized one-off objects, that’s a conclusion largely based on how we as individuals use the technology. When you’re building something as complex as a rocket engine, the true advantage of 3D printing is the ability to not only rapidly iterate your design, but to produce objects with internal geometries that would be difficult if not impossible to create with traditional tooling.

SpaceX’s SuperDraco 3D Printed Engine

So it’s no wonder that key “New Space” players like SpaceX and Blue Origin make use of 3D printed components in their vehicles. Even NASA has been dipping their proverbial toe in the additive manufacturing waters, testing printed parts for the Space Launch System’s RS-25 engine. It would be safe to say that from this point forward, most of our exploits off of the planet’s surface will involve additive manufacturing in some capacity.

But one of the latest players to enter the commercial spaceflight industry, Relativity Space, thinks we can take the concept even farther. Not content to just 3D print rocket components, founders Tim Ellis and Jordan Noone believe the entire rocket can be printed. Minus electrical components and a few parts which operate in extremely high stress environments such as inside the pump turbines, Relativity Space claims up to 95% of their rocket could eventually be produced with additive manufacturing.

If you think 3D printing a rocket sounds implausible, you aren’t alone. It’s a bold claim, so far the aerospace industry has only managed to print relatively small rocket engines; so printing an entire vehicle would be an exceptionally large leap in capability. But with talent pulled from major aerospace players, a recently inked deal for a 20 year lease on a test site at NASA’s Stennis Space Center, and access to the world’s largest metal 3D printer, they’re certainly going all in on the idea. Let’s take a look at what they’ve got planned.

Continue reading “Relativity Space’s Quest To 3D Print Entire Rockets”

Burn Some Time With This Arduino Reddit Browser

If you’re like us, you probably spend more time browsing Reddit than you’d like to admit to your friends/family/boss/therapist. A seemingly endless supply of knowledge, wisdom, and memes; getting stuck on Reddit is not unlike looking something up on Wikipedia and somehow managing to spend the next couple hours just clicking through to new pages. But we’re willing to bet that none of us love browsing Reddit quite as much as [Saad] does.

He writes in to tell us about the handheld device he constructed which lets him view random posts from the popular /r/showerthoughts sub. Each press of the big red button delivers another slice of indispensable Internet wisdom, making it a perfect desk toy to fiddle with when you need a little extra push to get you through the day. Like one of those “Word a Day” calendars, but one that you’ll actually read.

For those curious as to how [Saad] is scraping Reddit with an Arduino, the short answer is that he isn’t. Posts are pulled from Reddit using an online tool created for the project by his wife (/r/relationshipgoals/), and dumped into a text file that can be placed on the device’s SD card. With 1500 of the all-time highest rated posts from /r/showerthoughts onboard, he should be good on content for awhile.

[Saad] has done an excellent job documenting the hardware side of this build, providing plenty of pictures as well as a list of the parts he used and a few tips to help make assembly easier. Overall it’s not that complex a project, but his documentation is a big help for those who might not live and breathe this kind of thing.

For the high-level summary: it uses an Arduino Pro Mini, a ILI9341 screen, and a 3.3 V regulator to step down 5 V USB instead of using batteries. A bit of perfboard, a 3D printed case, and a suitably irresistible big red button pulls the whole thing together.

We’ve seen a similar concept done in a picture frame a couple of years back, but if that’s not interactive enough you could always build yourself a Reddit “controller”.

Low-cost Autonomous Rover Will Drive Your Projects

[Miguel] wanted to get more hands-on experience with Python, so he created a small robotic platform as a testbed. But as such things sometimes go, it turns out the robot he created is a worthy enough project in its own right. With a low total cost and highly flexible design, it might be exactly what you’re looking for. Who knows, it might even bootstrap that rover project that’s been wandering around the back of your mind.

The robot makes use of an exceptionally simple 3D printed frame. No complicated suspension to worry about, no fasteners to hold together multiple printed parts. It’s just a single printed “L” shaped piece that has mounts for the motors and front sensor board. As designed it simply drags its tail around, which should work fine on smooth surfaces, but might need a bit of tweaking if you plan on taking your new robotic friend on an outdoor adventure.

There’s a big open area on the “tail” to mount a Raspberry Pi, but you could really put whatever board or microcontroller you wish here. In the nose is an HC-SR04 ultrasonic sensor, which [Miguel] is using to perform obstacle avoidance in his Python code. A dual H-Bridge motor driver controls the pair of gear motors in the front to provide propulsion and steering, and a buck converter steps down the 7.4V from the 2S LiPo battery to power the electronics. He’s even included a mini breadboard so you can add circuits or sensors as experimental payloads.

If you’re looking for a slightly more advanced 3D printed robotics platform, we’ve seen our fair share. From the nearly fully printed Watney to a tank that looks like it’s ready for front-line combat.