Cracking A Bluetooth Credit Card

You might be surprised to find out that it’s actually not a good idea to put all of your credit card information on a little Bluetooth enabled device in your pocket. Oh, what’s that? You knew already? Well in that case you won’t find the following information terribly shocking, but it’s still a fascinating look at how security researchers systematically break down a device in an effort to find the chinks in its armor.

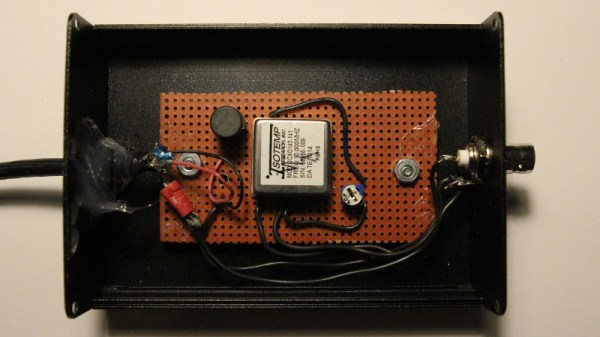
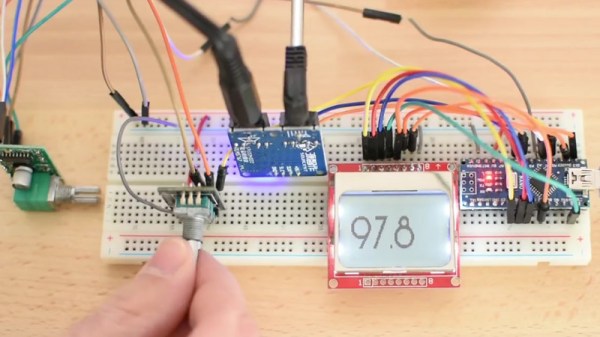
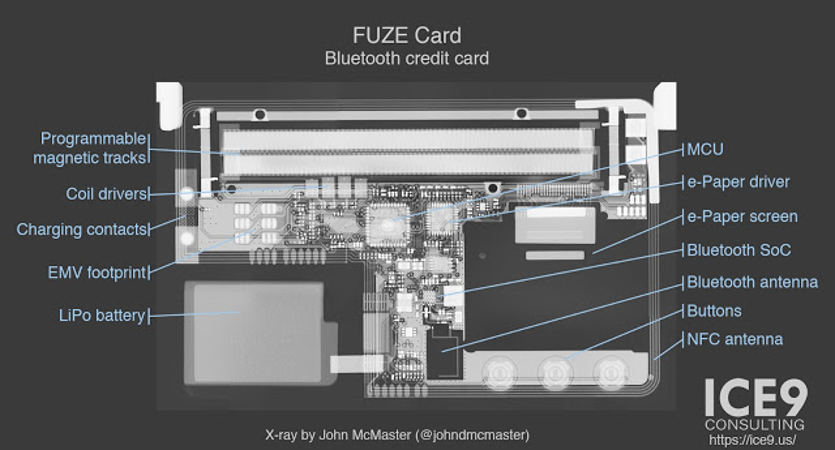
[Mike Ryan] of ICE9 Consulting has recently published an article detailing the work done to examine and ultimately defeat the security on the FUZE Card. From using an x-ray machine to do non-destructive reconnaissance on the device’s internals to methodically discovering all the commands it responds to over Bluetooth, it’s safe to say the FUZE Card is cracked wide open at this point.

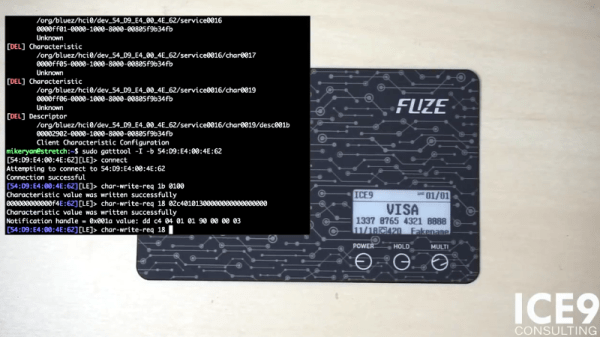
To be clear, the attacker must still pair with FUZE, so physical access is required. But as pointed out by [Mike] in the blog post, handing your card over to a merchant is standard operating procedure in many cases. It isn’t as if it would be hard to get a hold of one of these FUZE cards for a minute or two without the owner becoming suspicious. Pairing FUZE to the Linux device to continue to the next step of the attack only takes a few seconds, as demonstrated in the video after the break.

Once paired, the attacker can simply send a BLE command to FUZE which disables the lock screen. It’s really that simple. The attacker can also send commands to dump credit card info over Bluetooth, meaning they could download your information even when the card is “safely” back in your pocket. The inherent failure in the FUZE design is that you don’t need to provide any sort of authentication to pair it to a new Bluetooth device. It makes the (very dangerous) assumption that the person holding it is entitled to do so.

Even if you know better than to ever buy a device like this, the post [Mike] has written up is really a must-read for anyone who’s ever looked at a device and tried to figure out what was going on in its little silicon brain. We especially liked his assertion that reverse engineering a device essentially boils down to: “staring, thinking, a little experimentation, but mostly staring and thinking.” We’re having an internal debate here at Hackaday HQ about making that the site’s tagline.

Incidentally, this is very similar to the Bluetooth gun “safe” that was cracked not so long ago. At this point, it might be wise to just stay away from anything with that little blue logo on it if you intend to trust it with your identity and/or deadly weapon.

Continue reading “Cracking A Bluetooth Credit Card”

Function Generator Gets DIY Frequency Standard

For those of us who like to wrangle electrons from time to time, there are some exceptional deals out there for low (or at least lower) cost imported test equipment. If you’re willing to part with a few hundred dollars US, you can get some serious hardware that a decade ago would have been effectively outside the reach of the hobbyist. Right now you can order a four channel oscilloscope for less than what a new Xbox costs; but which one you’ll rack up more hours staring at slack-jawed is up to you.

10 MHz output from DIY frequency standard

Of course, these “cheap” pieces of equipment aren’t always perfect. [Paul Lutus] was pretty happy with his relatively affordable Siglent SDG 1025 Arbitrary Function Generator, but found its accuracy to be a bit lacking. Fortunately, the function generator accepts an external clock which can be used to increase its accuracy, so he decided to build one.

[Paul] starts off by going over the different options he considered for this project, essentially boiling down to whether or not he wanted to jump through the extra hoops required for an oven-controlled crystal oscillator (OCXO). But the decision was effectively made for him when his first attempt at using a more simplistic temperature controlled oscillator failed due to an unfortunate misjudgment in terms of package size.

In the end, he decided to spring for the OCXO, and was able to use the USB port on the front panel of the SDG 1025 to provide the power necessary for the crystal to warm up and remain at operating temperature. After he got the oscillator powered, he just needed to put it in a suitable metal enclosure (to cut down external interference) and calibrate it. [Paul] cleverly used the NIST WWV broadcast and his ears to find when his frequency standard overlapped that of the source, therefore verifying it was at 10 MHz.

Hackers love accuracy, and accordingly, we’ve seen a number of frequency standard builds ranging from extremely cheap to luxuriously overkill.

Art Deco Radio Gets FM Reception

Taking a vintage radio and cramming it full of modern, Internet-connected, guts has long been a staple of the hacking and making scene. While some might see it as a crime to take what’s arguably a legitimate piece of history and turn it into nothing more than a slipshod case for the Raspberry Pi, we have to admit there’s a certain appeal to the idea. Taking the beauty of classic design and pairing it with more modern capabilities is getting the best of both worlds.

But this project by [Nick Koumaris] is a somewhat unique take on the concept. Rather than sacrificing a real vintage piece of hardware to house the electronics, he’s designed a 3D printable case that looks like a classic 1936 AWA Radiolette. But what’s really interesting to us is that he then puts a basic FM radio inside of it.

That’s right, no Internet radio streaming or smartphone Bluetooth compatibility here. It’s just a regular FM radio, not entirely unlike the kind of hardware you’d expect to be inside of a classic radio. Of course, it’s much more modern, and [Nick] actually built it himself from a TEA5767 FM radio module and an Arduino Pro Mini.

While functionally it might not be terribly exciting, we do appreciate that he went through the trouble to make a vintage-looking user interface for the radio. While physical buttons would arguably have been more appropriate given the era, the art deco inspired font and graphics that show on the device’s Nokia 5110 LCD do look really slick.

Purists will surely be happy to see another project where a piece of vintage piece of audio equipment wasn’t sacrificed at the Altar of Hack, but we’ve also played host to many projects which weren’t nearly as concerned with historical preservation.

Continue reading “Art Deco Radio Gets FM Reception”

Reviving An Electron Microscope With Arduino

We don’t know about you, but when our friends ask us if we want to help them fix something, they’re usually talking about their computer, phone, or car. So far it’s never been about helping them rebuild an old electron microscope. But that’s exactly the request [Benjamin Blundell] got when a friend from a local hackerspace asked if he could take a look at a vintage Cambridge Stereoscan 200 they had found abandoned in a shed. Clearly we’re hanging out with the wrong group of people.

As you might imagine, the microscope was in desperate need of some love after spending time in considerably less than ideal conditions. While some of the hackerspace members started tackling the hardware side of the machine, [Benjamin] was tasked with finding a way to recover the contents of the scope’s ROM. While he’s still working on verification, the dumps he’s made so far of the various ROMs living inside the Stereoscan 200 have been promising and he believes he’s on the right track.

The microscope uses a mix of Texas Instruments 25L32 and 2516 chips, which [Benjamin] had to carefully pry out after making sure to document everything so he knew what went where. A few of the chips weren’t keen on being pulled from their home of 30-odd years, so there were a few broken pins, but on the whole the operation was a success.

Each chip was placed in a breadboard and wired up to an Arduino Mega, as it has enough digital pins to connect without needing a shift register. With the wiring fairly straightforward, [Benjamin] just needed to write up some code to read the contents of the chip, which he has graciously provided anyone else who might be working on a similar project. At this point he hasn’t found anything identifiable in his ROM dumps to prove that they’ve been made successfully, all he really knows right now is that he has something. At least it’s a start.

More and more of these older electron microscopes are getting a second lease on life thanks to dedicated hackers in their home labs. Makes you wonder if there’s ever going to be a piece of hardware the hacker community won’t bend to their will.

Handheld Arduino Light Painter

Light painting is a technique which allows you to “draw” on a photograph by moving a light past the camera during a long exposure shot. While it can be difficult to master, light painting allows for some incredible effects such as text and images that appear to be hovering in mid-air. Think of it like a very slow but much cooler version of an augmented reality app.

[Reven] recently wrote in to tell us about the Arduino light painter he put together, and while DIY (and even commercial) light painting gear isn’t exactly new at this point, we think he’s raised the bar a bit with his design. With the addition of a slick 3D printed enclosure and on-board display and menu system, his light painter looks exceptionally professional for being built out of hardware he had on hand.

On his blog, [Reven] has done a phenomenal job of documenting the build from start to finish. Not only does he include a detailed Bill of Materials and the STL files so you can build your own version of his light painter, he walks the reader though his design process and explains why he did the things he did. Even if you aren’t interested in building a light painter, there’s almost certainly something of interest for anyone who’s ever looked at a pile of parts on their workbench and wondered how they were going to turn it into a functioning device.

Powered by an Arduino Uno, the light painter provides a user interface on a 16×2 LCD which allows control over not only the brightness of the WS2812 LED strips but selecting and loading different images from the micro SD card. The case was designed in FreeCAD, and while [Reven] mentions there are a number of issues which could be improved, satisfies all his design goals.

We covered the original Adafruit project that [Reven] based his code all the way back in 2013, though there’s certainly been more modern interpretations of the idea since then.

A True 3D Printed Weather Station

If the term “3D printed weather station” makes you think of a printed enclosure for off-the-shelf sensors, don’t feel bad. We thought the same thing when we first read the message [Rob Ward] sent in about his latest project. Surely he couldn’t mean that he actually printed all the principal parts of a serious weather station setup, such as the wind vane, anemometer, or rain gauge?

Except, on closer inspection, that’s exactly what he did. Every part of the weather station is designed in OpenSCAD, printed out, and infused with various vitamins to turn them into functional pieces of hardware. Interestingly enough, most of the magic is done with simple reed switches and magnets.

For example, the wind vane uses eight reed switches and an embedded magnet to communicate the current wind direction to the Arduino Uno which handles the user interface. Wind speed, on the other hand, it done with a single reed switch as it just needs to count rotations to calculate speed.

[Rob] did “cheat” by using an off-the-shelf barometric pressure sensor, but we’ll give him a pass for that one. Unless somebody wants to hit the tip line with a design for a printable barometer, we’ll consider this the high water mark in printable weather stations.

This isn’t the first time we’ve seen a DIY anemometer or rain gauge, of varying degrees of complexity. But the clean look of the final version, completely open nature of the OpenSCAD source, and the low part count make this an extremely compelling option for anyone looking to up their home forecasting game.

Workbench Light Arch On The Cheap

A light arch is exactly what it sounds like: an arch fitted with LED strips that can evenly illuminate the area below. They are becoming very popular in the miniature and model making communities as they put a lot of light where you need it without the shadows that you can get with purely overhead lighting. Those same characteristics make it excellent for electronics work as well, so while we haven’t seen many light arches come our way yet, we expect it won’t be long before they start tricking in.

[Spencer Owen] recently wrote in to tell us about his LED light arch that’s exceptionally easy and cheap to build. Whatever excuse you had before about not trying a light arch over your bench is probably out the window once you check this build out.

The heart of the arch is a length of plastic tile edging, which you can pick up from any big box home improvement store. LED strips are then attached to the inside face of the tile edging, and a suitable power supply wired into one end. [Spencer] mentions he’s strategically wrapped some sections of the arch with a diffuser, which may or may not be necessary for your particular application.

At this point the astute reader may have realized that this doesn’t make an arch, and would just give you a floppy light stick thing. Right you are. The real magic of this design are the 3D printed anchors. All you need to do is bend the tile edging, insert the ends in the anchors, and you’ve got a perfectly formed arch.

The hole in the anchor matches the profile of the tile edging closely, though might need to be adjusted to match a different brand of edging from what [Spencer] has. The tension of the plastic will be enough to hold the arch up without the need for glue or fasteners. As an added bonus, the arch can be taken down by just pulling the edging out and letting it return to its original shape.

Using your newly arisen arch to light up the bench is all well and good, but why stop there? Why not use it as clock, or to play a dungeon crawler?

Continue reading “Workbench Light Arch On The Cheap”