Terrible RC Transmitter Made Less Terrible

It should probably go without saying that we’ve got nothing against the occasional bout of elaborate troubleshooting and repair, in fact it’s one of the most common things we cover here. As it turns out, people aren’t overly fond of being fleeced, and there are a lot of smart people out there who will put a lot of work in to keep from having to toss a favorite piece of gear into the trash. We can’t fault them for that.

But we have to say, we generally don’t see those kind of elaborate repairs for something brand new. Unfortunately, that’s exactly what [Marek Baczynski] had to do when trying to review the new iRangeX transmitter for his YouTube channel “dronelab”. He found a transmitter that was so poorly designed and constructed that he had to address a laundry list of issues to make the thing halfway tolerable. As you might expect, he’s not suggesting anyone go run and pick this one up.

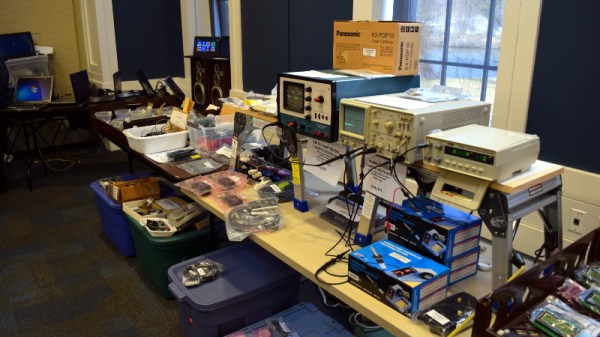
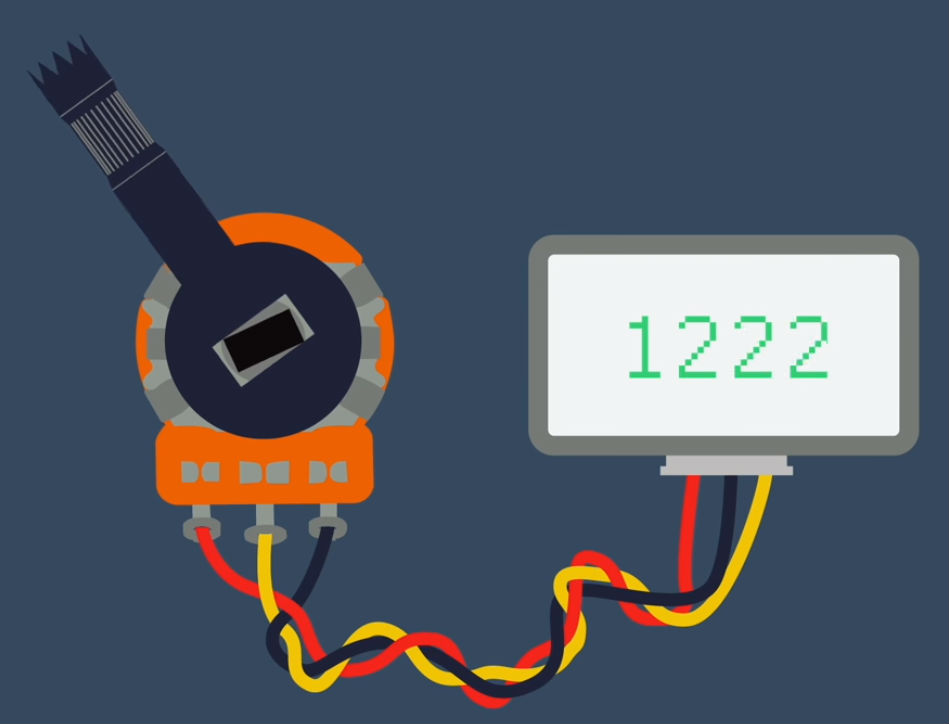
The biggest problem is a fundamental flaw with how the gimbals are constructed. Due to poorly mated surfaces between the potentiometer and the stick itself, the accuracy of the controller is very low. The potentiometers don’t even return to zero when the sticks are released. Some tape was used to tighten up the connection and make the controller usable, but such poor tolerances are hard to forgive when accurate control is essentially the whole point of the device.

The other issues took a bit more debugging to figure out. The TX made an absolutely terrible screeching sound when turned on, but [Marek] was sure he was hearing a little bit of melody under the din. Putting the signal through the oscilloscope, he was able to confirm his suspicions. As it turns out, the buzzer used in the TX has a built in tone generator that was overriding the intended melody. Switching it out for a basic buzzer fixed the issue. Similarly, an issue where the radio wouldn’t turn on if it was recently turned off was tracked back to a resistor of the wrong value. Putting a higher lower value resistor in its place sorted that out as well.

It’s hard to imagine how this device made it out of the factory with so many wrong or unsuitable components, but here we are. Not that this would be acceptable at any price point, but as [Marek] points out in the video, it isn’t as if this radio is even all that cheap. For nearly $90 USD, it doesn’t seem unreasonable to expect something that actually works.

This isn’t the first time he’s put “cheap” RC hardware through the wringer. We recently covered his efforts to quantify latency in different transmitters. As the RC transmitter world gets increasingly competitive, detailed analysis like these help separate the real gear from the toys.

Continue reading “Terrible RC Transmitter Made Less Terrible”

US Military Developing Laser Plasma Speakers

It probably won’t surprise you to know that the US military is very interested in using lasers as weapons. Directed energy weapons such as lasers have many advantages over more traditional kinetic weaponry, not least of which the fact that you don’t need to cart around ammunition for them. But somewhat surprisingly, some of the most promising laser developments have been in the field of non-lethal weaponry. While the mental image of a laser is usually a destructive one, recent demonstrations by the Joint Non-Lethal Weapons Program show lasers can do more than blow holes your target.

As reported by [Patrick Tucker] of Defense One, a radical new laser-powered sonic weapon was shown off at the “Directed Energy to DC Exhibition”. The system uses two lasers: one to generate a ball of plasma when it hits the target, and another to modulate the plasma ball in open air. The result is a variation of the classic plasma speaker demonstration, where plasma is used as a a driver for a massless speaker.

Currently the system is capable of generating a deafening crack at the target area, with a measured intensity as high as 140 dB. That’s about as loud as fireworks or a shotgun going off at close distance, and in theory is enough to drive off whoever is unlucky enough to be targeted with the beam.

In time, the researchers hope to refine their secondary modulation laser to the point that they can play audio over the plasma. This would allow the beam to be used as a directed loud speaker of sorts, which could prove useful for defensive applications. Only the target would be able to hear the audio, which could be a recording telling them they were entering a secured area. A disembodied voice telling you to turn around sounds like a extremely effective non-violent deterrent to us. The voices in our head don’t have to tell us twice.

We recently looked at the possibility of targeted sonic weapons being used in Cuba, and of course, we’ve covered many plasma speakers on Hackaday over the years. Plasma speakers have always been more or less nothing more than a fun high voltage demonstration, so to see them potentially weaponized is a crossover episode we weren’t expecting.

Continue reading “US Military Developing Laser Plasma Speakers”

Building A Plate Reverb On The Cheap

For those who don’t spend their free time creating music with experimental audio effects, a plate reverb is essentially a speaker. It just happens to be, by design, a rather poor one. Rather than using a paper cone for a diaphragm like a traditional speaker, the plate reverb uses as you might guess, a metal plate. As the plate vibrates along with the source audio, a set of piezoelectric pickups convert that to an output. The end result is that audio fed into the plate reverb comes out with a nice echo effect.

But despite their relative simplicity, a plate reverb costs thousands of dollars. They’re so expensive that the majority of people just emulate the effect in software. But it doesn’t have to be that way. [Sammartino] and an audio engineer friend recently came up with a detailed guide for building a plate reverb that cost about 10% of commercially available models.

The construction is fairly simple. A wooden frame is built, and eight hooks are installed around the edges. The plate is suspended between these hooks using guitar strings, which holds it tight but with enough give to vibrate along with the tunes. Another board is attached across the center of the frame to support the electronics: a transducer to vibrate the plate, and two piezo pickups to convert that to an audio signal, and a couple jacks and some wiring to tie it all together.

For a different take on the DIY plate reverb, check out this one we covered all the way back in 2013. If you’re in the market for something a bit larger, we’ve got you covered there as well.

Hackaday Visits World’s Oldest Computer Festival: TCF 43

I was fortunate enough to visit the Trenton Computer Festival last weekend. The show struck a very interesting mix of new and old, commercial and educational. Attendees were writing programs in BASIC on an Apple I (courtesy of the Vintage Computer Federation) not more than five feet from where students were demonstrating their FIRST robot.

The one-day event featured over fifty demonstrations, talks, and workshops on topics ranging from a crash course in lock picking to the latest advancements in quantum computing. In the vendor room you could buy a refurbished laptop while just down the hall talks were being given on heady topics such as using neural networks and genetic algorithms for day trading on the stock market.

Recent years have seen a widening of the content presented, but TCF’s longevity means there is a distinct “vintage” vibe to the show and the culture surrounding it. Many of the attendees, and even some of the presenters, can proudly say they’ve been attending since the very first show in 1976.

There was simply too much going on to see everything. At any given time, there were eleven talks happening simultaneously, and that doesn’t include the demonstrations and workshops which ran all day. I documented as many highlights from this year’s TCF as I could for those who haven’t had a chance to visit what might be the most low-key, and certainly oldest, celebration of computing technology on the planet. Join me after the break for the whirlwind tour.

Continue reading “Hackaday Visits World’s Oldest Computer Festival: TCF 43”

Arduino Clock Jots Down The Time, In UV

We’re big fans of the impractical around here at Hackaday. Sure there’s a certain appeal to coming up with the most efficient method to accomplish your goal, the method that does exactly what it needs to do without any superfluous elements. But it’s just not as much fun. If at least one person doesn’t ask “But why?”, then you probably left something on the table, design wise.

So when we saw this delightfully complex clock designed by [Tucker Shannon], we instantly fell in love. Powered by an Arduino, the clock uses an articulated arm with a UV LED to write out the current time on a piece of glow-in-the-dark material. The time doesn’t stay up for long depending on the lighting in the room, but at least it only takes a second or two to write out once you press the button.

Things are pretty straightforward inside the 3D printed case. There’s an Arduino coupled with an RTC module to keep the time, which is connected to the two standard hobby servos mounted in the front panel. A UV LED and simple push button round out the rest of the Bill of Materials. The source code is provided, so you won’t have to figure out the kinematics involved in getting the two servos to play nicely together if you want to try this one at home.

We’ve seen many clocks powered by Arduinos over the years, occasionally they even have hands. But few can boast their own robotic arm.

Continue reading “Arduino Clock Jots Down The Time, In UV”

3D Printed Raspberry Pi NAS With Dual Drive Bays

While it might not pack the computational punch you’d usually be looking for in a server platform, you can’t beat how cheap the Raspberry Pi is. As such, it’s at the heart of many a home LAN, serving up files as a network attached storage (NAS) device. But the biggest problem with using the Pi in a NAS is that it doesn’t have any onboard hard drive interface, forcing you to use USB. Not only is this much slower, but doesn’t leave you a lot of options for cleanly hooking up your drives.

This 3D printable NAS enclosure designed by [Paul-Louis Ageneau] helps address the issue by integrating two drive bays which can accommodate 2.25 inch laptop hard disk drives and their associated IB-AC6033-U3 USB adapters. The drives simply slide into the “rails” designed into the case without the need for additional hardware. There’s even space in the bottom of the case for a USB hub to connect the drives, and a fan on the top of the case to help keep the whole stack cool. It still isn’t perfect, but it’s compact and doesn’t look half bad.

The design is especially impressive as it doesn’t require any supports, an admirable goal to shoot for whenever designing for 3D printing. As an added bonus, the entire case is designed in OpenSCAD and licensed under the GPL v3; making modification easy if you want to tweak it for your specific purposes.

This certainly isn’t the strongest Raspberry Pi enclosure we’ve ever seen, that title would have to go to the ammo case that does double duty as a media streamer, but looks like it would make a great home for that new 3 B+ you’ve got on order.

Look Upon Eyepot, And Weep For Mercy

Hope you weren’t looking forward to a night of sleep untroubled by nightmares. Doing his part to make sure Lovecraftian mechanized horrors have lease in your subconscious, [Paul-Louis Ageneau] has recently unleashed the horror that is Eyepot upon an unsuspecting world. This Cycloptic four legged robotic teapot takes inspiration from an enemy in the game Alice: Madness Returns, and seems to exist for no reason other than to creep people out.

Even if you aren’t physically manifesting nightmares, there’s plenty to learn from this project. [Paul-Louis Ageneau] has done a fantastic job of documenting the build, from the OpenSCAD-designed 3D printed components to the Raspberry Pi Zero and Arduino Pro Mini combo that control the eight servos in the legs. If you want to play along at home all the information and code is here, though feel free to skip the whole teapot with an eyeball thing.

A second post explains how the code is written for both the Arduino and Pi, making for some very illuminating reading. A Python script on the Pi breaks down the kinematics and passes on the appropriate servo angles to the Arduino over a serial link. Combined with a web interface for control and a stream from the teapot’s Raspberry Pi Camera module, and you’ve got the makings of the world’s creepiest telepresence robot. We’d love to see this one stomping up and down a boardroom table.

Seems we are on a roll recently with creepy robot pals. Seeing a collaboration between Eyepot and JARVIS might be too much for us to handle. Though we have a pretty good idea how we’d want to control them.