Building A Static Grass Applicator

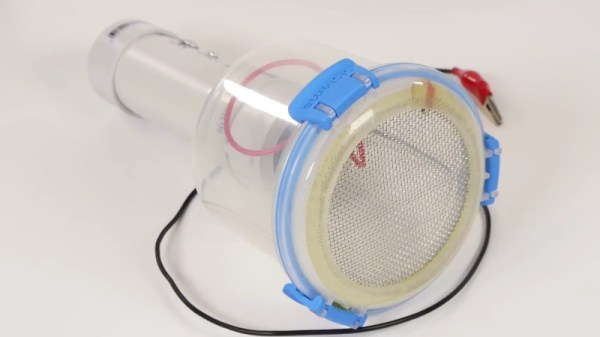
A “Static Grass Applicator” is very specialized tool used by model makers to create realistic grass. Don’t feel bad if you didn’t know that, neither did we. Anyway, the idea is that you distribute a fine filament over the surface, and then use static electricity to make the “blades” of grass stand up vertically. This is a huge improvement over the old school method of manually placing the grass on the model, but the tool itself is somewhat expensive, at least for a decent one.

But thanks to avid modeler [Luke Towan], those looking to up their diorama game without breaking the bank now have a fantastically detailed guide on building their own grass applicator that is not only fairly cheap (as little as $20 USD depending on what your part bins look like), but is robust enough to last for years of service.

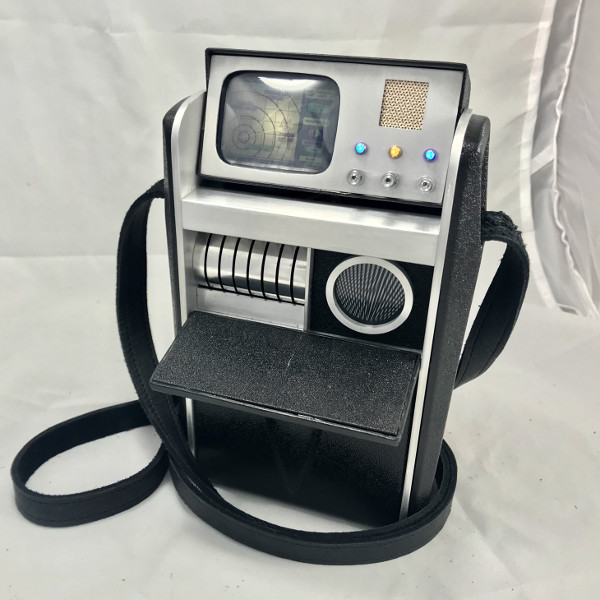
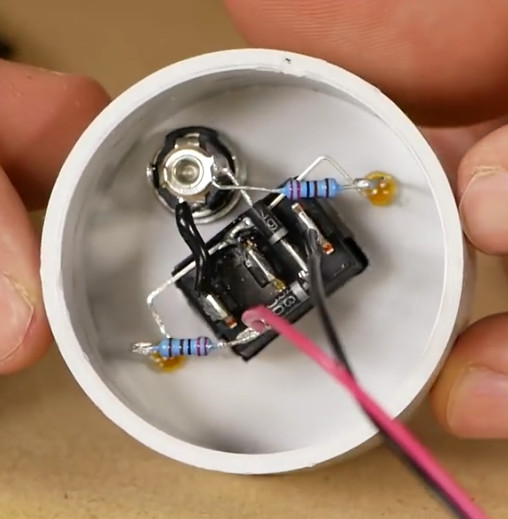
The heart of the device, and probably the only part you’d need to go out and buy especially for this project, is a small 12V negative ion generator. This is used to setup an electric charge between the grid of the applicator and a long wire that gets attached to the piece you’re working on. What little wiring there is simply provides a switch and some status LEDs. The design [Luke] has come up with lets the user switch between and internal 9V battery for portability, or an external 12V wall adapter for larger projects.

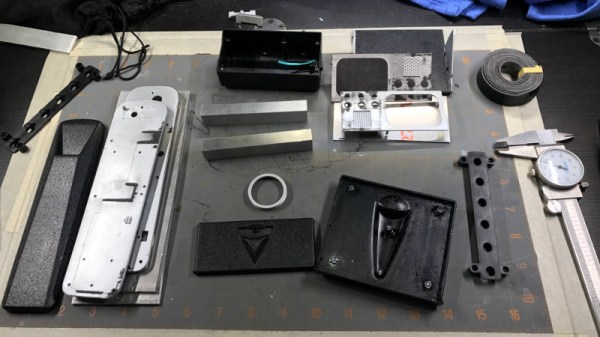
Building the chamber to hold the grass filament as well as the handle which houses the electronics will take longer than anything else, and even that seems pretty straightforward. Given the impressive results shown in the video after the break, it’s actually pretty surprising how simple the device is.

The setup used here reminds us of the DIY powder coating we covered a few years back.

Continue reading “Building A Static Grass Applicator”

Building A Tricorder Prop Worthy Of Mr Spock

We’ve all been there. You want to assemble a proper Star Trek: The Original Series landing party prop set, but the TOS tricorders you can find on the market are little more than overpriced toys. Imagine the embarrassment of beaming down to Cestus III with a plastic tricorder. The Metrons wouldn’t have even bothered with the trial by combat with such a sorry showing.

Unhappy with the state of Star Trek props, [Dean O] decided to take matters into his own hands. He purchased a TOS tricorder from Diamond Select Toys and set out to modify it into something a bit closer to Starfleet standards. Anything painted metallic silver on the toy was replaced with a machined aluminum duplicate, adding some much needed heft. He even spruced up the controls and display.

To start, [Dean] stripped the tricorder down, separating all of the silver plastic parts and finding aluminum stock that was close enough to the desired dimensions. This ended up being .125″ plate for the sides, and .500″ bars for the horizontal dividers. To make the side panels he placed the original plastic parts over the aluminum, marked the mounting holes with a punch, and used the belt sander to shape them.

[Dean] then put in a more screen accurate Moire disc, and went as far as to get real watch crowns for the buttons (just like the prop used in the show). In a particularly bold move, he even drilled out the center of watch crowns to install plastic light pipes for LED illumination.

Last year we saw a build that crammed a Raspberry Pi into the same Diamond Select tricorder toy to excellent effect. Now somebody just needs to combine both projects and they’ll have the slickest tricorder in the Alpha Quadrant.

Taking Halloween To The Next Level With JARVIS

As an avid “Haunt Hacker”, [Steve Koci] knows a thing or two about bringing high-tech to Halloween. Wanting to build a mobile robot that could accompany him to conventions as a demonstration of the sort of animatronic mechanisms and controls he uses, he came up with the idea of JARVIS. The original plan was to make a more traditional robot, but with the addition of an animated skull and some Steampunk-style embellishments, JARVIS is definitely the kind of thing you don’t want to run into on an October night.

Construction of JARVIS started in 2016, after [Steve] saw the Agent 390 tracked robot chassis from ServoCity. With the addition of extra wheels and a custom track, he converted the Agent 390 into a triangular track arrangement which he said he’s had his eye on since “Johnny 5” sported them back in Short Circuit.

There’s a dizzying array of electronics required to make JARVIS move and talk, not least of which is the “Banshee” prop controller. This device is made to simplify the construction of animatronic heads and provides not only organic-looking randomized movement but automatic jaw synchronization. Using a wireless audio connection, [Steve] is able to talk through a speaker mounted on the chest of the robot, while the skull automatically matches its mouth to his speech in real time. Combined with the GoPro in a two-axis gimbal, this allows JARVIS to function as a fairly robust telepresence platform. Much to the delight/horror of those it’s used on.

Getting JARVIS to move requires not only the two beefy motors and a dedicated controller supplied by the Agent 390 platform, but no less than thirteen servos for the head, arms, and grippers. There’s even a linear actuator used to tilt the skull up and down, presumably for terrifying people of various heights and ages. JARVIS even has a pair of Adafruit’s electronic eyes mounted in the skull, as if you thought you would be spared the horror of seeing glowing eyes following you in the dark.

To control all this hardware, [Steve] uses two RC transmitters in conjunction with a smartphone displaying the video feed coming from the GoPro. It takes some serious finger-gymnastics to get JARVIS doing its thing, which [Steve] says he’s still trying to master.

As many projects that have graced these pages can attest to, hackers seem to delight in coming up with new and exciting ways to terrify the young and old alike. Sometimes they can’t even wait until Halloween.

Continue reading “Taking Halloween To The Next Level With JARVIS”

Control A Swarm Of RC Vehicles With ESP8266

Over at RCgroups, user [Cesco] has shared a very interesting project which uses the ever-popular ESP8266 as both a transmitter and receiver for RC vehicles. Interestingly, this code makes use of the ESP-Now protocol, which allows devices to create a mesh network without the overhead of full-blown WiFi. According to the Espressif documentation, this mode is akin to the low-power 2.4GHz communication used in wireless mice and keyboards, and is designed specifically for persistent, peer-to-peer connectivity.

Switching an ESP8266 between being a transmitter or receiver is as easy as commenting out a line in the source code and reflashing the firmware. One transmitter (referred to as the server in the source code) can command eight receiving ESP8266s simultaneously. [Cesco] specifically uses the example of long-range aircraft flying in formation; only coming out of the mesh network when it’s time to manually land each one.

[Cesco] has done experiments using both land and air vehicles. He shows off a very hefty looking tracked rover, as well as a quickly knocked together quadcopter. He warns the quadcopter flies like “a wet sponge”, but it does indeed fly with the ESP’s handling all the over the air communication.

To be clear, you still need a traditional PPM-compatible RC receiver and transmitter pair to use his code. The ESPs are simply handling the over-the-air communication. They aren’t directly responsible for taking user input or running the speed controls, for example.

This isn’t the first time we’ve seen an ESP8266 take the co-pilot’s seat in a quadcopter, but the maniacal excitement we feel when considering the possibility of having our very own swarm of flying robots gives this particular project an interesting twist.

3D Printed Stethoscope Makes The Grade

On the off chance that initiatives like the Hackaday Prize didn’t make it abundantly clear, we believe strongly that open designs can change the world. Putting technology into the hands of the people is a very powerful thing, and depending on where you are or your station in life, can quite literally mean the difference between life and death. So when we saw that not only had a team of researchers developed a 3D printable stethoscope, but released everything as open source on GitHub, it’s fair to say we were pretty interested.

The stethoscope has been in development for several years now, but has just recently completed a round of testing that clinically validated its performance against premium brand models. Not only does this 3D printed stethoscope work, it works well: tests showed its acoustic performance to be on par with the gold standard in medical stethoscopes, the Littmann Cardiology III. Not bad for something the researchers estimate can be manufactured for as little as $3 each.

All of the 3D printed parts were designed in OpenSCAD (in addition to a Ruby framework called CrystalSCAD), which means the design can be evaluated, modified, and compiled into STLs with completely free and open source tools. A huge advantage for underfunded institutions, and in many ways the benchmark by which other open source 3D-printable projects should be measured. As for the non-printed parts, there’s a complete Bill of Materials which even includes links to where you can purchase each item.

The documentation for the project is also exceptional. It not only breaks down exactly how to print and assemble the stethoscope, it even includes multi-lingual instructions which can be printed out and distributed with kits so they can be assembled in the field by those who need them most.

From low-cost ultrasounds to truly personalized prosthetics, the future of open source medical devices is looking exceptionally bright.

[Thanks to Qes for the tip]

Cracking An Encrypted External Hard Drive

As far as hobbies go, auditing high security external hard drives is not terribly popular. But it’s what [Raphaël Rigo] is into, and truth be told, we’re glad it’s how he gets his kicks. Not only does it make for fascinating content for us to salivate over, but it’s nice to know there’s somebody with his particular skill set out there keeping an eye out for dodgy hardware.

No word on how the “Secret Wang” performs

The latest device to catch his watchful eye is the Aigo “Patriot” SK8671. In a series of posts on his blog, [Raphaël] tears down the drive and proceeds to launch several attacks against it until he finally stumbles upon the trick to dump the user’s encryption PIN. It’s not exactly easy, it did take him about a week of work to sort it all out, but it’s bad enough that you should probably take this particular item off the wishlist on your favorite overseas importer.

[Raphaël] treats us to a proper teardown, including gratuitous images of chips under the microscope. He’s able to identify a number of components on the board, including a PM25LD010 SPI flash chip, Jmicron JMS539 USB-SATA controller, and Cypress CY8C21434 microcontroller. By hooking his logic analyzer up to the SPI chip he was able to dump its contents, but didn’t find anything that seemed particularly useful.

The second post in the series has all the gory details on how he eventually gained access to the CY8C21434 microcontroller, including a description of the methods which didn’t work (something we always love to see). [Raphaël] goes into great detail about the attack that eventually busted the device open: “cold boot stepping”. This method allowed him to painstakingly copy the contents of the chip’s flash; pulling 8192 bytes from the microcontroller took approximately 48 hours. By comparing flash dumps he was able to eventually discover where the PIN was being stored, and as an added bonus, found it was in plaintext. A bit of Python later, and he had a tool to pull the PIN from the drive’s chip.

This isn’t the first time we’ve seen a “secure” hard drive that ended up being anything but. We’ve even been witness to a safe being opened over Bluetooth. Seems like this whole “Security by Obscurity” thing might not be such a hot idea after all…

A Plywood Laptop For Your Raspberry Pi

[Rory Johnson] writes in to tell us about PlyTop Shell, a Creative Commons licensed design for a laser cut wooden laptop that he’s been working on since 2016. It’s designed to accommodate the Raspberry Pi (or other similarly sized SBCs), and aims to provide the builder with a completely customizable mobile computer. He’s got a limited run of the PlyTop up for sale currently, but if you’ve got the necessary equipment, you can start building yours while you wait for that new Pi 3B+ to arrive.

Originally [Rory] was working on a 3D printed design, but quickly ran into problems. The vast majority of 3D printers don’t have nearly the build volume to print out a laptop case in one shot, so the design needed to be broken up into multiple smaller pieces and then grafted together into the final case. Not only did this take a long time and a lot of material, but the final result had the rather unfortunate appearance of a plastic quilt.

Eventually he got hooked up with a maker collective in Minneapolis that had a laser cutter, and the PlyTop was born. There’s still a 3D printed component in the design that goes in the screen hinge, but the rest of the PlyTop is cut out of a three 2′ x 4′ sheets of 1/8″ Baltic birch plywood. As you might expect, plenty of fasteners are required, but [Rory] has a complete Bill of Materials (complete with purchase links) for everything you’ll need to turn the cut pieces into a fully fledged laptop. He’s considering selling kits in the future, but is still working on the logistics.

In keeping with the idea of complete flexibility, there’s no defined layout for the internals of the PlyTop. Rather, there’s an array of star-shaped openings on the bottom plate that allow the builder to connect hardware components up in whatever way works for them. [Rory] actually suggests just holding everything down with zip ties to allow for ease of tinkering.

He’s also come up with a list of suggested hardware for the keyboard, touchpad, and display; but those are really just suggestions. The design is open enough that it shouldn’t take much work to adapt to whatever gear you’ve got laying around.

Of course, this isn’t the first open source laptop we’ve seen here at Hackaday. It isn’t even the first wooden one. But we love the lines of the PlyTop and the focus on complete customization.

Continue reading “A Plywood Laptop For Your Raspberry Pi”