LEGO Meets Nintendo Switch

As you probably know, the Nintendo Switch is the incredibly popular console of the moment. You of course also know that LEGO has been popular since the beginning of recorded history. So it was only a matter of time before somebody decided that these two titans of youthful entertainment needed to combine up like some kind of money-printing Voltron. You know, for science.

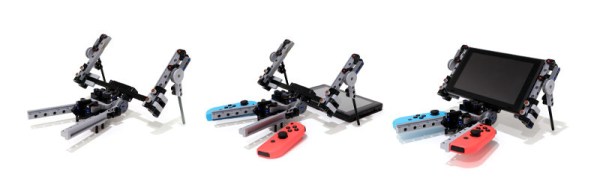
[Vimal Patel], a known master of all things plastic brick related, decided to take up the challenge with a few experimental LEGO accessories for the Switch. These add-ons are largely designed to make playing the Switch a bit more comfortable, but represent an interesting first step to more complex hardware modifications down the road.

The key to these experiments are a set of 3D printed rails which allow you to attach standard LEGO parts to the Switch. With the rails installed, [Vimal] demonstrates a simple “kick stand” which improves the system’s stability when not being used in handheld mode.

A few different steering wheel modifications are also demonstrated, which use an impressive bit of engineering to move the controller’s analog stick left and right with rotational input on the wheel. Both variations are shown in-use with Mario Kart, and seem to do the job.

It will be interesting to see what kind of projects will be made possible at the intersection of Switch and LEGO when Nintendo Labo goes live later this month.

Continue reading “LEGO Meets Nintendo Switch”

The Era Of Orville Props Has Officially Begun

Over a decade after the last Star Trek show warped off of television, we finally have a new series in the form of Star Trek: Discovery. But much to the chagrin of many old school Trek fans, Discovery has gone all in on the gritty and hyper-serialized storytelling that’s taken over TV since Starfleet last patrolled the airwaves. But for those who are looking for somewhat more lighthearted space adventures, Seth MacFarlane (of Family Guy fame) has created a show which is essentially a love-letter to Star Trek: The Next Generation called The Orville. Some have gone as far as to claim that The Orville is the true continuation of the Trek legacy, though such discussion sounds awfully close to a Holy War to us so we’ll steer clear.

Unfortunately for The Orville fans, the series doesn’t have nearly the commercial draw of Trek. Accordingly, the market for things like replica uniforms and props from the show is still in its infancy, meaning fans of the show have to go the DIY route. [JohnSmallBerries] is one such fan, and his 3D printed “Comscanner” from The Orville is a shot across the bow to the well established Trek prop-making scene.

Without so much as an official toy version of the device, [John] was forced to do his initial 3D rendering based completely on screenshots from the show. Even the scale of the device had to be guessed, as it’s usually only seen being held in a crew member’s hand. In the end he reasoned it’s probably supposed to be about the size of a large smartphone.

Not content with just a static prop, [John] managed to integrate not only the spring-assisted retractable display of the scanner from the show, but also some LED backlit panels complete with a screen-accurate user interface. Judging by the internal shots of the scanner, it looks like there’s still plenty of room inside to add some more advanced electronics. The next evolution of this prop will surely be to add in a microcontroller and potentially even a real screen to add some more elaborate effects and (relatively) practical functions.

We’ve seen plenty of impressive builds of Star Trek gadgets, arguably bringing the devices much closer to reality than the original show runners ever did. It will be interesting to see if The Orville inspires a new generation of engineers to bring their favorite fictional pieces of kit into the real world.

Filter Your Pi And Be A Responsible Pirate

At this point it’s pretty well-known that you can tack a long wire to the Raspberry Pi’s GPIO, install some software, and you’ve got yourself the worlds easiest pirate FM radio station. We say that it’s a “pirate” station because, despite being ridiculously easy to do, broadcasting on these frequencies without a license is illegal. Even if you had a license, the Raspberry Pi with a dangling bit of wire will be spewing out all kinds of unintentional noise, making it a no-go for any legitimate purposes.

Unfiltered output of Pi broadcasting on 107.3 MHz

In an effort to address that issue, [Naich] has written up a couple posts on his blog which not only discuss why the Pi is such a poor transmitter, but shows how you can build a filter to help improve the situation. You’ll still be a lawless pirate if you’re transmitting on FM stations with your Pi, but you won’t be a filthy lawless pirate.

In the first post, [Naich] shows us exactly what’s coming out of the wire antenna when the Pi is broadcasting some tunes on the default 107.3 MHz, and it ain’t pretty. The Pi is blasting out signals up and down the spectrum from 50 MHz to 800 MHz, and incredibly, these harmonics are in some cases stronger than the intentional broadcast. Definitely not an ideal transmitter.

[Naich] then goes on to show how you can build a DIY filter “hat” for the Pi that not only cuts down a lot of the undesirable chatter, but even boosts the intended signal a bit. The design is surprisingly simple, only costs a few bucks in components, and conveniently is powered directly from the Pi’s GPIO. It even gives you a proper antenna jack instead of a bare wire wound around a header pin.

We’ve seen plenty of projects utilizing the Raspberry Pi FM transmission hack, and while this mod still doesn’t make it perfect, it’s always nice to see an awesome hack made even better.

Bringing Fiction To Life With 3D Printing

I print something nearly every day, and over the last few years, I’ve created hundreds of practical items. Parts to repair my car, specialized tools, scientific instruments, the list goes on and on. It’s very difficult for me to imagine going back to a time where I didn’t have the ability to rapidly create and replicate physical objects at home. I can say with complete honesty that it has been an absolutely life-changing technology for me, personally.

But to everyone else in my life, my friends and family, 3D printers are magical boxes which can produce gadgets, weapons, and characters from their favorite games and movies. Nobody wants to see the parts I made to get my girlfriend’s 1980’s Honda back on the road before she had to go to work in the morning, they want to see the Minecraft block I made for my daughter. I can’t get anyone interested in a device I made to detect the algal density of a sample of water, but they all want me to run off a set of the stones from The Fifth Element for them.

As I recently finished just such a project, a 3D printed limpet mine from Battlefield 1, I thought I would share some thoughts on the best practices for turning fiction into non-fiction.

Continue reading “Bringing Fiction To Life With 3D Printing”

Evolution Of The ESP8266 Party Button

Sometimes the best part of building something is getting to rebuild it again a little farther down the line. Don’t tell anyone, but sometimes when we start a project we don’t even know where the end is going to be. It’s a starting point, not an end destination. Who wants to do something once when you could do it twice? Maybe even three times for good measure?

Original version of the Party Button

That’s what happened when [Ryan] decided to build a wireless “party button” for his kids. Tied into his Home Assistant automation system, a smack of the button plays music throughout the house and starts changing the colors on his Philips Hue lights. His initial version worked well enough, but in the video after the break, he walks through the evolution of this one-off gadget into a general purpose IoT interface he can use for other projects.

The general idea is pretty simple, the big physical button on the top of the device resets the internal ESP8266, which is programmed to connect to his home WiFi and send a signal to his MQTT server. In the earlier versions of the button there was quite a bit of support electronics to handle converting the momentary action of the button to a “hard” power control for the ESP8266. But as the design progressed, [Ryan] realized he could put the ESP8266 to deep sleep after it sends the signal, and just use the switch to trigger a reset on the chip.

Additional improvements in the newer version of the button include switching from alkaline AA batteries to a rechargeable lithium-ion pack, and even switching over to a bare ESP8266 rather than the NodeMCU development board he was using for the first iteration.

For another take on MQTT home automation with the ESP8266, check out this automatic garage door control system. If the idea of triggering a party at the push of a button has your imagination going, we’ve seen some elaborate versions of that idea as well.

Continue reading “Evolution Of The ESP8266 Party Button”

The Essential List Of 3D Printer Accessories

You’ve acquired your first 3D printer and are giddy with excitement. But like all new additive manufacturing adventurers, the more you do with your printer the more questions arise. Don’t worry, we’ve got your back.

Getting the most out of your time with a new 3D printer has a lot to do with the tools and accessories on hand and what you do with them. Let’s take a look at a few of the accessories that should accompany every 3D printer, be it in your home, school, or hackerspace. There’s already enough potential aggravation when it comes to 3D printing, the goal here is to ensure you won’t be without a tool or supply when you need it the most.

Continue reading “The Essential List Of 3D Printer Accessories”

3D Printed ESP8266 Programming Jig

The various development boards such as the NodeMCU or Wemos D1 make working with the ESP8266 an absolute breeze. If they have a downside, it is that they are larger than the bare ESP2866, and of course cost a bit more. Just as with the Arduino, once you have the wiring sorted out and the code more or less finalized, your best bet is to ditch the unnecessary support hardware and use the bare module to save space and money in your final design.

The design took a few revisions to get right

Unfortunately, the ESP8266 form factor isn’t terribly forgiving when it comes time for hooking up a programmer. Rather than having to solder a serial adapter to the chip to flash it, [Ryan] came up with a slick 3D printed programming jig that uses pogo pins. If you have to program these boards in bulk, a jig like this can save a massive amount of time and aggravation.

Beyond the 3D printed holder for the pogo pins, this programmer uses a FTDI USB-to-serial adapter, a couple passive components to smooth out the power going into the chip, and a couple buttons.

In the video after the break, [Ryan] walks through the many iterations it took to get the 3D printed aspect of the jig worked out. The design went through a few rather large revisions, including one that fundamentally changed the whole form factor. Even with the jig now working, he mentions that he might circle back around and try it from a different angle.

Programming jigs are a staple of electronics manufacturing, and we’ve covered quite a few that have helped transformed a proof of concept into a small scale production runs.

Continue reading “3D Printed ESP8266 Programming Jig”