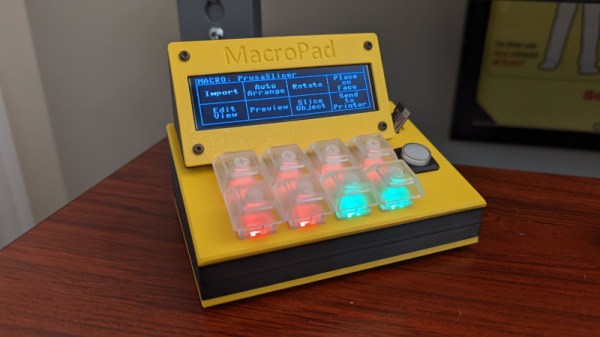
ESP32 board with battery and nearby antenna

How To Easily Set Up Secure OTA Firmware Updates On ESP32

After an electronic IoT device has been deployed into the world, it may be necessary to reprogram or update it. But if physical access to the device (or devices) is troublesome or no longer possible, that’s a problem.

OTA updates allow a device to download new firmware, install it, and reboot itself into the new version. Convenient? Yes. Secure? It definitely needs to be.

Fortunately, over-the-air (OTA) firmware updates are a thing, allowing embedded devices to be reprogrammed over their wireless data connection instead of with a physical hardware device. Security is of course a concern, and thankfully [Refik] explains how to set up a basic framework so that ESP32 OTA updates can happen securely, allowing one to deploy devices and still push OTA updates in confidence.

[Refik] begins by setting up a web server using Ubuntu Linux, and sets up HTTPS using a free SSL certificate from Let’s Encrypt, but a self-signed SSL certificate is also an option. Once that is done, the necessary fundamentals are in place to support deploying OTA updates in a secure manner. A bit more configuration, and the rest is up to the IoT devices themselves. [Refik] explains how to set things up using the esp32FOTA library, but we’ve also seen other ways to make OTA simple to use.

You can watch a simple secure OTA firmware update happen in the video, embedded below. There are a lot of different pieces working together, so [Refik] also provides a second video for those viewers who prefer a walkthrough to help make everything clear. Watch them both, after the break.

Continue reading “How To Easily Set Up Secure OTA Firmware Updates On ESP32”

Z80 Video Output Via The Raspberry Pi Pico

Building basic computers from the ground up is a popular pastime in the hacker community. [Kevin] is one such enthusiast, and decided to whip up a video interface for his retro Z80 machine.

The output from [Kevin]’s build.
The computer in question is a RC2014 Classic ][, a popular single-board 8-bit computer kit. As standard, it doesn’t have a video output, so [Kevin] built one using the PIO interface of the Raspberry Pi Pico.

74-series logic is pressed into service to handle address selection, enabling the Pico and Z80 to effectively communicate. Wait states in the Z80 are used to avoid the vintage chip tripping over when the two are communicating. The Pico outputs video in 160 x 120 resolution with eight bits of color per pixel, using a simple resistor-ladder DAC to do basic VGA.

The build serves as a great way to get familiar with programming both the Pi Pico and the Z80 itself. With that said, it’s probably possible to simply just emulate the Z80 on the Pi Pico given the latter runs at a default clock rate of 125 MHz, eclipsing the RC2014’s snail-like 7.3728 MHz main clock.

If you’ve been building your own retro graphics hardware, do let us know.  We love that sort of thing around here!

accelerometer, oled, and PocketBeagle create a gesture-controlled calculator

The Calculator Charm: Calculatorium Leviosa!

Have you ever tried waving your hand around like a magic wand and summoning a calculator? We would guess not since you’d probably look a little silly doing so. That is unless you had [Andrei’s] cool gesture-controlled calculator. [Andrei] thought it would be helpful to use a calculator in his research lab without having to take his gloves off and the results are pretty cool.

His hardware consists of a PocketBeagle, an OLED, and an MPU6050 inertial measurement unit for capturing his hand motions using an accelerometer and gyroscope. The hardware is pretty straightforward, so the beauty of this project lies in its machine learning implementation.

[Andrei] first captured a few example datasets to train his algorithm by recreating the hand gestures for each number, 0-9, and recording the resulting accelerometer and gyroscope outputs. He processed the data first with a wavelet transform. The intent of the transform was two-fold. First, the transform allowed him to reduce the number of samples in his datasets while preserving the shape of the accelerometer and gyroscope signals, the key features in the machine learning classification. Secondly, he was able to increase the number of features for the classification since the wavelet transform resulted in both approximation and detailed coefficients which can both be fed into the algorithm.

Because he had a small dataset, he used the Stratified Shuffle Split technique instead of the test train split method which is generally more suited for larger datasets. The Stratified Shuffle Split ensured approximately the same number of train and test samples for each gesture. He was also very conscious of optimizing his model for running on a portable processing unit like the PocketBeagle. He spent some time optimizing the parameters of his algorithm and ultimately converted his model to a TensorFlowLite model using the built-in “TFLiteConverter” function within TensorFlow.

Finally, in true open-source fashion, all his code is available on GitHub, so feel free to give it a go yourself. Calculatorium Leviosa!

Continue reading “The Calculator Charm: Calculatorium Leviosa!”

Automating Mobile Games With A Robot Arm

My Singing Monsters is one of those mobile titles that has users play simple games to earn coins and gems in the usual way. [Anykey] found that his son was a fan of the game, but that sometimes it felt a little rigged. Thus, rather than waste time playing themselves, he set up a robot to do the job for them. (Super-boring video, embedded below.)

The player must complete a basic but time-consuming memory game. Upon winning, the player gets to choose a prize from 17 mystery cards. The top prize of 1,000 diamonds always seemed to be hidden under another card, leading to the aforementioned frustration.

In order to test if the game was rigged, [Anykey] set up a uArm Swift Pro to play the game, with the robot arm moving a small stylus over the iPad playing the game. The iPad’s video was piped to a PC via HDMI out, going into a Camlink capture card. A Python script using OpenCV was then created to play the game automatically, and log the results of prizes gained along the way. All the code is up on GitHub.

After over 100 attempts, the robot never managed to pick the right card to score 1,000 diamonds. Given that there are only 17 cards to choose from, one would expect the 1,000 diamond prize to come up several times in that many selections.

It seems then that the prize selection for completing the memory game may not actually be down to picking the right card. Instead, the prize given is selected by some other calculation entirely.

We love a robot playing games at Hackaday, even if it’s as simple as Tic-Tac-Toe. Video after the break.

Continue reading “Automating Mobile Games With A Robot Arm”

Generate Fully Parametric, 3D-Printable Speaker Enclosures

Having the right speaker enclosure can make a big difference to sound quality, so it’s no surprise that customizable ones are a common project for those who treat sound seriously. In that vein, [zx82net]’s Universal Speaker Box aims to give one everything they need to craft the perfect enclosure.

The parts can be 3D-printed, but the design ensures that the front and back panels are flat, so one can use wood or some other material for those depending on preference and appearance. The assembly is screwed together using six M3 bolts per side with optional heat-set inserts, but it’s entirely possible to simply glue the unit together if preferred.

One thing that makes this design a bit more broadly useful is that [zx82net] not only provides the parametric design file for Fusion360, but also includes STEP format CAD files, and a small number of pre-configured assemblies for a few commonly available speaker drivers: the Dayton Audio DMA70-4, ND91-4, and the TCP115-4. Not enough for you? Check out [zx82net]’s collection of ready-to-rock enclosures in a variety of designs and configurations; there’s bound to be something to appeal to just about anyone.

[via Reddit]

The Trials And Tribulations Of SLA Printing A Portable Wii Handheld

The G-Boy kit revolutionized the subculture around building portable home consoles, allowing an entire Wii to be crammed into a form factor the size of a original Game Boy. [Chris Downing] is no stranger to the field, and sourced a G-Boy kit of his own to build it to the best of his abilities. (Video embedded after the break.)

However, he wanted to step up above the FDM-printed parts of the original kit. Thus, he contacted the kit developer Gman, who provided him with the 3D model files so he could attempt a higher-quality SLA print himself. [Downing] had some experience with SLA printing in the past with the Form 2, but found some unique challenges on this build with the Form 3.

The benefits of SLA printing are the finer detail and surface finish it delivers. This is particularly nice on things like enclosures and buttons which are handled regularly by the user. However, the standard resin that ships with the Form 3 had issues with warping, particularly on thin flat walls which make up the majority of the G-Boy case.

Other issues included the fact that the standard cured SLA resin is much harder to thread screws into than softer FDM plastic, something which frustrated assembly of the design. It’s also brittle, too, which leads to easy breakages.

As a fan of a properly finished product, [Downing] decided to sand and paint the enclosure regardless. Tragedy struck when the spray cans started to spit chunks due to being over a year old. However, it serendipitously turned into a win, producing an attractive granite stone-like finish which actually looks pretty good.

The G-Boy kit took Wii portable builds mainstream, and drew many new builders into the subculture. [Downing] may be a stalwart of the scene, but still learned new skills along the way of the build.

We can’t wait to see what happens next in the scene, though we’d suspect someone’s already out there chopping up a rare PlayStation 5 as we speak.

Continue reading “The Trials And Tribulations Of SLA Printing A Portable Wii Handheld”

A man using a homemade vacuum apparatus to climb a wall

Scale Buildings With The Power Of Suction

Walls can’t hold [Elijah Cirioli]. The would-be superhero has been busy scaling the sides of buildings using his self-contained vacuum climbers. (Video embedded after the break.)

After being inspired by the winning project of an Air Force design challenge, our plain-clothed crusader got to work on a pair of prototype vacuum climbers. The wooden prototypes were an unexpected success, so work soon began on the models featured in the video after the break. The main improvements in this second version included using ¼ inch acrylic instead of plywood, as well as an improved gasket for a better seal against the imperfect exterior of many building walls.

While the system would still ultimately struggle with brick walls (and other imperfect surfaces), it performs more than adequately when ascending smoother concrete walls. And while the acrylic was a far better choice than the plywood, one of the acrylic panels still developed a fracture. Even so, the results speak for themselves, and we have to applaud the inventor’s seemingly unconditional trust in his equipment.

We haven’t seen a follow-up from [Elijah Cirioli] recently, so here’s hoping that he’s busy working on version three, and that he’s not stuck up a wall somewhere. In the meantime, check out how someone accomplished similar wall-climbing feats using salvaged microwave transformers.

Continue reading “Scale Buildings With The Power Of Suction”