An Open-source Scientific RPN Calculator

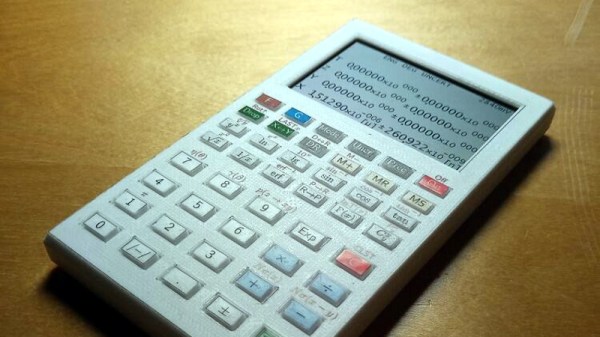
Why reach for a bland, commercially available calculator when you be using a model that employs RPN (Reverse Polish Notation) in its calculations and be a custom build all at the same time? The kids may have colour TFTs and graphing functions, but your keyboard has no equals sign, and that means something.

Unfortunately for RPN enthusiasts, the RPN calculator is a little on the rare side. Since classic models from the 1970s and ’80s are rather pricey, [Anton Poluektov]’s just build his own called the OpenCalc. This glorious specimen is an open hardware RPN calculator with more than a nod to the venerable Hewlett Packard HP42 in its design.

At its heart is an STM32L476 low-power ARM processor and a Sharp Memory LCD, all on a PCB clad in a 3D-printed case you’d have been proud to own in the 1980s. It runs from a CR2032 which is more than can be said for some modern styles of calculator, and it gives the user everything you could wish for in a scientific calculator. The key legends are a set of printable stickers, which when printed on self-adhesive laser film prove durable enough to last. All the resources can be found in a GitHub repository, so if RPN is your thing there’s nothing to stop you building one for yourself.

If RPN interests you, it’s a subject we’ve looked at in greater detail in the past.

Wreck Your Mail Before You Check Your Mail

Every five years or so, I think it’s time to review my e-mail flow. (Oh no!) I run my own mail server, and you should too, but this means that I get to figure out managing and searching and archiving and indexing it all by myself. (Yippee!)

And I’ll be honest — sometimes I’m a bit of a luddite. I actually, literally have been using Mutt, or its derivative NeoMutt for maybe fifteen years, after a decade or so of mouse-intensive graphical mail readers. If e-mail is about typing words, and maybe attaching the occasional image, nothing beats a straight-up text interface. But what a lot of these simple mail clients lack is good search. So I decided to take that seriously.

Notmuch is essentially an e-mail database. It’s an e-mail searcher, tagger, and indexer, but it’s not much else. The nice thing is that it’s brutally fast. Searches and extraction of tagged subsets are faster than sending the same data back and forth to the Big G, and I have a ton more flexibility. It’s awesome. Of course good ol’ Mutt can work with Notmuch. Everything can. It’s Linux/UNIX. Continue reading “Wreck Your Mail Before You Check Your Mail”

A Vacuum Battery Made For Looks And Learning

Looks and RGB LEDs are usually not a priority in tool batteries, but [Oleg Pevtsov] decided the battery for his DIY vacuum cleaner needed to be different. In the process, he learned some lessons in chemical etching, plating, machining, casting, and electronics. See the video after the break for the build compilation.

The core of the battery is just five 18650 cells in a 3D-printed holder with a BMS, but the real magic is in the external components. The outer body is a brass tube with the logo etched through the 0.6 mm wall. Getting the etching right took a few tries and a lot of frustration, but he eventually found success with a solution of sulfuric acid and nitric acid in a magnetically stirred container. For etch resist he sprayed lacquer on the outside and filled the inside with silicone. The inside was then coated with clear epoxy by allowing it to cure while spinning. The final touches were nickel plating, then gold plating, and a high polish.

The silver-plated connector on one end consists of a machined copper tip and ring, epoxied together for isolation. The tip has a multi-start external thread, allowing the female side of the connector to securely connect with a single twist. A set of RGB LEDs were added to the core to light up the battery from the inside. We have to hope the vacuum this is supposed to attach to is equally impressive.

This being Hackaday, we see a lot of custom power banks for all the custom electronics. These range from a small power bank for on-the-go soldering to a heavy metal beast with a built-in inverter.

Continue reading “A Vacuum Battery Made For Looks And Learning”

3D-Printed Scale Model Of Perseverance Rover Seems As Complicated As The Real One

Sometimes the best way to figure out how something works is to make a model of it. 3D-modeling software makes it possible to do the job in silico, and sometimes that’s enough. But to really get inside the designer’s head, executing a physical model, like this quarter-scale RC-controlled Perseverance rover, is a great way to go.

If you’re looking for cutting-edge tech or groundbreaking design, this build will probably not light your fire. But a closer look will show not only great details about how JPL designs robots that can operate on Mars, but some great design and 3D-printing tips too. [Dejan]’s modeling process started with the 3D renderings of Perseverance available on the NASA website, which went into SolidWorks via Blender. [Dejan] was intent on capturing all the details of the rover, even those that ended up just for looks. But there’s plenty of functionality, too — the running gear looks and functions just like the six-wheel double-bogie design used on Perseverance, as well as Curiosity before it. This revealed an interesting fact that we didn’t previously realize — that the hull is suspended from a single pivot point on each side, while a linkage across the deck both prevents the body from pivoting and provides differential control of the drive bogies on either side of the rover.

The video below shows both the impressive amount of 3D printing needed to make all the model’s parts as well as the involved assembly process. It also shows the Arduino-controlled model being piloted around via radio control. There’s a lot to learn from this model, and [Dejan]’s craftsmanship here is top-notch too. We’ve seen such builds before from him, like this 3D-printed SCARA arm, a CNC hot-wire foam cutter, and an automated wire bender.

Continue reading “3D-Printed Scale Model Of Perseverance Rover Seems As Complicated As The Real One”

Dreamcast Homebrew Gets Boost From SD Card Cache

While it might have been a commercial failure compared to contemporary consoles, the Sega Dreamcast still enjoys an active homebrew scene more than twenty years after its release. Partly it’s due to the fact that you can burn playable Dreamcast discs on standard CD-Rs, but fans of the system will also point out that the machine was clearly ahead of its time in many respects, affording it a bit of extra goodwill in the community.

That same community happens to be buzzing right now with news that well-known Dreamcast hacker [Ian Micheal] has figured out how to cache data to an SD card via the console’s serial port. At roughly 600 KB/s the interface is too slow to use it as swap space for expanding the system’s paltry 16 MB of memory, but it’s more than fast enough to load game assets which otherwise would have had to be loaded into RAM.

A third-party Dreamcast SD adapter.

In the video below, [Ian] shows off his new technique with a port of DOOM running at 640×480. He’s already seeing an improvement to framerates, and thinks further optimizations should allow for a solid 30 FPS, but that’s not really the most exciting part. With the ability to load an essentially unlimited amount of data from the SD card while the game is running, this opens the possibility of running mods which wouldn’t have been possible otherwise. It should also allow for niceties like saving screenshots or game progress to the SD card for easy retrieval.

[Ian] says he’ll be bringing the same technique to his Dreamcast ports of Quake and Hexen in the near future, and plans on posting some code to GitHub that demonstrates reading and writing to FAT32 cards so other developers can get in on the fun. The downside is that you obviously need to have an SD card adapter plugged into your console to make use of this technique, which not everyone will have. Luckily they’re fairly cheap right now, but we wouldn’t be surprised if the prices start climbing. If you don’t have one already, now’s probably the time to get one.

To be clear, this technique is completely separate from replacing the Dreamcast’s optical drive with an SD card, which itself is a very popular modification that’s helped keep Sega’s last home console kicking far longer than anyone could have imagined.

Continue reading “Dreamcast Homebrew Gets Boost From SD Card Cache”

Old Textbooks Galore

This collection of public domain books proclaims to not be about survival, but for survivors. It is a extensive collection of text books, manuals, etc., in over 150 categories from Accounting to Woodworking. Because of the copyright duration laws, most are around one hundred years old.

You might not want to have your appendix removed by someone who has only learned surgery from reading Dr John Sluss’s 1908 tome, “Emergency Surgery for the General Practitioner, with 584 illustrations, some of which are printed in colors“. But some knowledge is timeless. And much is of historical interest as well, helping us get a better appreciation of what bodies of knowledge people had in the beginning of the last century. There are books on farming, forging and casting, steam engines, clockmaking, telegraph and telephone, and even back issues of Scientific American and 73 magazines, just to name a few.

Here’s a random sampling of a few illustrations from electronics-related books.

High speed electrons from “Inside the Vacuum Tube” by John F. Rider, 1945, a relatively modern book from this collection. This book alone is worth downloading just to see the excellent illustrations. Mr Rider wrote so many technical books that he formed his own publishing company.

Using triangles from “Mechanical Drawing, Prepared for the Students of the Massachusetts Institute of Technology” by Linus Faunce, 1898.

The Weidemann system of wiring lamps, from “Electric-Wiring, Diagrams and Switchboards” by Newton Harrison E.E., published in 1906, complete with “one hundred and five illustrations showing the principles and technics of the art of wiring”. This system employed equal lengths of wires between each lamp in a (failed) attempt to make the voltage drop the same for each bulb.

Do you have any timeless reference or text books you like to use? Let us know down below in the comments. And thanks to [David Gustafik] for the tip.

Hacking A Solar Inverter RF Interface

One of the main advantages of cheap wireless modules is that they get used in consumer electronics, so if you know what’s being used you can build your own compatible hardware. While investigating the RF interface used in a series of cheap “smart” solar inverters [Aaron Christophel], created an Arduino library to receive inverter telemetry using a $2 RF module. See the demonstration after the break.

[Aaron] bought the inverter and ~40 euro USB “Data Box” that allows the user to wirelessly monitor the status of the inverter. Upon opening the two units, he found that they used LC12S 2.4Ghz modules, which create a wireless UART link. With a bit of reverse engineering, he was able to figure out the settings for the RF modules and the serial commands required to request the status of the inverter. He doesn’t delve into the possible security implications, but there doesn’t appear to be any form of encryption in the link. It should be possible for anyone with a module to sniff the messages, extract the ID of the inverter, and hijack the link. Just knowing the status of the inverter shouldn’t be all that dangerous, but he doesn’t mention what other commands can be sent to the module. Any others could have more severe implications.

Sniffing the wireless signal flashing through the air around us is a regular topic here on Hackaday. From testing the security of WiFi networks with an ESP32 to monitoring SpaceX launches with an SDR, the possibilities are infinite.

Continue reading “Hacking A Solar Inverter RF Interface”