Protect Vintage Gear With Easy Capacitor Reforming

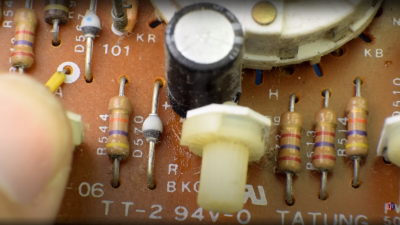
Having acquired some piece of old electronic equipment, be it a computer, radio, or some test gear, the temptation is there to plug it in as soon as you’ve lugged it into the ‘shop. Don’t be so hasty. Those power supplies and analog circuits often have a number of old aluminium electrolytic capacitors of unknown condition, and bad things can happen if they suddenly get powered back up again. After a visual inspection, to remove and replace any with obvious signs of leakage and corrosion, those remaining may still not be up to their job, with the oxide layers damaged over time when sat idle, they can exhibit lower than spec capacitance, voltage rating or even be a dead short circuit. [TechTangents] presents for us a guide to detecting and reforming these suspect capacitors to hopefully bring them, safely, back to service once more.

Capacitor failure modes are plentiful

When manufactured, the capacitors are slowly brought up to operating voltage, before final encapsulation, which allows the thin oxide layer to form on the anode contact plate, this is an electrically driven chemical process whereby a portion of the electrolyte is decomposed to provide the needed oxygen ions. When operating normally, with a DC bias applied to the plates, this oxidation process — referred to as ‘self-healing’ — continues slowly, maintaining the integrity of the oxide film, and slowly consuming the electrolyte, which will eventually run dry and be unable to sustain the insulating oxide layer.

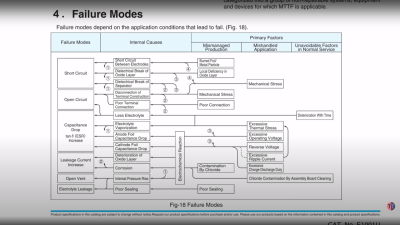
If left to sit un-powered for too long, the anodic oxide layer will decay, resulting in reduced operating voltage. When powered up, the reforming process will restart, but this will be in an uncontrolled environment, resulting in a lot of excess heat and gases being vented. It all depends on how thin the oxide layer got and if holes have started to form. That is, if there is any electrolyte left to react – it may already be far too late to rescue.

If the oxide layer is sufficiently depleted, the capacitor will start to conduct, with a resultant self-heating and runaway thermal decomposition. They can explode violently, which is why there are score marks at the top of the can to act as a weak point, where the contents can burst through. A bit like that ‘egg’ scene in Aliens!

Yucky leaky capacitor. Replace these! and clean-up that conductive goo too.

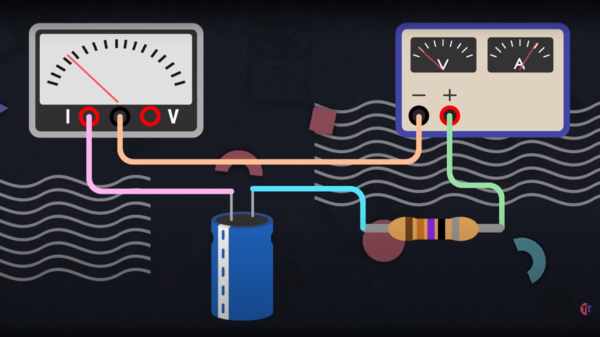
The ‘safe’ way to reform old capacitors is to physically remove them from the equipment, and apply a low, controlled voltage below the rated value to keep the bias current at a low value, perhaps just 2 mA. Slowly, the voltage can be increased to push the current back up to the initial forming level, so long as the current doesn’t go too high, and the temperature is within sensible bounds. The process ends when the applied voltage is at the rated value and the current has dropped off to low leakage values.

A word of warning though, as the ESR of the reformed caps could be a little higher than design, which will result in higher operating temperature and potentially increased ripple current in power supply applications.

We’re really glossing over this subject fast here, but [TechTangents] was kind enough to link to some fine capacitor-related reading for those who need a primer. Here is a US DoD handbook for reforming capacitors with advice on storage shelf life, some tech notes on using electrolytic capactors from chemi-con, and a general capacitor guide from TDK. Reforming caps is nothing new, here’s an previous article about repairs, and something a bit more recent.

Continue reading “Protect Vintage Gear With Easy Capacitor Reforming”

3D Printing Safety (According To The UL)

If you want to start a heated discussion in 3D printing circles, ask people about the requirements to print safely. Is ABS safe to print without ventilation? Can you drink out of a PLA cup? How nasty is that photo resin if you spill it on yourself? If you are at home, it’s more or less up to you. But if you are building a shared hackerspace, a corporate workstation, or a classroom, these questions might come up, and now, the UL has your answer. The UL200B document is aimed at 3D printers in “institutions of higher education,” but we imagine what’s good for the university is good for us, too.

The 45-page document isn’t an easy read. It does cover both “material extrusion” and “vat photopolymerization” technology. In fact, they identify seven “most common” processes ranging from powder bed fusion, energy deposition, and more.  The work results from a UL task force with participants from Harvard, Princeton, and Carnegie-Mellon. We were surprised there didn’t seem to be any industry representation, but maybe that was on purpose.

With extrusion printing — what we’d call FDM — the focus seems to be on ultra-fine particles and volatile organic compounds (VOCs). However, the level of VOCs rose up to six times with resin printers when compared to FDM. Filters helped with ABS, nylon, and ASA, and polycarbonate/ABS. The paper does acknowledge that PLA is probably safer, although it is quick to point out that PLA with additives may not be as safe as plain PLA. If you want a quick summary, check out Table 2, starting on page 23.

The rest of the document is about creating a safety plan for all the printers that might be on a college campus — that might not be as interesting. However, you’ll want to skip forward to the appendix section. It has some data about relevant industrial standards and other data.

This is a great step in analyzing the risks of 3D printing. Of course, laser printers and copiers also spew micro-particles, and we seem to have survived those for a number of decades. Still, more data is good — you should be informed to make decisions about your health and safety. We didn’t see much in the document that covered food safety, something we’ve talked about before. If you want to monitor your VOC exposure, we got you.

Victorian Train Tunnel Turned Test Track

Characterizing the aerodynamic performance of a vehicle usually requires a wind tunnel since it’s difficult to control all variables when actually driving. Unless you had some kind of perfectly straight, environmentally controlled, and precision-graded section of road, anyway. Turns out the Catesby Tunnel in the UK meets those requirements exactly, and [Tom Scott] recently got to take a tour of it.

The 2.7 kilometer (1.7 mile) long tunnel was constructed as a railway tunnel between 1895 and 1897, thanks to the estate owner objecting to the idea of “unsightly trains” crossing his property. The tunnel’s construction was precise even by modern standards, deviating only 3 mm from being perfectly straight along its entire length. It lay abandoned for many years until it was paved and converted into a test facility, opening in 2021.

To measure the speed without the luxury of GPS reception, a high-speed camera mounted inside a vehicle detects reflective tags mounted every 5 m along the tunnel’s wall. This provides accurate speed measurement down to 0.001 km/h. A pair of turntables are installed at the ends of the tunnel to avoid an Austin Powers multi-point turn (apparently that’s the technical term) when turning around inside the confined space.

Due to the overhead soil and sealed ends, the temperature in the tunnel only varies by 1 – 2 °C year round. This controlled environment makes the tunnel perfect for coastdown tests, where a vehicle accelerates to a designated speed and then is put into neutral and allowed to coast. By measuring the loss of speed across multiple runs, it’s possible to calculate the aerodynamic drag and friction on the wheels. Thanks to the repeatable nature of the tests, it was even possible to calculate the aerodynamic losses caused by [Tom]’s cameras mounted to the outside of the vehicle.

The Catesby Tunnel is an excellent example of repurposing old infrastructure for modern use. Some other examples we’ve seen include using coal mines and gold mines for geothermal energy.

Continue reading “Victorian Train Tunnel Turned Test Track”

Hackaday Links Column Banner

Hackaday Links: June 4, 2023

A report released this week suggests that 50 flights into its five-flight schedule, the Mars helicopter might be starting to show its age. The report details a protracted communications outage Ingenuity’s flight controllers struggled with for six sols after flight 49 back in April. At first attributed to a “communications shadow” caused by the helicopter’s robotic buddy, Perseverance, moving behind a rocky outcrop and denying line of sight, things got a little dicey once the rover repositioned and there was still no joy. Since the helicopter has now graduated from “technology demonstration” to a full-fledged member of the team tasked with scouting locations for the rover while respecting the no-fly zone around it, it was essential to get it flying again. Several attempts to upload a flight plan failed with nothing but an acknowledgment signal from the helicopter, but a final attempt got the program uploaded and flight 50 was a complete if belated success. So that’s good, but the worrying news is that since Sol 685, the helicopter has been switching in and out of nighttime survival mode. What that portends is unclear, but no matter how amazing the engineering is, there’s only so much that can be asked on Ingenuity before something finally gives.

Continue reading “Hackaday Links: June 4, 2023”

It Turns Out Parrots Love Videoconferencing

A recent experiment showed that parrots seem considerably enriched by the ability to video call other parrots. It’s important that the activity be done in a healthy and ethical way, so researchers do not recommend bird caretakers immediately slap a spare tablet in front of every bird — but the results are as heartwarming as they are encouraging.

Parrots are intelligent creatures known to require and benefit from intellectual and emotional stimulation, and their eyesight is such that they are able to use a display like a tablet screen much like a human would. They are also social creatures, and that led to researchers designing a pilot study to explore a parrot-to-parrot videoconferencing system.

The three-month study showed that when given the opportunity to initiate and receive video calls, every single parrot in the test group did so and all bird caretakers reported perceived benefits. Birds made friends, seemed highly motivated, and even learned behaviors by watching others.

Curious about the details? The published results (a PDF and two brief videos) covers all the bases. Parrot pals may also remember another time that technology enriched a feathered friend with a motorized buggy complete with beak-compatible joystick for steering.

Make Yourself A Megamind With A Hypercentric Camera

Sometimes, all it takes to learn something new is a fresh perspective on things. But what’s to be learned from reversing your perspective completely with a hypercentric lens? For one thing, that you can make humans look really, really weird.

To be fair, there’s a lot to the optical story here, which [volzo] goes over in ample detail. The short version of it is that with the right arrangement of optical elements, it’s possible to manipulate the perspective of a photograph for artistic effect, up to the point of reversing the usual diminishment of the apparent size of objects in the scene that are farther away from the camera. Most lenses do their best to keep the perspective of the scene out of this uncanny valley, although the telecentric lenses used in some machine vision systems manipulate the perspective to make identical objects within the scene appear to be the same size regardless of their distance from the camera. A hypercentric lens, on the other hand, turns perspective on its head, making near objects appear smaller than far objects, and comically distorts things like the human face.

[volzo]’s hypercentric camera uses a 700-mm focal length Fresnel lens mounted on a motorized gantry, which precisely positions a camera relative to the lens to get the right effect. A Raspberry Pi controls the gantry, but it’s not strictly needed for the hypercentric effect to work. Lighting is important, though, with a ring of LEDs around the main lens providing even illumination of the scene. The whole setup as well as the weirdly distorted portraits that result are shown in the video below.

If these bizarrely distorted faces look familiar, you might be recalling [Curious Marc]’s head-enlarging wearable.

Continue reading “Make Yourself A Megamind With A Hypercentric Camera”

A Real-World Experience In PCB Dye-Sub Printing

We all love PCB artwork, but those who create it work under the restriction of having a limited color palette to work with. If it’s not some combination of board, plating, solder mask, and silk screen, then it can’t easily be rendered on a conventional PCB. That’s not the end of the story though, because it’s technically possible to print onto a PCB and have it any color you like. Is it difficult? Read [Spencer]’s experience creating a rainbow Pride version of his RC2014 modular retrocomputer.

Dye-sublimation printing uses an ink that vaporizes at atmospheric pressure without a liquid phase, so a solid ink is heated and the vapor condenses back to solid on the surface to be printed. Commercial dye-sub printers are expensive, but there’s a cheaper route in the form of an Epson printer that can be converted. This in turn prints onto a transfer paper, from which the ink is applied to the PCB in a T-shirt printing press.

[Spencer] took the advice of creating boards with all-white silkscreen applied, and has come up with a good process for creating the colored boards. There is still an issue with discoloration from extra heat during soldering, so he advises in the instructions for the kit to take extra care. It remains however a fascinating look at the process, and raises the important point that it’s now within the reach of perhaps a hackerspace.

Regular readers will know we’ve long held an interest in the manufacture of artistic PCBs.