[Old Alaska] had a problem. He needed a second remote for his apartment garage door, but was quoted a fee in the hundreds of dollars for the trouble of sourcing and programming another unit. Realizing this was a rip-off given the cheap hardware involved, he decided to whip up his own sneaky solution instead.
It’s a simple hack, cheap and functional. An RF-activated relay with two remotes was sourced online for the princely sum of $8. [Old Alaska] then headed down to the equipment cabinet in the garage, opening the lock with the side of his own car key. He then wired the relay in parallel with the existing manual pushbutton for activating the garage door.
Sometimes, a hack doesn’t have to be complicated to be useful. Many of us might have jumped straight to trying to capture and emulate the existing remote’s radio signals. There was really no need. With physical access, [Old Alaska] was able to simply wire in his own remote entry setup himself.
As ARM continues to make inroads in the personal computing space thanks to its more modern and streamlined instruction set architecture (ISA) and its reduced power demands especially compared to x86 machines, the main reason it continues to become more widespread is how easy it is to get a license to make chips using this ISA. It’s still not a fully open source instruction set, though, so if you want something even more easily accessible than ARM you’ll need to find something like these chips running the fully open-source RISC-V ISA and possibly put them to work in a custom supercluster.
[bitluni] recently acquired a large number of CH32V003 microcontrollers and managed to configure them all to work together in a cluster. The entire array is only $2 (not including all of the other components attached to the board) so a cluster of arbitrary size is potentially possible. [bitluni] built a four-layer PCB for this project with an 8-bit bus so the microcontrollers can communicate with each other. Each chip has its own ADC and I/O that are wired to a set of GPIO pins on the sides of the board. The build is rounded out with a USB interface for programming and power.
There were a few quirks to get this supercluster up and running, including some issues with the way the reset and debug pins work on these specific microcontrollers. With some bugs like this out of the way, the entire cluster is up and running, and [bitluni] hints that his design could be easily interfaced with even larger RISC-V superclusters. As for a use for this build, sometimes clusters like these are built just to build them, but since the I/O and ADCs are accessible in theory this cluster could do anything a larger microcontroller might be able to do, only at a much lower price.
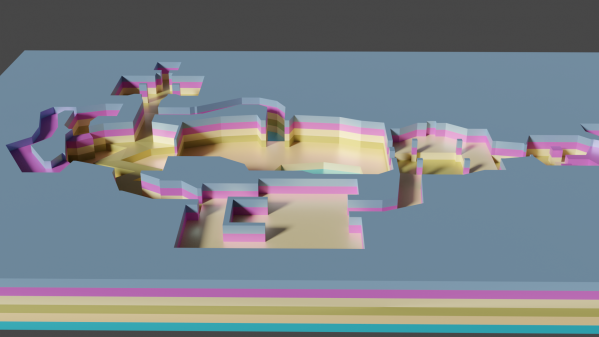
Doom has a larger cultural footprint than the vast majority of video games ever made. That inspired [Theor] to see if it was possible to laser-cut some of the game’s maps to create a real-world model of those famous original levels.
Level data was extracted from the game’s original WAD data files using code written in Rust. Maps are described by multiple “lumps” within the WAD file format, each containing information on vertexes, walls, and floors. This data was scraped and converted into SVG files suitable for laser cutting. [Theor] then built a visualizer that could display what a stacked-up laser cut map would look like in 3D, to verify everything worked correctly. With that done, the map could be laser cut without worries that it would come out a jumbled, janky mess.
[Theor] kept the finished product simple, creating the map as a stack of blue acrylic pieces. We can imagine this tool being perfect for creating a high-quality diorama though, with some work done to paint the map to match what the player sees in game. If you happen to take that approach, don’t hesitate to notify the tipsline!
The first round of the 2023 Hackaday Prize closes next Tuesday, March April 25th. If you’ve got an educational project – whether that’s a robot technique you just need to share, or an instructional radio build – you’ve got this weekend left to get your project into shape, whip up a Hackaday.io page in support, and enter. The top 10 projects get a $500 prize award, and a chance to win the big prizes in the final round. You want to get your project in now.
But there is still room for your project! And with the deadline closing in, your best bet at the $500 prize money relies on you burning a bit of the midnight oil this weekend, but Hackaday glory awaits those who do.
Watching an anthill brings an air of fascination. Thousands of ants are moving about and communicating with other ants as they work towards a goal as a collective whole. For us humans, we project a complex inner world for each of these tiny creatures to drive the narrative. But what if we could peer down into a miniature world and the ants spoke English? (PDF whitepaper)
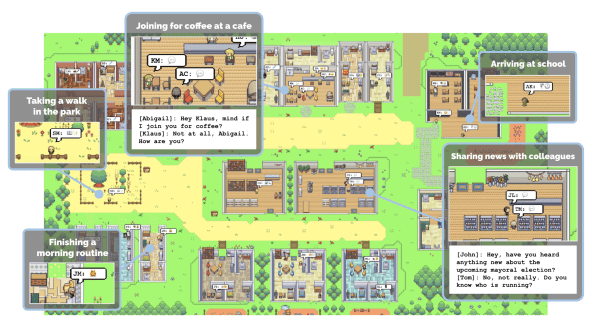
Researchers at the University of Stanford and Google Research have released a paper about simulating human behavior using multiple Large Language Models (LMM). The simulation has a few dozen agents that can move across the small town, do errands, and communicate with each other. Each agent has a short description to help provide context to the LLM. In addition, they have memories of objects, other agents, and observations that they can retrieve, which allows them to create a plan for their day. The memory is a time-stamped text stream that the agent reflects on, deciding what is important. Additionally, the LLM can replan and figure out what it wants to do.
The question is, does the simulation seem life-like? One fascinating example is the paper’s authors created one agent (Isabella) intending to have a Valentine’s Day party. No other information is included. But several agents arrive at the character’s house later in the day to party. Isabella invited friends, and those agents asked some people.
A demo using recorded data from an earlier demo is web-accessible. However, it doesn’t showcase the powers that a user can exert on the world when running live. Thoughts and suggestions can be issued to an agent to steer their actions. However, you can pause the simulation to view the conversations between agents. Overall, it is incredible how life-like the simulation can be. The language of the conversation is quite formal, and running the simulation burns significant amounts of computing power. Perhaps there can be a subconscious where certain behaviors or observations can be coded in the agent instead of querying the LLM for every little thing (which sort of sounds like what people do).
There’s been an exciting trend of combining LLMs with a form of backing store, like combining Wolfram Alpha with chatGPT. Thanks [Abe] for sending this one in!
The Vintage Computer Festival East took place last weekend at the InfoAge Science and History Museum in New Jersey, and by any metric you care to use, it was a phenomenal success. Everyone you spoke with, from the the exhibitors and attendees, to the veteran volunteers who put this incredible show together, all said the same thing: they’d never seen a turnout like this before.
Of course, such success is not without cost. The exhibit rooms were so packed that moving through them was a challenge, the line to get food or browse the consignment area occasionally stretched outside the building, and at one point the event’s electronic payment system buckled under the pressure.
Some things are worth the wait.
Yet even the folks who waited the better part of an hour to rummage through boxes of dusty treasures, only to find themselves left standing with armfuls of heavy gear they couldn’t pay for until the technical issues were resolved couldn’t really complain. I should know, I was one of them. It would be like going to a concert and getting upset that the music was too loud — the event was advertised as a festival, and that’s exactly what it was.
No matter where you went, you’d find throngs of excited people who were eager to chat about the golden age of computing. So even if you were stuck in a long line, or had to step outside of the exhibit area to get some fresh air, you were always in excellent company. Seeing such a large and diverse number of people come out for what’s ultimately a niche event was exceptionally gratifying. At the end of the day, if the price we have to pay for this kind of community response is a few long lines and tight squeezes, it’s well worth it.
Each time I cover an event like this for Hackaday, I do so with the caveat that there’s really no substitute for being there in person. No matter how many articles you read and YouTube recaps you watch, you’ll never be able to see all the things you would have had you been able to walk the show floor yourself. It’s a bit like exploring the Moon or Mars: remotely controlled robots are capable of capturing terabytes of data and beaming it back to Earth, but even still, there’s the potential to learn so much more by putting boots on the ground.
The same is true of VCF East 2023 — what I bring you here is just the tip of the iceberg in terms of what was on display at this year’s event. On the other hand, you have the advantage of being able to peruse these images without having to stand in line. Is it worth the trade? Only you can be the judge of that. But for my money, I’ll gladly get back in line when VCF East 2024 rolls around.
In a lot of ways, it seems like we’re in the “plateau of productivity” part of the hype cycle when it comes to drones. UAVs have pretty much been reduced to practice and have become mostly an off-the-shelf purchase these days, with a dwindling number of experimenters pushing the envelope with custom builds, like building drones out of dead birds.
These ornithopomorphic UAVs come to us from the New Mexico Insitute of Mining and Technology, where [Mostafa Hassanalian] runs the Autonomous Flight and Aquatic Systems lab. While looking into biomimetics, [Dr. Hassanalian] hit upon the idea of using taxidermy birds as an airframe for drones. He and his team essentially reverse-engineered the birds to figure out how much payload they’d be able to handle, and added back the necessary components to make them fly again.
From the brief video in the tweet embedded below, it’s clear that they’ve come up with a huge variety of feathered drones. Some are clearly intended for testing the aerodynamics of taxidermy wings in makeshift wind tunnels, while others are designed to actually fly. Propulsion seems to run the gamut from bird-shaped RC airplanes with a propeller mounted in the beak to true ornithopters. Some of the drones clearly have a conventional fuselage with feathers added, which makes sense for testing various subsystems, like wings and tails.
It’s easy to mock something like this, and the jokes practically write themselves. But when you think about it, the argument for a flying bird-shaped robot is pretty easy to make from an animal behavior standpoint. If you want to study how birds up close while they’re flying, what better way than to send in a robot that looks similar to the other members of the flock? And besides, evolution figured out avian flight about 150 million years ago, so studying how birds do it is probably going to teach us something.