Washington, DC Finally Gets Its Own PCB Metro Map

There was a time, not so long ago, when folks who wanted to make their own custom PCBs would have found themselves in the market for a bucket of acid and a second-hand laser printer. These days, all you have to do is click a few buttons in your EDA program of choice and send the files off for fabrication. It’s easy, cheap, and nobody ends up with chemical burns.

This has obviously had a transformative effect on the electronics hobby — when you can place traces on a PCB like an artist using a brush, it’s only a matter of time before you get projects like [Logan Arkema]’s DCTransistor. This open source board uses carefully arranged RGB LEDs to recreate the Washington Metropolitan Area Transit Authority (WMATA) metro map, and thanks to an ESP8266 connected to their API, can display the positions of trains in real-time.

If you’re getting a sense of déjà vu here, it’s not just in your head. We’ve seen similar maps created for other major metropolitan areas, and [Logan] certainly isn’t trying to take credit for the idea. In fact, he was a bit surprised to find that nobody had ever made one for the DC area — so he decided to take on the challenge himself. He reasoned it would be a good way to hone his PCB design skills and become more comfortable with embedded development. We’d say the end result proves his theory correct, and makes one more city that can boast about its IoT cartography.

Looking to hang a DCTransistor on your own wall? [Logan] says he’ll be dropping the board design files and schematics into the project’s GitHub repository soon, and he also plans on selling pre-made boards in the near future.

We covered this London “tube” map back in 2020, and were impressed by the attention to detail that went into similar displays for Tokyo, Singapore, and the San Francisco Bay Area a year later. Perhaps it’s time to map out your own hometown in LEDs?


Dead Solar Panels Are The Hottest New Recyclables

When it comes to renewable energy, there are many great sources. Whether it’s solar, wind, or something else, though, we need a lot of it. Factories around the globe are rising to the challenge to provide what we need.

We can build plenty of new solar panels, of course, but we need to think about what happens when they reach end of life. As it turns out, with so much solar now out in the field, a major new recycling industry may be just around the corner.

Continue reading “Dead Solar Panels Are The Hottest New Recyclables”

Putting A Cheap Laser Rangefinder Through Its Paces

Sometimes a gizmo seems too cheap to be true. You know there’s just no way it’ll work as advertised — but sometimes it’s fun to find out. Thankfully, if that gadget happens to be a MILESEEY PF210 Hunting Laser Rangefinder, [Phil] has got you covered. He recently got his hands on one (for less than 100 euros, which is wild for a laser rangefinder) and decided to see just how useful it actually was.

The instrument in question measures distances via the time-of-flight method; it bounces a laser pulse off of some distant (or not-so-distant) object and measures how long the pulse takes to return. Using the speed of light, it can calculate the distance the pulse has traveled).

As it turns out, it worked surprisingly well. [Phil] decided to focus his analysis on accuracy and precision, arguably the most important features you’d look for while purchasing such an instrument. We won’t get into the statistical nitty-gritty here, but suffice it to say that [Phil] did his homework. To evaluate the instrument’s precision, he took ten measurements against each of ten different targets of various ranges between 2.9 m and 800 m. He found that it was incredibly precise (almost perfectly repeatable) at low distances, and still pretty darn good way out at 800 m (±1 m repeatability).

To test the accuracy, he took a series of measurements and compared them against their known values (pretty straightforward, right?). He found that the instrument was accurate to within a maximum of 3% (but was usually even better than that).

While this may not be groundbreaking science, it’s really nice to be reminded that sometimes a cheap instrument will do the job, and we love that there are dedicated folks like [Phil] out there who are willing to put the time in to prove it.

Tech In Plain Sight: Fire Hydrants

You probably see them so often that you don’t even notice they are there. Fire hydrants are one of those things that aren’t interesting until you need them, but then they are of paramount importance. You sometimes hear them called fireplugs and it made us wonder what was a plug about it. Perhaps it was because that’s where you plug in your hose? Turns out, no. The real story is much stranger. Not to mention, did you know that there are even “dry” fire hydrants?

Apparently, in the 16th century, water mains were made of wood. When there was a fire, a team would dig the cobblestones out to expose the wooden mains and cut a hole to make an ad hoc well to fill buckets or to pump. Of course, after the fire, you had to repair the mains and that was done with a plug. The city would keep a record of plugs so that if a fire was nearby in the future, you could just “pull the plug” instead of making a new hole.

Continue reading “Tech In Plain Sight: Fire Hydrants”

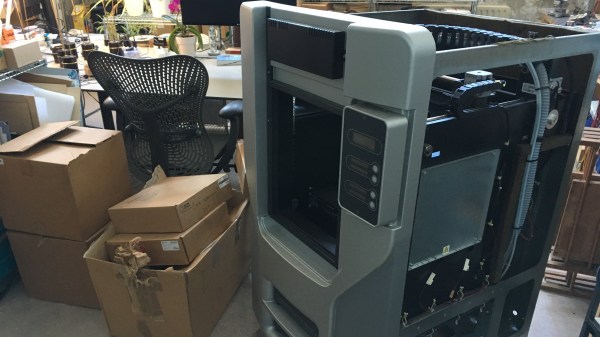
The printer in question - it's tall, about a meter and a half tall, in fact!

Hackaday Prize 2022: $40k Stratasys Printer Fix Costs $1

Companies don’t treat equipment in the same way that we, hobbyists, do. When it comes to reassessing equipment state, there’s calculations to be done – how many failures it’s experienced, what’s the rate of the support contract for it (often increasing as equipment ages), and whether it’d be more price-efficient to just buy a new one. Hobbyists aren’t tied to commercial support contracts that prohibit DIY repair, however. We can investigate things and try our luck, and in many cases, the repair will be super simple and satisfying! Today’s lucky repair story is about [Gregor], who has acquired a written-off ±$40k Stratasys 3D printer for peanuts, and repaired it with $1 in parts.

The error code shown on the display indicated an extruder changer error — yes, this is a dual extruder printer! Earlier, [Gregor] noted that some of the chamber lighting LEDs failed, very likely because of the constant heat in the chamber. After investigating the infrared LED responsible for extruder change detection, it indeed had failed as well, presumably for the same reason. After the installation of a new SMD LED, the error message went away. Thus concludes the story of [Gregor] getting himself a new professional-grade printer! He also documents other possible failure modes, some just as easy to fix. In short, if you ever spot a Stratasys Dimension printer for sale, you might want to consider it!

As it turns out, this isn’t the only Stratasys success story we’ve seen on Hackaday.io. After you’ve repaired your newly obtained Stratasys, you might want to bypass the cartridge DRM, by the way. Got repairs of your own to share, industrial printer or otherwise? Submit it for the 2022 Hackaday Prize, there’s still a few days left in the Hack it Back round!

Modular Z80 Really Racks Up The Retrocomputer Cred

Very few retrocomputing projects are anything other than a labor of love. There’s really no practical reason to build a computer that is woefully inadequate for just about any task compared to even an entry-level PC today. But the lack of a practical reason to do something rarely stops a hacker, as with this nifty modular Z80-based rack computer.

Actually, there’s at least one area where retrocomputers excel compared to their modern multi-core gigahertz counterparts — and that’s nostalgia. That’s what [Ricardo Kaltchuk] was going for with his build, which started by finding a Z80 and an Intel 8251 USART in his parts bin. Those formed the core of what would become the “Proton” computer, a modular beauty built around 7 cm by 10 cm PCBs that plug into a backplane inside a rack made from aluminum angle. Aside from the power supply and the Z80 CPU, other modules include a RAM card with a zero insertion force socket for an EPROM, a mass-storage module sporting a 128 MB Compact Flash card, plus modules for standard serial and I2C comms.

The fit and finish are excellent, and the performance is impressive. The Proton runs CP/M and boasts a ton of old applications that will bring back some memories, like SuperCalc and dBase. We’d venture a bet that WordStar is in there someplace, or easily could be. The video below is a little rough, but shows everything off really well.

In some ways, the Proton reminds us of the RC2014, but its fit and finish are what bring this build home. That’s not to take away from the work [Ricardo] obviously put into documentation, though. The 62-page manual has every detail of every module, plus instructions for building one of your own.

Continue reading “Modular Z80 Really Racks Up The Retrocomputer Cred”

Print Your Own Drill Guide Without A Linear Bearing

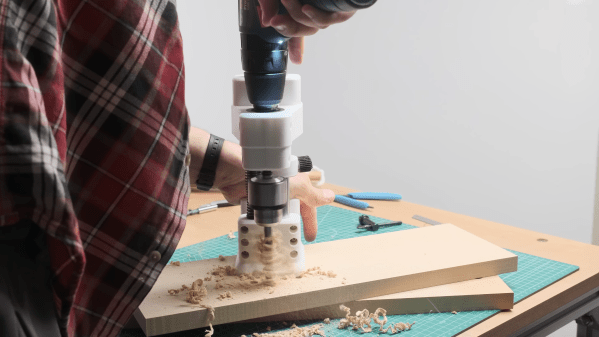
Typically we often don’t cover paid products here on Hackaday, but we couldn’t help but be impressed with this 3D printed drill guide from [USSA]. While you’ll need to pay the toll to access the STL files and plans, there’s an excellent video showing a bit of magic behind the curtain that you can check out free of charge. There are several interesting insights and some great techniques put into this design that anyone could take and apply to their own project.

First, what is a drill guide? Many of us don’t have the luxury of a full-sized drill press, so we have to make do with a hand drill. There are various jigs and tricks to get straighter holes, but it can be frustrating to mark out threaded screw inserts with great precision only to discover all the inserts are at an angle and the circuit board won’t fit. A drill guide ensures holes are plunged straight up and down and at a reliable depth.

[USSA] starts by showing the node-based CAD that makes up the design (a program called Grasshopper). As he assembled it, simple nuts and screws held it together. But rather than clamp two separate pieces together, the screws compress the single plastic with a clever slot in the side to allow the plastic to flex. Several 3D printed jigs were used for assembling the bearing shaft. Ultimately the results look quite impressive, and it’s an inspiration for our own printed projects.

Continue reading “Print Your Own Drill Guide Without A Linear Bearing”