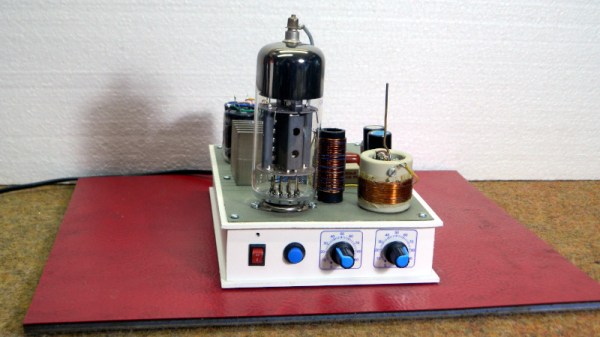
Inside An EBay Marking Laser

When it comes to trolling eBay for cool stuff, some people have all the luck. Whereas all we ever seem to come across is counterfeit chips and obviously broken gear listed as, “good condition, powers on”, [Les Wright] actually managed to get more than he bargained for with one of his recent eBay purchases.

In his video teardown and tour of an industrial marking laser, [Les] suggests that he was really just in it for the optics — which is not a surprise, given his interest in optics in general and lasers in particular. The 20-W CO2 laser once etched barcodes and the like into products on assembly lines, but with a 2009 date code of its own, it was a safe bet that it was pitched due to a burned-out laser tube. But there were still high-quality IR optics and a precision X-Y galvanometer assembly to be harvested, so [Les] pressed on.

The laser itself ended up being built around a Synrad RF-stimulated CO2 tube. By a happy accident, [Les] found that the laser actually still works, at least most of the time. There appears to be an intermittent problem with the RF driver, but the laser works long enough to release the magic smoke from anything combustible that gets in its way. The galvos work too — [Les] was able to drive them with a Teensy and a couple of open-source libraries.

Galvos, lenses worth more than $800, and a working laser tube — not a bad haul. We’ll be following along to see what [Les] makes of this booty. Continue reading “Inside An EBay Marking Laser”

Bug Zapper Counts And Serenades Its Victims

Not many creatures are as universally despised as mosquitoes, whether it’s the harmless kind that, at worst, makes you miss winter, or the more serious ones that can be a real threat to your health. A satisfying way to deal with them is to send them off with a bang using one of those racket-shaped high voltage metal mesh bug zappers. [lmu34] saw big potential for some additional gamification here, and decided to equip his zapper with a kill counter and matching sound effects.

The initial thought was that there has to be a way to detect when a mosquito hits the mesh, and use that to trigger further events — in [lmu34]’s case play a sound file and increment a counter. After taking the zapper apart and doing a bit of research, he put theory into practice using a Digispark Pro board containing an ATtiny167, the DFPlayer module for playing a set of WAV files, and an ambitious four digit 7-segment display to keep track of the “score”. A new 3d-printed cover provided enough space to house all the components, including a charging circuit as he swapped the original two AAA batteries with a rechargeable one, which gave a bit more power for the display.

Of course, with these operation voltages, it would be difficult to detect activity on the high voltage side more than once, so [lmu34] went with current sensing instead. He distinguishes between two different levels here and maps them as normal kill and monster kill for the big zaps respectively, playing different sounds for each. Have a look at the video after the break for some quick demonstration.

All in all, this is a delightfully absurd modification that almost screams for an ESP32 to enable multiplayer mode as next iteration. But if chasing mosquitoes with low-tech gadgets isn’t for you, there’s always lasers and good old torture, although those can’t be repurposed to do some hardware fault injections during the winter months then.

Continue reading “Bug Zapper Counts And Serenades Its Victims”

Here’s What It Takes To Fill A Piano With Water

Filling a piano with water probably sounds frivolous and asinine to many. However, it also sparks a certain curiosity as to what it would be like. Thankfully, [Mattias] put in the hours of work to find out so we don’t have to!

It doesn’t make a great pool, though.

A first attempt with an upright piano failed quickly. After just four minutes submerged in water, the wooden hammers would seize up as they swelled with moisture.

A grand piano was sourced for a second attempt. The strings were first detensioned to make things easier to work with, and the internal frame pried out from the surrounding piano body. To stop the water pouring out past the keys and strings, a simple solution was implemented: tilting the piano up so the water remained in the body below. A judicious application of various sealing agents was then used to seal the frame. Amazingly, the best information on sealing a piano came from enthusiasts building aquariums out of plywood boxes. Go figure.

The water has a muting effect on the piano’s sound as you might expect. The sound is particularly compelling when heard via underwater mics placed in the water-filled cavity. It almost sounds like a plucked instrument, and gives everything a strangely maritime feel. The sound waves can be seen on the surface of the water, too.

The experiment came to a tragic end when the piano was overfilled, dumping water over the keys and hammers. This caused every key to jam, killing the piano for good.

It’s a fun build, and a very silly one, if you can stand to watch a piano treated in this way. [Mattias] has form in the area of oddball instrument hacks, too, as we’ve previously featured his helium guitar. Video after the break.

Continue reading “Here’s What It Takes To Fill A Piano With Water”

Simple Snap Action Mechanism Is 100% 3D Printed

Plastics are wonderous materials, much loved for their ability to elastically deform and spring back to their original shape. They’re a category of materials perfect for creating things like living hinges and similar mechanisms, and this 3D printed snap action device shows that off admirably.

The device consists of an outer housing, into which two printed springs are inserted. These leaf springs are curved and protrude towards the center of the housing. A slide is then inserted into the housing with a cam in its middle. The cam allows the slide to push past the springs when actuated, while also holding it in place at rest.

As demonstrated the mechanism reliably snaps back and forth between its two positions in a satisfying manner. It’s shown with one side of the housing removed so we get a good idea of how it works. It’s 100% 3D printed, as well. Anyone looking to replicate the design should note the importance of printing orientation, particularly in the case of the spring pieces, which won’t work if layered up in the wrong way.

Overall, it’s a neat design that could prove useful for those eager to build printed switches or other mechanical devices. It’s also simply a great way to learn about 3D printed springs and working with deformable plastic structures. Video after the break.

Continue reading “Simple Snap Action Mechanism Is 100% 3D Printed”

Making A Projector Screen Out Of Flex Seal Works Okay, Kinda

Watching movies on the big screen is fun, but getting out to the cinema or drive-in can be a hassle. It’s possible to get the same experience at home with a little creativity, as shown in this DIY projector screen build by [The Hook Up].

The build started with a giant motorized roller screen designed for a patio. It was scored on the cheap as it was salvaged after removal from its original home. Having seen a screen door turned into a boat with the help of Flex Seal, [The Hook Up] was confident that the flyscreen could be sealed up and used for projection.

Right away, the going got tough. Light applications weren’t really filling in the holes in the flyscreen, while thick applications had major issues with runs. Eventually, the screen was painted with 3 gallons of white Flex Seal and hung up to test.

The runs caused issues, as the lumpy screen texture was distracting when viewing movies. Additionally, the glossy finish was creating unsightly reflections. After some trial and error, the issues were solved by sanding the Flex Seal surface flat and using matte clear spray paint to dull the shine.

The result was a grand projection screen that rolls down at the touch of a button, the likes of which we’ve seen before, though at significant cost. [The Hook Up] readily admitted that the several hundred dollars invested might have been better spent on buying a pre-made screen. Nonetheless, it’s a cool project, and we respect the creator for putting in the work! Video after the break.
Continue reading “Making A Projector Screen Out Of Flex Seal Works Okay, Kinda”

3D-Printed Lobe Pump Shifts Water Well

Lobe pumps are perhaps most popularly known for their use in Rootes-type superchargers, but they can pump water, too. [Let’s Print] demonstrates this ably with a 3D-printed design that can pump with the best of them. 

The design uses two figure-eight shaped counter-rotating rotors, or lobes. As the rotors turn, they trap fluid between the rotor and the housing, forcing it towards the outlet. It’s a positive-displacement design, meaning it traps a fixed volume of fluid in each rotation, moving it from inlet to outlet.

The design requires proper timing of the two rotating lobes in order to ensure they maintain the closed volume and don’t impact each other. This is achieved with a pair of timing gears on the back of the pump. The housing, lobes, and gears are all 3D-printed, making this a build that anyone can replicate at home with their own printer.

ABS was used for the rotors for its better handling of friction without melting as easily. However, resin-printed lobes were also employed for their higher tolerances, too, with both designs working acceptably in practice.

The pump still needs more improvement; the hope is to reduce the leaks out of the rear of the pump. [Let’s Print] also intends to add a motor to the pump itself rather than using a power drill to run the device. It’s great to see these 3D-printed pump builds continuing in earnest. Video after the break.

Continue reading “3D-Printed Lobe Pump Shifts Water Well”

An Interesting Circular Stewart Platform

Stewart platforms are pretty neat, and not seen in the wild all that often, perhaps because there aren’t a vast number of hacker-friendly applications that need quite this many degrees of freedom within such a restricted movement range. Anyway, here’s an interesting implementation from the the curiously named [Circular-Base-Stewart-Platform] YouTube channel (no, we can’t find the designer’s actual name) with a series of videos from a few years ago, showing the construction and operation of such a beast. This is a very neat mechanism comprised of six geared motors on the end of arms, engaging with a large internal gear. The common end of each arm rides on the central shaft, each with its own bearing. With the addition of the usual six linkages, twelve ball joints, and a few brackets, a complete platform is realised.

This circular arrangement is so simple that we can’t believe we haven’t come across it before. One interesting deviation from the usual Stewart platform arrangement is the use of a central slip-ring connector to provide power, allowing the whole assembly to rotate continuously, in addition to the usual six degrees of freedom the mechanism allows. Control is courtesy of an Arduino Pro Mini, which drives the motors using a handful of Pololu TB6612 (PDF) dual H-bridge driver modules. Obviously, the sketch running on the Arduino will give the thing a fixed motion, but add in an additional data link over that central slip-ring setup (or maybe a wireless link), and it will be much more useful.

We recently saw another 6-DOF actuator design, using flexures, yet another ball-balancing hack, but if you want an actually useful Stewart platform application, checkout this pool-playing robot!

Continue reading “An Interesting Circular Stewart Platform”